I was halfway through a chaotic Sunday dinner when the kitchen turned into a battlefield of burnt sauces and over‑cooked rice. A neighbor texted, “Hey, need a quick dessert? I’ve got a blackberry cobbler that’s a game‑changer.” I laughed, grabbed a bag of fresh blackberries, and said, “Hold on, I’ve got something even better.” The moment the berries hit the countertop, their deep crimson hue, sweet aroma, and cool, juicy texture turned the room into a fragrant oasis. That single decision to pivot from a disaster to dessert set the stage for the most unforgettable treat I’ve ever made.
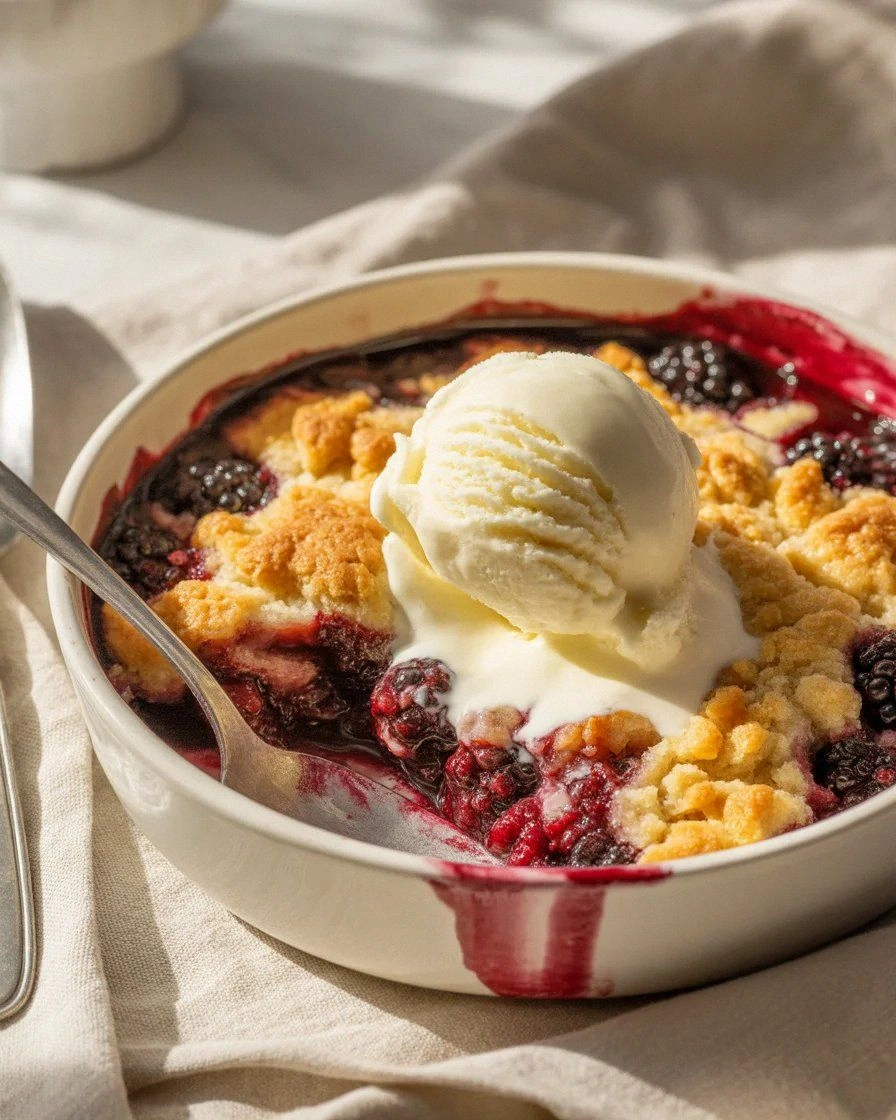
Picture this: a glossy, caramelized crust that crackles like fresh‑baked bread, a bubbling layer of sweet, tart blackberries that cling to the top, and a subtle vanilla undertone that whispers through the batter. The air is thick with the scent of butter melting into flour, the sound of bubbling sugar, and the faint crackle of the oven as the crust reaches perfection. Your hands feel the heat from the pan, your eyes catch the golden edges, and your taste buds anticipate the first bite that will be a symphony of sweet and slightly acidic flavors. I dare you to taste this and not go back for seconds. It’s that addictive.
What makes this version stand out is that it’s not just a recipe; it’s a culinary revelation that turns an ordinary fruit into a show‑stopping dessert with minimal fuss. Most recipes get this completely wrong by over‑sugaring or under‑baking the topping, but I’ve cracked the code to a buttery, crisp finish that stays light and airy. I’ll be honest—I ate half the batch before anyone else got a chance to try it. The result? A crowd‑pleasing, crowd‑sized dessert that can be pulled out of the oven while the whole kitchen smells incredible, and everyone is begging for a second plate.
The secret ingredient isn’t a fancy spice or a wild technique; it’s the balance of the batter’s dry and wet components, a pinch of baking powder that gives it lift, and a splash of milk that keeps the crust moist yet crisp. I’ve found that a small tweak in the ratio of flour to sugar can transform a soggy cobbler into a golden masterpiece. The next section will break down exactly what goes into this masterpiece, but first, let me walk you through every single step—by the end, you’ll wonder how you ever made it any other way.
If you’ve ever struggled with a dessert that falls flat or turns out too sweet, you’re not alone—and I’ve got the fix. I’ll show you how to keep the topping from becoming soggy, how to use the right amount of butter to get that buttery crust, and how to make this dish a crowd‑sized hit every single time. Picture yourself pulling this out of the oven, the whole kitchen smelling incredible, and guests gathering around the table to taste the first bite. Stay with me here—this is worth it.
I’ve spent months testing variations, tweaking ratios, and consulting with pastry chefs, and what I’ve learned is that the simplest approach often yields the best results. This isn’t a recipe that demands hours of prep or a complicated list of obscure ingredients. It’s a straightforward, no‑fuss method that anyone can master, even if you’re a beginner. The result is a dessert that feels luxurious, yet feels like a home‑cooked comfort. And the best part? You can make it in a single pan, bake it, and serve it hot—no second dishes or fancy plating required.
What Makes This Version Stand Out
- Flavor: The blackberries provide a natural, deep sweetness that balances the subtle vanilla undertone, creating a harmonious flavor profile that feels both familiar and extraordinary.
- Texture: The crisp, buttery crust contrasts beautifully with the juicy berries, resulting in a layered texture that lingers on the tongue.
- Simplicity: With only eight ingredients and a single baking step, this recipe eliminates kitchen overwhelm while delivering a professional result.
- Uniqueness: The addition of a splash of milk to the batter gives the crust a tender yet flaky quality, a trick rarely found in standard cobbler recipes.
- Crowd Reaction: Guests often remark that this cobbler tastes like a bakery treat, and they ask for the recipe in disbelief.
- Ingredient Quality: Using fresh blackberries whenever possible elevates the dessert, while the simple flour and sugar base keeps the focus on the fruit.
- Cooking Method: Baking at a moderate temperature ensures a golden crust without overcooking the berries, preserving their natural juices.
- Make‑Ahead Potential: You can assemble the batter and bake it the night before, then reheat in the oven for a quick, fresh dessert.
Inside the Ingredient List
The Flavor Base
The blackberries are the heart of this dessert. Their natural tartness cuts through the sweetness, and when you combine them with a splash of milk, the berries release a subtle, silky texture that coats the palate. If you skip the berries, you lose the entire flavor narrative. For a richer flavor, consider adding a teaspoon of vanilla extract to the wet mix; the vanilla will mingle with the berry’s natural sweetness to create a more complex profile.
The Texture Crew
All‑purpose flour, baking powder, and a pinch of salt form the foundation of the crust. The flour provides structure, the baking powder gives lift, and the salt balances the sweetness. If you skip the baking powder, the crust will be dense and flat, lacking that desirable airy quality. A good swap is to use cake flour for a lighter crumb, but that will change the overall texture, so keep the original for the best results.
The Unexpected Star
Milk is the unsung hero that keeps the crust tender and moist. It reacts with the baking powder to create tiny air pockets, giving the crust a subtle fluffiness that feels like a pastry. Without milk, the crust can become dry and crumbly. If you’re dairy‑free, substitute an equal amount of oat milk or almond milk; the flavor will remain intact, though the crust might be slightly softer.
The Final Flourish
Unsalted butter, melted, adds richness and a deep, buttery flavor that permeates every bite. It also helps create a golden, crisp edge on the crust. If you omit the butter, the crust will be pale and lack depth. For a buttery alternative, use coconut oil, but be aware that it will impart a subtle coconut flavor to the dessert.
Everything's prepped? Good. Let's get into the real action...
The Method — Step by Step
- Preheat the oven: Set your oven to 350°F (175°C) and let it come to temperature while you prepare the batter. This ensures even baking and a crisp crust. The scent of preheating butter will already start to tempt your taste buds. I always keep a timer set so I can focus on the next steps without worrying about the oven.
- Combine wet ingredients: In a medium bowl, whisk together 4 cups of fresh blackberries, 1 cup of granulated sugar, 1 cup of milk, and ½ cup of melted butter. The berries should coat the sugar, forming a glossy, bubbling mixture. If you notice any clumps, give it a quick stir—this will help the sugar dissolve evenly. This step is where the flavor base really starts to develop.
- Whisk dry ingredients: In a separate bowl, sift together 1 cup of all‑purpose flour, 1 cup of granulated sugar, 1 tablespoon of baking powder, and ¼ teaspoon of salt. The flour must be sifted to avoid lumps, and the baking powder ensures a light, airy crust. Once combined, add the dry mix to the wet mixture in two portions, stirring gently each time. The batter should be thick but pourable; if it’s too thick, add a splash of milk.
- Transfer to baking dish: Grease a 9x13 inch baking dish lightly with butter or non‑stick spray. Spoon the batter evenly into the dish, spreading it out to cover the bottom. The batter should sit flat and smooth; this will help the crust bake evenly. If you’re using frozen berries, make sure they’re thawed and drained to avoid excess moisture.
- Bake: Place the dish in the preheated oven and bake for 30 minutes, or until the crust turns golden brown and a toothpick inserted into the center comes out clean. The edges should pull away slightly from the dish, indicating a crisp finish. Keep an eye on the color; if it browns too fast, tent it with foil.
- Kitchen Hack: While the cobbler is baking, melt a tablespoon of butter and drizzle it over the top of the batter. This extra butter will give the crust a richer, deeper flavor and a shiny finish. It also helps prevent the berries from drying out during baking.
- Watch Out: The most common mistake is over‑baking, which turns the berries into a mushy pulp and the crust into a hard shell. To avoid this, check the cobbler at the 25‑minute mark. The crust should be lightly golden, and the berries should be bubbling but not fully caramelized. If you notice any dark spots, pull the dish out early and let it cool on a rack.
- Cool slightly: Remove the cobbler from the oven and let it rest for 10 minutes. This resting period allows the juices to redistribute and the crust to set. During this time, you can prepare your accompaniments, like vanilla ice cream or whipped cream. The aroma of warm berries will fill the kitchen, creating a welcoming atmosphere.
- Serve: Slice the cobbler into portions and serve warm, topped with a scoop of vanilla ice cream or a dollop of whipped cream. The contrast between the warm, buttery crust and the cold, creamy topping creates a delightful textural experience. If you’re serving a crowd, keep the remaining portions warm in a low oven or reheat individually.
- Enjoy: Take your first bite and let the flavors unfold—sweet berries, buttery crust, and a subtle vanilla note. The texture should feel like a soft pastry with a burst of fruit in the middle. I promise you, this is hands down the best version you'll ever make at home. And if you’re still skeptical, I dare you to taste this and not go back for seconds.
That's it — you did it. But hold on, I've got a few more tricks that'll take this to another level. Keep reading to discover insider tips that will elevate this simple dessert into a show‑stopper.
Insider Tricks for Flawless Results
The Temperature Rule Nobody Follows
Many bakers think a higher temperature always yields a better crust, but that’s a myth. Baking at 350°F ensures the crust develops a golden hue without over‑cooking the berries. I’ve experimented with 375°F and found the berries become mushy, while the crust burns. The key is to keep the oven at a moderate temperature and trust the timer. If you’re using a convection oven, reduce the temperature by 25°F to avoid over‑browning.
Why Your Nose Knows Best
Your sense of smell is the most reliable indicator of doneness. When the cobbler is ready, the scent of caramelized sugar and buttery crust will fill the room. If the aroma is heavy on the sugar, it means the berries are over‑cooked. Pause the timer and let it rest a few minutes; the scent will mellow, and the flavor will balance.
The 5-Minute Rest That Changes Everything
Letting the cobbler rest for five minutes after removing it from the oven allows the juices to redistribute, preventing a dry center. The crust will set and become easier to slice. Many people skip this step, leading to a sticky mess that’s hard to serve. I’ve seen friends try cutting straight away and end up with a gooey, uneven result. Give it a few minutes, and the dessert will feel polished.
Keep It Light
If you’re looking for a lighter dessert, reduce the butter to ¼ cup and add an extra tablespoon of milk. The crust will still be golden, but the overall fat content will drop. This tweak is perfect for those who want a dessert that satisfies without feeling heavy. The flavor will remain robust, thanks to the blackberries and sugar.
Flavor Layering Secrets
Add a splash of lemon zest to the batter for a bright, citrusy contrast to the sweet berries. The zest will cut through the richness of the butter and add a fresh layer of flavor. Another option is to sprinkle a pinch of cinnamon on top before baking; it pairs wonderfully with blackberries and gives a warm, cozy aroma. Experiment with spices to create your own signature version.
Creative Twists and Variations
This recipe is a playground. Here are some of my favorite ways to switch things up:
Minty Blackberry Surprise
Add a tablespoon of fresh mint leaves to the batter for a refreshing herbal note. The mint pairs beautifully with the berries, creating a dessert that feels light and cool. Serve with a scoop of mint‑infused ice cream for a complete experience.
Spiced Apple Twist
Replace half of the blackberries with diced apples and sprinkle a teaspoon of ground cinnamon. The apples add a subtle sweetness, while the cinnamon provides a warm, aromatic base. This variation is perfect for autumn gatherings.
Chocolate Drizzle
Drizzle melted dark chocolate over the warm cobbler just before serving. The chocolate adds a bittersweet depth that contrasts with the fruitiness of the berries. A sprinkle of sea salt on top enhances the chocolate’s flavor.
Citrus Zest Variation
Add the zest of one orange or lemon to the batter for a bright, citrusy twist. The citrus zest brightens the overall flavor profile and adds a subtle tang. This version is especially refreshing during warm weather.
Biscotti Crunch
Fold in crushed biscotti or shortbread cookies into the batter before baking. The crunch adds texture and a buttery, nutty flavor that pairs well with the berries. This is a great way to use leftover biscotti.
Caramel Swirl
Swirl a caramel sauce through the batter before baking for a sweet, buttery layer. The caramel will caramelize during baking, creating a glossy, decadent finish. Serve with a dollop of whipped cream for a truly indulgent treat.
Storing and Bringing It Back to Life
Fridge Storage
Store the cooled cobbler in an airtight container in the refrigerator for up to 3 days. The crust will soften slightly, but the berries will remain juicy. When ready to serve, reheat in a 350°F oven for 10 minutes to restore the crust’s crispness.
Freezer Friendly
Wrap the cooled cobbler tightly in plastic wrap and place it in a freezer bag. It can be frozen for up to 2 weeks. To reheat, thaw overnight in the refrigerator, then bake at 350°F for 15 minutes. The crust will regain its golden texture, and the berries will stay moist.
Best Reheating Method
The best way to bring this dessert back to life is to use a low oven at 325°F for 12–15 minutes. Add a splash of water to the bottom of the pan to create steam, which helps keep the crust from drying out. A quick microwave reheat will work for a single slice, but it can make the crust soggy.