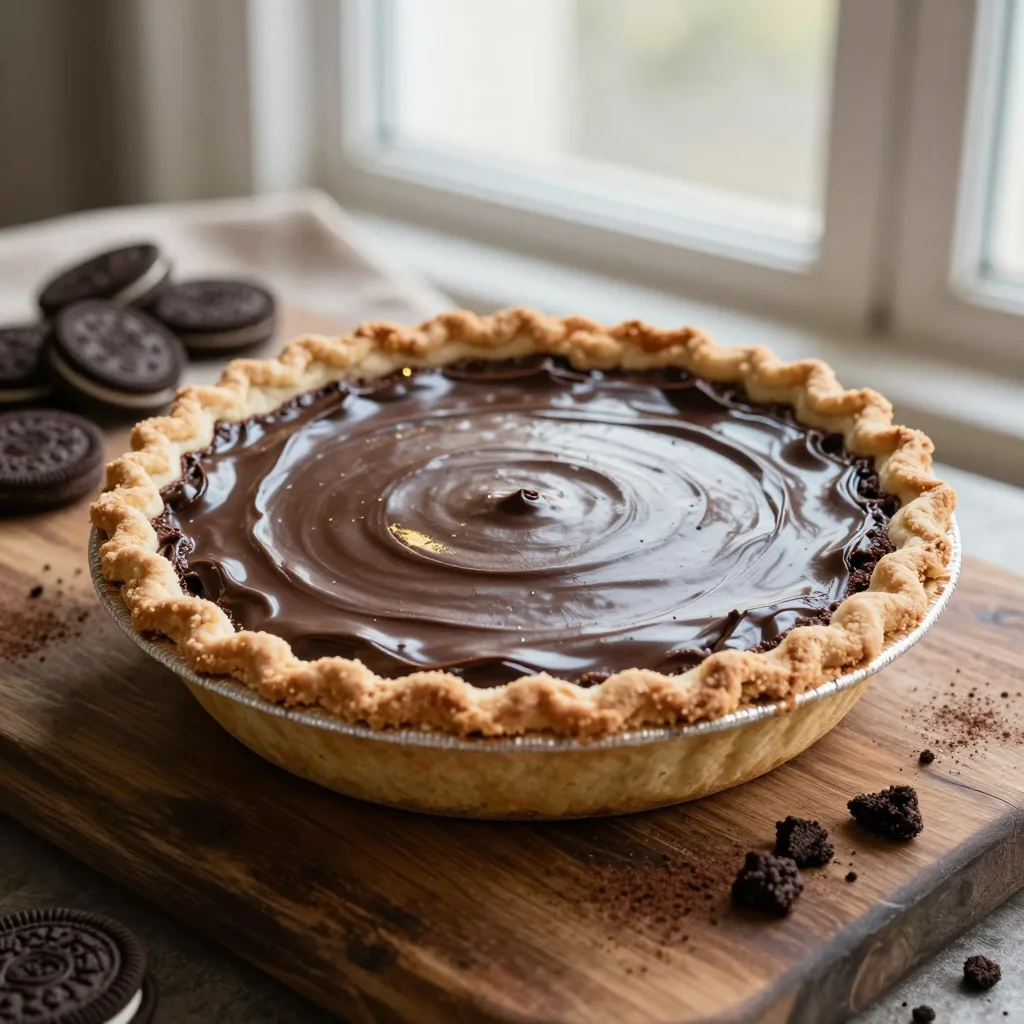
A velvety, melt‑in‑your‑mouth chocolate silk pie perched on a crunchy Oreo cookie crust – pure indulgence in every bite.
When I was a teenager, my family’s holiday gatherings always featured a mysterious, glossy chocolate dessert that seemed to float on a dark, crunchy base. I was ten, eyes wide, and the first spoonful was a revelation – a silky, almost ethereal chocolate mousse that melted like a dream while the crust offered a satisfying snap. That memory stayed with me, and years later, after countless experiments with different chocolate percentages and crust variations, I finally cracked the code: a chocolate silk pie that balances the richness of premium dark chocolate with the playful crunch of an Oreo cookie crust.
The origins of silk pie trace back to classic American chocolate mousse pies, but the addition of Oreo crumbs gives it a contemporary twist that feels both nostalgic and novel. This dessert has become a centerpiece for celebrations, potlucks, and even quiet evenings when you crave something luxurious without the fuss of baking a cake from scratch.
In this article, I’ll walk you through every step, from selecting the perfect chocolate to mastering the glossy sheen that makes the silk so iconic. You’ll learn why each ingredient matters, how to adjust the recipe for any number of guests, and the little secrets that guarantee a flawless, glossy finish every time.
So grab your whisk, preheat your imagination, and let’s embark on a journey to create a chocolate silk pie that will become the star of your dessert repertoire.
🌟 Why This Recipe Will Captivate You
From the moment you bite into the buttery Oreo crust, the silky chocolate filling will envelop your palate, delivering a harmony of textures and flavors that feels both familiar and extraordinary.
- ✨ Irresistible Texture Contrast: The crunchy, buttery crust provides a perfect counterpoint to the ultra‑smooth, melt‑in‑your‑mouth chocolate silk, creating a multi‑sensory experience that keeps you reaching for another slice.
- ✨ Simple No‑Bake Technique: No oven is required for the filling, which means you can prepare this elegant dessert even on the hottest summer day without heating up the kitchen.
- ✨ Premium Chocolate Flavor: Using 70% dark chocolate ensures a deep, nuanced cocoa profile that isn’t overly sweet, allowing the natural bitterness to shine through.
- ✨ Versatile Presentation: Whether you serve it in a classic pie dish, individual ramekins, or even glass jars for a modern twist, the pie adapts beautifully to any setting.
- ✨ Crowd‑Pleaser: The combination of chocolate and cookies appeals to both kids and adults, making it an ideal dessert for birthdays, holidays, or casual get‑togethers.
- ✨ Customizable Sweetness: Adjust the sugar level or swap the dark chocolate for milk chocolate to suit personal preferences without compromising the silky texture.
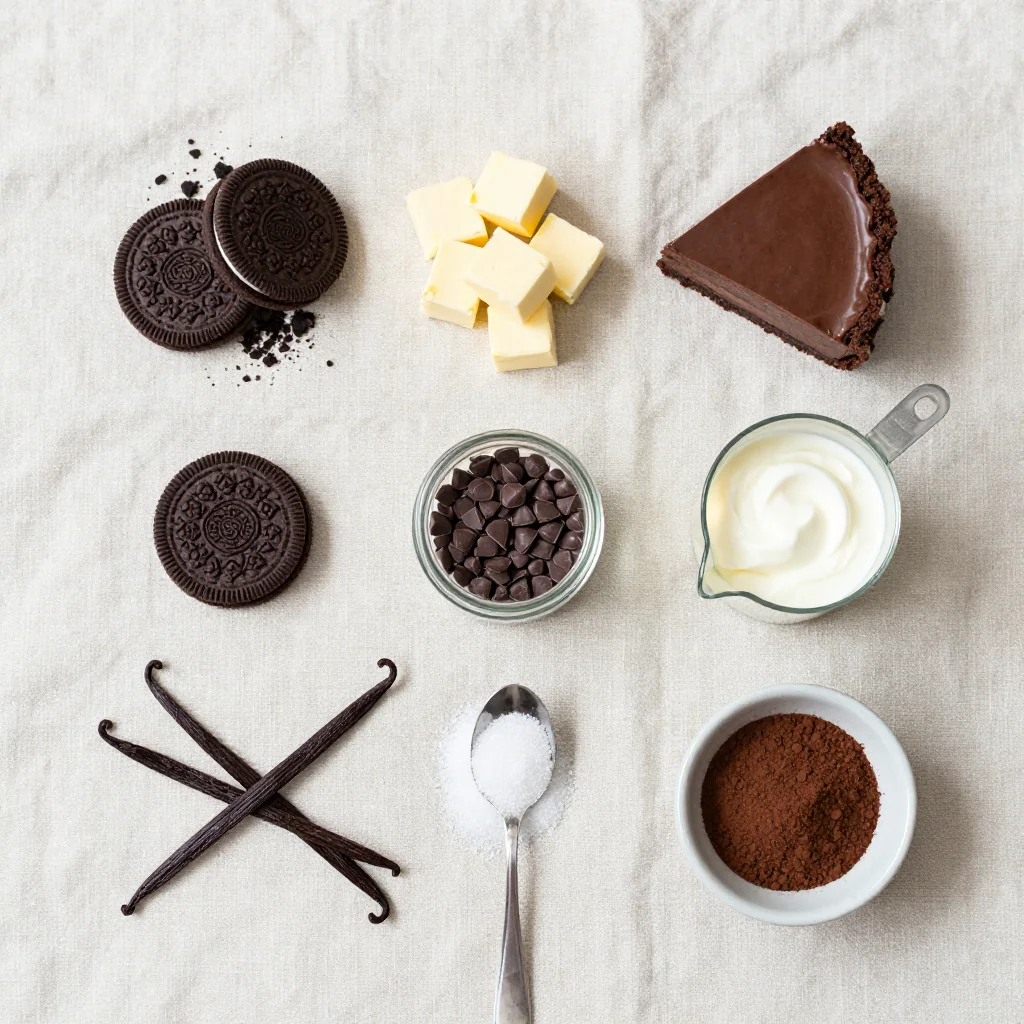
🥗 Ingredients
📝 Complete Ingredient List
For the Oreo Cookie Crust:
For the Chocolate Silk Filling:
For the Whipped Cream Topping:
🔍 Focus on Key Ingredients
Dark Chocolate (70% Cacao)
The backbone of the silk filling, 70% dark chocolate delivers a deep cocoa flavor without overwhelming sweetness. Choose a chocolate that melts smoothly and has a glossy finish; this ensures the silk texture remains velvety and glossy after chilling.
Heavy Cream
Heavy cream provides the richness and body that gives silk its luxurious mouthfeel. Its high fat content stabilizes the mousse when folded with the melted chocolate, creating that signature glossy sheen.
Egg Whites
Whipping the egg whites to stiff peaks introduces air, lightening the chocolate mixture while preserving its smooth texture. This step is crucial for achieving that melt‑in‑the‑mouth quality without making the filling too dense.
🔄 Quick Substitutions
| If you don’t have... | Use instead... |
|---|---|
| Oreo cookies | Chocolate sandwich cookies (any brand) or crushed chocolate graham crackers |
| Unsalted butter | Salted butter (reduce added salt) |
| Heavy cream | Coconut cream for a dairy‑free version |
👨🍳 Step‑by‑Step Instructions
Follow these detailed steps to assemble a flawless chocolate silk pie that looks as impressive as it tastes.
📋 Phase 1: Preparation & Mise en Place
Start by gathering all tools and measuring each ingredient precisely.
Prepare the Oreo Crust
Place the Oreo cookies in a large zip‑top bag and crush them with a rolling pin until they form fine crumbs. Transfer the crumbs to a mixing bowl, add the melted butter, and a pinch of salt if using unsalted butter. Stir until the mixture resembles wet sand.
Form the Crust
Press the crumb‑butter mixture evenly into the bottom and up the sides of a 9‑inch springform pan. Use the bottom of a measuring cup to compact the crust firmly. Refrigerate for 15 minutes while you prepare the filling.
🔥 Phase 2: Silk Filling & Assembly
This phase creates the glossy, airy chocolate silk that defines the pie.
Melt the Chocolate
Set a heat‑proof bowl over a pot of simmering water (double boiler). Add the chopped dark chocolate and stir gently until fully melted and smooth. Remove from heat and let it cool slightly, aiming for a temperature of about 40 °C (104 °F).
Whip the Heavy Cream
In a chilled bowl, whip 250 ml of heavy cream until soft peaks form. Set aside; this will be folded into the chocolate later to create the silk texture.
Combine Egg Yolks, Sugar, and Vanilla
In a separate bowl, whisk together the three egg yolks, granulated sugar, and vanilla extract until the mixture becomes pale and slightly thickened. This incorporates air and helps stabilize the silk.
Temper the Egg Yolks
Slowly pour a third of the warm melted chocolate into the yolk mixture while whisking constantly. This gentle tempering prevents the yolks from scrambling. Then, whisk the yolk‑chocolate mixture back into the remaining chocolate until fully combined.
Whip Egg Whites to Stiff Peaks
In a clean, grease‑free bowl, beat the three egg whites until they form stiff, glossy peaks. This will give the silk its airy lift.
Fold Whipped Cream and Egg Whites
First, gently fold the whipped cream into the chocolate‑yolk mixture using a spatula, turning the bowl over until just incorporated. Then, fold in the egg whites in two additions, being careful not to deflate the mixture. The final batter should be glossy and smooth.
✨ Phase 3: Final Set & Presentation
Now the pie will set and be dressed for a stunning finish.
Transfer Filling to Crust
Pour the chocolate silk filling into the chilled Oreo crust, smoothing the top with an offset spatula. Tap the pan gently on the counter to release any trapped air bubbles.
Chill the Pie
Refrigerate the assembled pie for at least 4 hours, preferably overnight, until the filling is firm to the touch.
Prepare Whipped Cream Topping
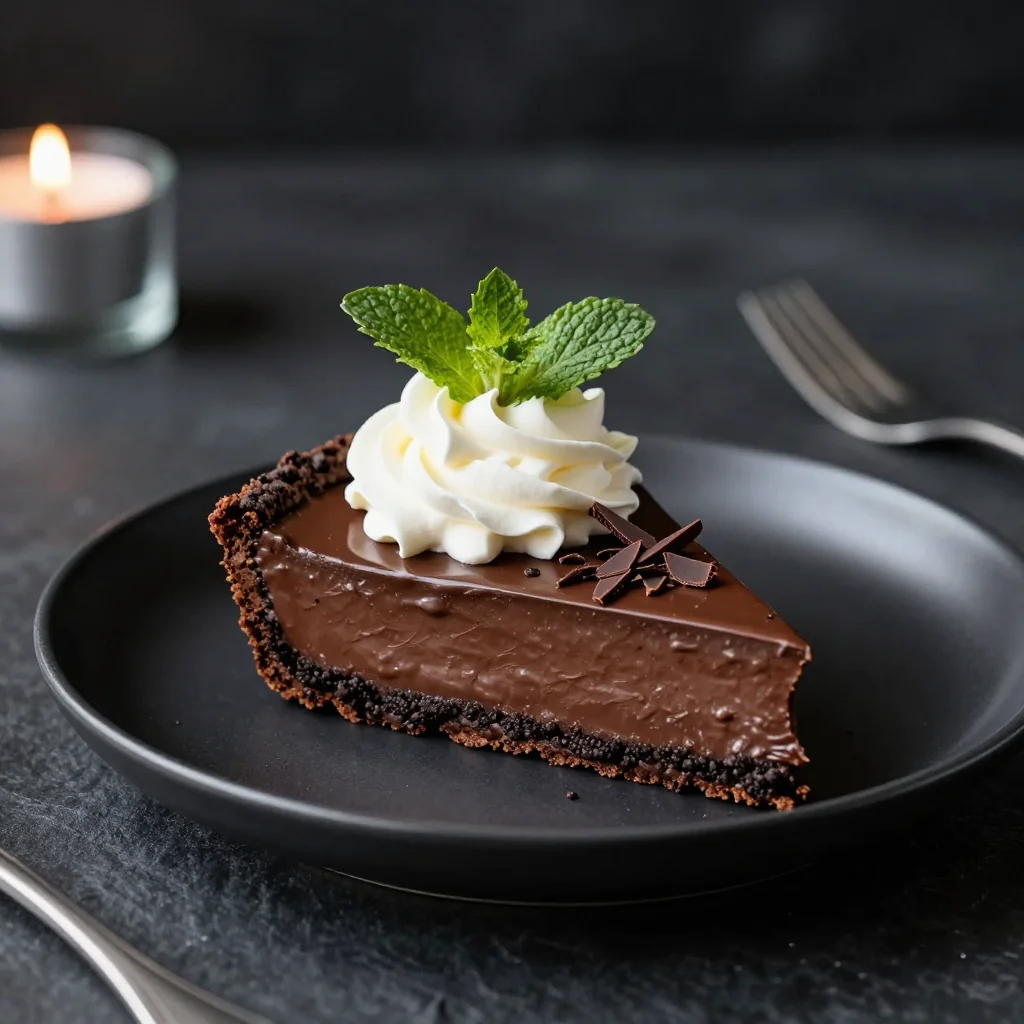
Whip 200 ml of heavy cream with powdered sugar and vanilla until stiff peaks form. Spread a generous layer over the chilled pie, then sprinkle dark chocolate shavings on top for visual contrast and extra crunch.
Serve
Release the springform pan, slice with a warm knife (dip in hot water, wipe dry), and serve each slice on a dessert plate. Pair with a glass of chilled dessert wine or a cup of espresso for an elegant finish.
💡 Expert Tips & Tricks
🛒 Choosing the Right Ingredients
When selecting chocolate, aim for a bar with at least 70% cacao; lower percentages can make the filling too sweet and affect the glossy texture. For the Oreo crust, use fresh cookies—stale cookies may crumble excessively and create gaps. Butter should be unsalted to give you full control over the final salt balance, and always use heavy cream with at least 35% fat for a stable silk.
🔪 Preparation Techniques
Crush the Oreo cookies evenly; too coarse will lead to a crumbly crust, while too fine can become soggy. Use a silicone spatula for folding; its flexibility helps preserve air bubbles. When tempering the chocolate with yolks, pour slowly and whisk continuously to avoid curdling.
🌡️ Mastering the Cooking
Although the pie is technically “no‑bake,” the chocolate must be cooled to around 40 °C before mixing with yolks. Use an instant‑read thermometer for accuracy. Chill the pie for a minimum of 4 hours; this allows the mousse to set firmly while retaining its silkiness.
🍽️ Presentation & Service
For a polished look, run a hot, damp knife through the crust before each slice to achieve clean cuts. Garnish with a light dusting of cocoa powder or a few fresh berries for a pop of color. Serve on white porcelain to highlight the dark chocolate sheen.
🏆 Pro Tips
Professional chefs rely on precision, timing, and a few scientific tricks to turn a good dessert into an unforgettable one.
- 🎯 Control the Chocolate Temperature: Chocolate that is too hot will cook the yolks, while chocolate that is too cool won’t incorporate air. Using a thermometer ensures you hit the sweet spot for a glossy, stable mousse.
- 🎯 Use a Double Boiler, Not a Microwave: Gentle, indirect heat prevents scorching and keeps the chocolate’s cocoa butter intact, which is essential for that silky mouthfeel.
- 🎯 Whisk Egg Whites with a Pinch of Cream of Tartar: This stabilizes the foam, allowing it to hold volume longer during folding, which translates to a lighter texture.
- 🎯 Chill the Crust Before Adding Filling: A cold crust prevents the chocolate from melting when the warm filling is poured, preserving the crisp base.
- 🎯 Fold with a “Cut and Fold” Motion: Rather than stirring, use a cutting motion across the bowl and then lift and turn; this technique keeps the mixture airy.
- 🎯 Finish with a Mirror Glaze (Optional): For an extra shine, brush a thin layer of tempered dark chocolate over the set pie just before adding whipped cream.
"Desserts are the final applause of a meal; make each bite a standing ovation." — Chef Dominique Ansel
🔄 Variations & Adaptations
The beauty of this recipe lies in its flexibility. Whether you need a vegan version or want to experiment with exotic flavors, the core technique remains the same.
🥬 Vegetarian / Vegan Version
Swap the egg yolks and whites with aquafaba (the liquid from canned chickpeas) – 3 tbsp aquafaba per egg equivalent. Replace dairy butter with coconut oil and use a plant‑based dark chocolate (at least 70% cocoa). The result is a fully vegan silk pie that retains the same glossy texture.
- Use 1 tsp agar‑agar dissolved in 2 tbsp water as a stabilizer for the filling.
- Replace heavy cream with chilled coconut cream (the solid part only).
🌶️ Flavor Variations
Chocolate is a versatile canvas. Here are three exciting directions you can take:
Spicy Mexican Twist
Add ½ tsp ground cinnamon and a pinch of cayenne pepper to the chocolate melt. Garnish with a drizzle of caramel sauce and a sprinkle of sea salt.
Mediterranean Olive‑Olive Oil
Replace half the butter in the crust with extra‑virgin olive oil and fold in finely chopped toasted almonds. The subtle fruity notes complement the dark chocolate beautifully.
Asian Matcha Fusion
Stir 1 tsp high‑grade matcha powder into the whipped cream topping and garnish with white chocolate shards dusted with additional matcha.
⚠️ Dietary Adaptations
Gluten‑Free
Use gluten‑free chocolate sandwich cookies or crush gluten‑free graham crackers mixed with almond flour for the crust.
Lactose‑Free
Swap heavy cream with lactose‑free whipping cream or chilled coconut cream, and ensure the chocolate is dairy‑free.
Low‑Calorie
Reduce sugar by half, use 60% dark chocolate, and replace half of the heavy cream with low‑fat Greek yogurt. The texture will be slightly lighter but still delicious.
👶 Kid‑Friendly Version
For younger palates, substitute dark chocolate with milk chocolate, add a swirl of strawberry puree into the filling before chilling, and top with colorful sprinkles. The visual appeal and milder flavor make it a hit with kids.
📦 Storage & Reheating
🧊 Conservation
In the Refrigerator:
- Duration: Up to 4 days
- Recommended container: Airtight glass or ceramic pie dish
- Tip: Place a piece of parchment paper over the whipped cream to prevent it from absorbing odors.
In the Freezer:
- Duration: Up to 2 months
- Method: Freeze the pie (without the whipped topping) tightly wrapped in plastic wrap and then aluminum foil.
- Defrosting: Transfer to the refrigerator overnight; add fresh whipped cream after thawing.
💡 For best texture, avoid refreezing once the pie has been thawed.
♨️ Reheating
🔥 In the Oven (Recommended):
- Preheat to 150 °C (300 °F).
- Cover the pie loosely with aluminum foil.
- Heat for 10‑12 minutes, just until the topping softens.
- Remove foil and warm for an additional 2‑3 minutes for a gentle surface glow.
⚡ In the Microwave (Quick):
- Place a slice on a microwave‑safe plate.
- Cover with a microwave‑safe lid.
- Heat on medium power for 20‑30 seconds; check and repeat if needed.
🍳 In a Skillet:
Warm a slice over low heat, covered, for 1‑2 minutes. This method keeps the crust crisp while gently melting the silk.
🍷 Perfect Pairings
🥗 Accompaniments
- Fresh Berries: A handful of raspberries or strawberries adds a bright, acidic contrast that cuts through the richness.
- Mint‑Infused Whipped Cream: Lightly fold chopped mint into the topping for a refreshing aroma.
- Caramel Drizzle: A thin ribbon of salted caramel adds depth without overwhelming the chocolate.
🍷 Wine & Beverage Matches
- Late Harvest Riesling: Its natural sweetness balances the bittersweet chocolate while its acidity refreshes the palate.
- Port (Ruby): Rich, fruity notes echo the chocolate’s depth, creating a harmonious finish.
- Non‑Alcoholic: A chilled hibiscus tea with a splash of orange blossom water offers a floral, slightly tart counterpoint.
🍰 Complementary Courses
Start the meal with a light citrus salad dressed in a honey‑lime vinaigrette, followed by a savory herb‑roasted chicken. After the silk pie, serve a palate‑cleansing sorbet—lemon or raspberry—to finish on a bright note.
❓ Frequently Asked Questions
Q: Can I use milk chocolate instead of dark chocolate?
A: Absolutely, but keep in mind that milk chocolate contains more sugar and less cocoa butter, which can make the silk slightly softer and less glossy. If you prefer a sweeter pie, you may want to reduce the added sugar in the yolk mixture by about 10‑15 g.
Q: How do I prevent the crust from becoming soggy?
A: The key is to chill the crust for at least 15 minutes before adding the warm chocolate filling. This solidifies the butter, creating a moisture barrier. Additionally, avoid over‑mixing the butter with the crumbs; a light coating is sufficient.
Q: Is it safe to use raw egg whites?
A: If you’re concerned about raw eggs, you can use pasteurized egg whites available in most grocery stores. They provide the same aeration without the risk of salmonella.
Q: My silk turned grainy—what went wrong?
A: Graininess usually results from overheating the chocolate or adding the egg yolk mixture too quickly. Ensure the chocolate is cooled to around 40 °C before tempering and add the yolk mixture gradually while whisking constantly.
Q: Can I make this pie ahead of time for a party?
A: Yes! Assemble the crust and filling up to 24 hours in advance, keep it refrigerated, and add the whipped cream topping just before serving to maintain its airy texture.
Q: How can I make the pie gluten‑free?
A: Replace the Oreo cookies with gluten‑free chocolate sandwich cookies or a blend of almond flour and cocoa powder. Ensure the butter and chocolate you use are certified gluten‑free.
🎉 To Your Oven!
This Chocolate Silk Pie with Oreo Cookie Crust embodies the perfect marriage of texture, flavor, and visual appeal. By mastering the delicate balance of glossy chocolate, airy mousse, and crunchy crust, you’ll create a dessert that not only satisfies sweet cravings but also earns applause at any gathering. Remember the tips about temperature control, gentle folding, and proper chilling—these are the secrets that transform an ordinary pie into a show‑stopping masterpiece.
Now that you have the full roadmap, it’s time to roll up your sleeves, gather the finest ingredients, and let your kitchen fill with the intoxicating aroma of melting chocolate. Share your beautiful creations, ask questions in the comments, and don’t forget to rate the recipe!
Have you tried this recipe?
Leave a comment and rating below! Share your photos on Instagram with #SilkPieDelight to be featured on our page.
Chocolate Silk Pie with Oreo Cookie Crust
A velvety chocolate mousse on a buttery Oreo crust, perfect for celebrations.
📝 Ingredients
Oreo Cookie Crust
Chocolate Silk Filling
Whipped Cream Topping
👨🍳 Instructions
- 1
Crush Oreo cookies into fine crumbs and mix with melted butter; press into a 9‑inch springform pan and chill.
- 2
Melt dark chocolate over a double boiler, let cool to 40 °C.
- 3
Whip 250 ml heavy cream to soft peaks.
- 4
Whisk egg yolks with sugar and vanilla until pale.
- 5
Temper yolk mixture with a third of the melted chocolate, then combine fully.
- 6
Whip egg whites to stiff peaks.
- 7
Fold whipped cream into chocolate‑yolk blend, then gently fold in egg whites.
- 8
Pour filling into crust, smooth top, and chill for at least 4 hours.
- 9
Whip remaining cream with powdered sugar and vanilla; spread over set pie.
- 10
Garnish with chocolate shavings and serve.
🥗 Nutritional Information (per serving)
*Nutrition values are estimates based on standard ingredients.
📚 You Might Also Like

Classic Tiramisu

Lemon Meringue Tart

Salted Caramel Cheesecake


💬 Comments & Reviews
Leave a Comment
[Reader comments will appear here]