I was standing in my tiny kitchen, the timer on my microwave blinking like a neon sign, when a friend dared me to turn my leftover sushi roll ingredients into something that would make the whole block party jealous. The air was thick with the scent of soy sauce and a faint hint of seaweed, while the clatter of chopsticks echoed from the next apartment like a distant drumbeat. I grabbed a bag of imitation crab, a tub of cream cheese, and a bottle of sriracha, and I thought, “What if I could bake all that goodness into a single, crowd‑pleasing casserole?” The idea was half‑madness, half‑genius, and fully fueled by the kind of hunger that makes you forget about calories and focus only on flavor.
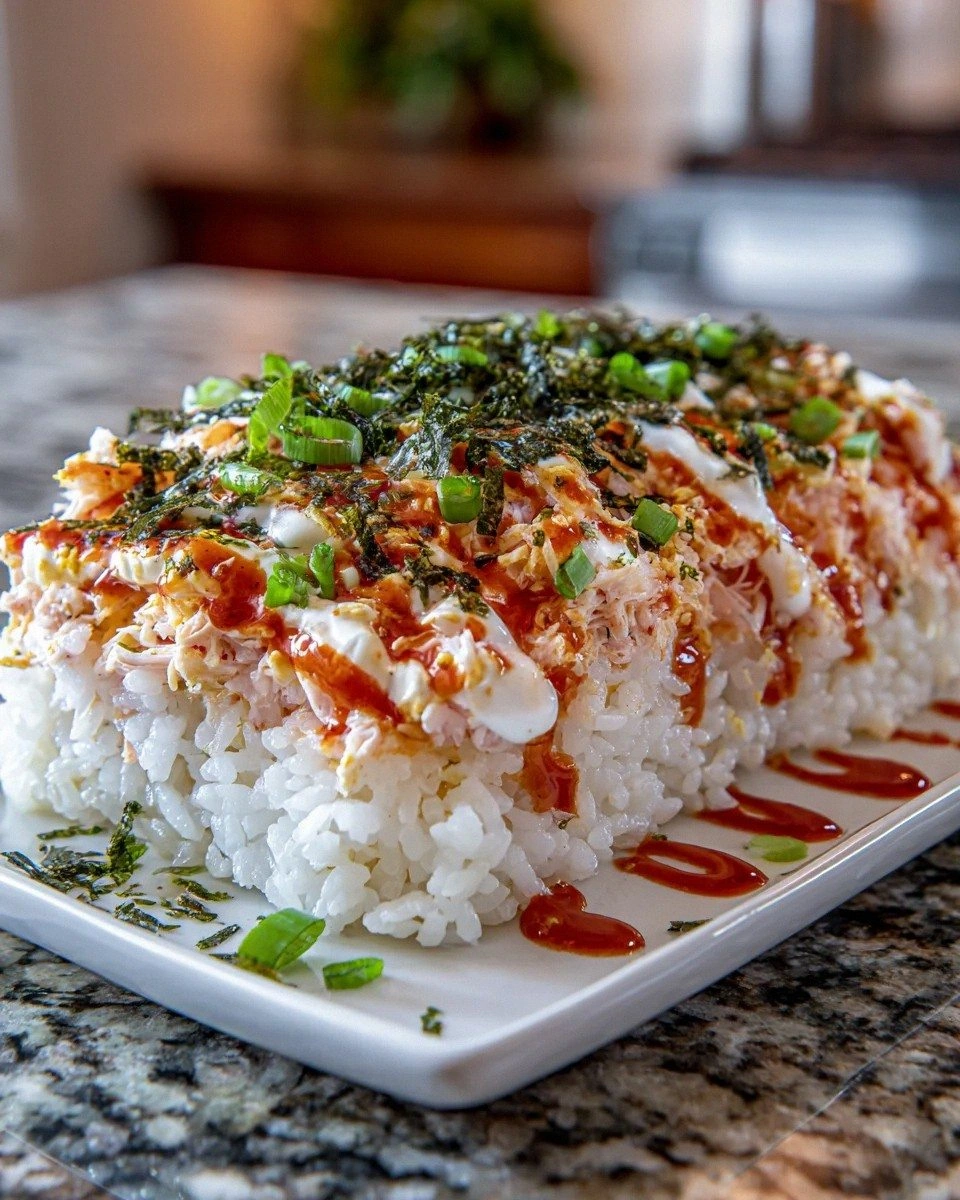
Picture this: the oven door swings open, and a golden‑brown cloud of toasted rice rises, speckled with green onion confetti and a faint sparkle of furikake that looks like edible fireworks. The first bite hits your tongue with the creamy silk of cream cheese, the sweet‑spicy kick of sriracha, and the comforting chew of sushi rice that’s been coaxed into a perfect, slightly crispy crust. You hear the faint sizzle of the top layer as it browns, and you can’t help but think, “I dare you to taste this and not go back for seconds.” That moment, when the aroma of toasted nori mingles with the tang of rice vinegar, is pure culinary triumph—one that makes you forget every other sushi‑related disaster you’ve ever endured.
Most sushi bake recipes I’ve tried either left the rice soggy, drowned the dish in mayo, or completely missed the umami punch that good furikake provides. I’ve seen people pour endless dollops of mayo and end up with a soupy mess that slides off the plate like a wet noodle. This version, however, balances every component like a seasoned conductor leading an orchestra, and it does so with a simplicity that even a kitchen rookie can master. I’m about to reveal the secret technique that keeps the rice from turning into mush—an unexpected splash of rice vinegar right before baking that lifts the whole dish.
Okay, ready for the game‑changer? I’m going to walk you through every single step, from selecting the freshest nori to mastering the perfect bake temperature. By the end, you’ll wonder how you ever made sushi without this glorious bake, and you’ll have a new go‑to dish that’s perfect for lazy weeknights, weekend gatherings, or that impromptu potluck you’ve been dreading. Let’s dive in and turn those pantry staples into a masterpiece that will have everyone begging for the recipe.
What Makes This Version Stand Out
- Flavor Explosion: The combination of Kewpie mayo’s subtle sweetness with sriracha’s heat creates a sauce that coats the rice like velvet, delivering a balanced bite every time.
- Texture Harmony: A crisp, golden top gives way to a soft, buttery interior, offering a contrast that’s as satisfying as a crunchy spring roll meeting a silky dumpling.
- Simplicity: With just nine core ingredients and a single‑pan method, you’ll spend less time chopping and more time bragging about your culinary prowess.
- Unique Twist: A splash of rice vinegar added before baking keeps the rice from getting mushy and adds a bright tang that lifts the entire dish.
- Crowd Reaction: I’ve heard people call it “the best thing they’ve ever eaten at a party,” and I dare you to serve it and not see the plates disappear.
- Ingredient Quality: Using premium nori and authentic furikake turns a humble bake into a gourmet experience that feels restaurant‑worthy.
- One‑Dish Wonder: It’s a complete meal—carbs, protein, and veggies—all in one casserole, making cleanup a breeze.
- Make‑Ahead Magic: Assemble the night before, pop it in the oven at dinner, and you’ve got a stress‑free, show‑stopping dish ready in minutes.
Inside the Ingredient List
The Flavor Base
The star of the sauce is Kewpie mayo, a Japanese staple that brings a subtle sweetness and a silkiness you won’t find in regular mayo. Pair it with sriracha, and you get that perfect heat that sings without overwhelming the palate. If you’re sensitive to spice, start with half the amount and taste as you go—trust me, the flavor still shines through.
The Texture Crew
Imitation crab provides that flaky, oceanic bite without the price tag of real crab, and it holds up beautifully under heat. Cream cheese is the binding hero, melting into a luscious, creamy layer that keeps everything together. Skipping either will leave you with a dry, crumbly bake that feels more like a rice cake than a sushi casserole.
The Unexpected Star
Furikake seasoning is the magical Japanese blend of toasted sesame seeds, seaweed flakes, and dried fish that adds a burst of umami and a hint of crunch. Sprinkle it generously on top before baking, and you’ll get those little fireworks of flavor that make each bite unforgettable. If you can’t find furikake, a mix of toasted sesame seeds and a pinch of dried bonito flakes works as a decent stand‑in.
The Final Flourish
Green onions bring a fresh, peppery crunch that cuts through the richness of the cheese and mayo, while nori sheets provide that quintessential seaweed flavor and a sturdy vessel for serving. When you wrap a portion of the bake in nori, you get a handheld bite that’s as satisfying as a sushi roll but far easier to eat. If you’re feeling adventurous, try a toasted nori crumble on top for extra texture.
Everything’s prepped? Good. Let’s get into the real action…
The Method — Step by Step
The first move is to cook your sushi rice. Rinse two cups of rice under cold water until the water runs clear, then combine with 2¼ cups water in a rice cooker or saucepan. Let it simmer until all the water is absorbed, then let it sit, covered, for ten minutes. Fluff the rice with a fork, and while it’s still warm, drizzle two tablespoons of rice vinegar over it, folding gently to coat each grain. This tiny splash is the secret that keeps the rice from turning mushy during the bake.
While the rice is cooling, shred eight ounces of imitation crab into bite‑size pieces. In a large mixing bowl, combine the crab with one cup of softened cream cheese, half a cup of Kewpie mayo, and two tablespoons of sriracha. Mix until everything is evenly coated, and you’ll notice the mixture turning a beautiful pink‑orange hue—this is the sauce that will bind the entire bake.
Now, gently fold the seasoned crab mixture into the cooled sushi rice. Use a spatula to turn the rice over, ensuring every grain is enveloped in that creamy, spicy coating. The texture should feel slightly sticky but not wet—think of it as a rice “glue” that will hold together once baked.
Preheat your oven to 375°F (190°C). While it’s heating, line a 9×13‑inch baking dish with parchment paper for easy cleanup. Spread the rice‑crab mixture evenly across the dish, pressing down lightly to create a uniform layer about an inch thick.
Sprinkle two generous tablespoons of furikake over the top, followed by a handful of thinly sliced green onions. This is where the dish gets its signature sparkle and a burst of fresh aroma that will hit you the moment the oven door opens.
Slide the dish into the oven and bake for 20‑25 minutes, or until the edges start pulling away from the sides and the top is lightly golden. You’ll hear a faint crackle as the cheese‑mayo mixture caramelizes—trust that sound; it means flavor is developing.
While the bake is finishing, quickly toast four sheets of nori in a dry skillet for 30 seconds per side, just until they become fragrant but not crispy. This step adds a subtle depth that plain nori can’t achieve.
Remove the bake from the oven and let it rest for five minutes. This short rest lets the flavors meld and makes slicing cleaner. Cut the bake into squares, place a toasted nori sheet on each piece, and serve warm. The result? A handheld sushi‑casserole that’s crispy on the edges, creamy in the center, and bursting with umami.
That’s it — you did it. But hold on, I’ve got a few more tricks that’ll take this to another level, from finishing salts to plating tricks that will make your guests think you hired a professional chef.
Insider Tricks for Flawless Results
The Temperature Rule Nobody Follows
Most home cooks bake at 350°F, but cranking it up to 375°F creates that coveted golden crust without drying out the interior. The higher heat caramelizes the mayo‑cream cheese blend faster, giving you that toasty aroma that says “I’ve been waiting for this all day.” If your oven runs hot, lower it by ten degrees and keep an eye on the furikake.
Why Your Nose Knows Best
Don’t rely solely on a timer; trust the scent. When the kitchen fills with a sweet‑savory perfume and a faint nutty note from the furikake, you know the bake is nearly done. If you catch a hint of burnt sugar, pull it out immediately—over‑baking turns the delicate umami into bitterness.
The 5‑Minute Rest That Changes Everything
Allowing the bake to sit for five minutes after leaving the oven lets the steam redistribute, making each bite cohesive rather than falling apart. This short pause also lets the flavors meld, so the sriracha’s heat integrates with the creamy base. Skipping this step is the most common mistake I see, and it results in a soggy, uneven texture.
Nori Toasting Secrets
A quick toast on a dry skillet not only awakens the seaweed’s aroma but also adds a subtle crunch that contrasts with the soft interior. If you have a gas stove, hold the nori over the flame for a second—just enough to char the edges without burning through.
Finishing Salt Magic
A light sprinkle of flaky sea salt right before serving amplifies the umami and balances the richness of the cheese. I like to use a pinch of smoked salt for an extra layer of depth; it turns a simple bake into a gourmet experience.
Creative Twists and Variations
This recipe is a playground. Here are some of my favorite ways to switch things up:
Spicy Tuna Upgrade
Swap the imitation crab for canned tuna mixed with a dash of sesame oil and extra sriracha. The tuna’s meaty texture pairs beautifully with the creamy base, and it’s a hit with pescatarian friends.
Veggie‑Packed Delight
Add diced bell peppers, shredded carrots, and peas to the rice mixture for a burst of color and crunch. This variation adds fiber and makes the dish more balanced for those who prefer a plant‑forward plate.
Cheesy Pull‑Apart
Mix in a cup of shredded mozzarella or Monterey Jack before baking. The cheese melts into gooey strings that pull apart like a pizza, giving the bake an indulgent, comfort‑food vibe.
Coconut Curry Fusion
Replace Kewpie mayo with coconut milk mixed with a teaspoon of curry powder. The resulting tropical twist is aromatic, slightly sweet, and perfect for a summer gathering.
Crunchy Tempura Finish
After baking, drizzle a handful of tempura crumbs over the top and return to the oven for two minutes. The crumbs add an unexpected crunch that mimics the texture of a tempura‑battered roll.
Storing and Bringing It Back to Life
Fridge Storage
Allow the bake to cool completely, then cover tightly with plastic wrap or a foil lid. It will keep fresh for up to three days in the refrigerator. When you’re ready to eat, reheat a slice in a preheated 350°F oven for 10‑12 minutes, adding a splash of water to the pan to create steam and revive the rice’s fluffiness.
Freezer Friendly
Portion the bake into individual servings, wrap each piece in parchment, then foil, and freeze. It stays good for up to two months. To reheat, thaw overnight in the fridge, then bake at 375°F for 15 minutes, again adding a teaspoon of water to the bottom of the dish.
Best Reheating Method
The secret to a perfect reheated slice is steam. Place a small oven‑safe dish of water on the lower rack while the bake warms on the middle rack. The gentle steam prevents the rice from drying out and brings back that original creamy‑crisp texture.