Love this? Pin it for later! 📌
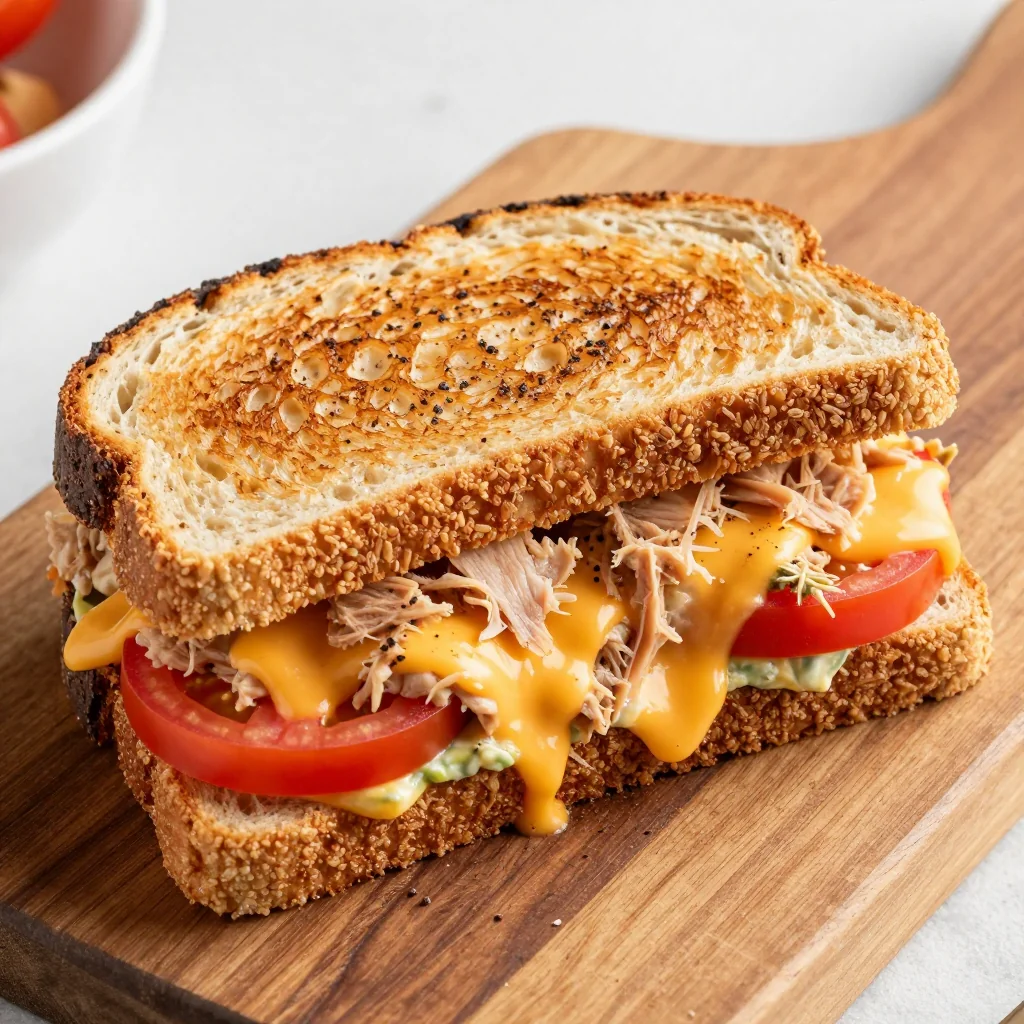
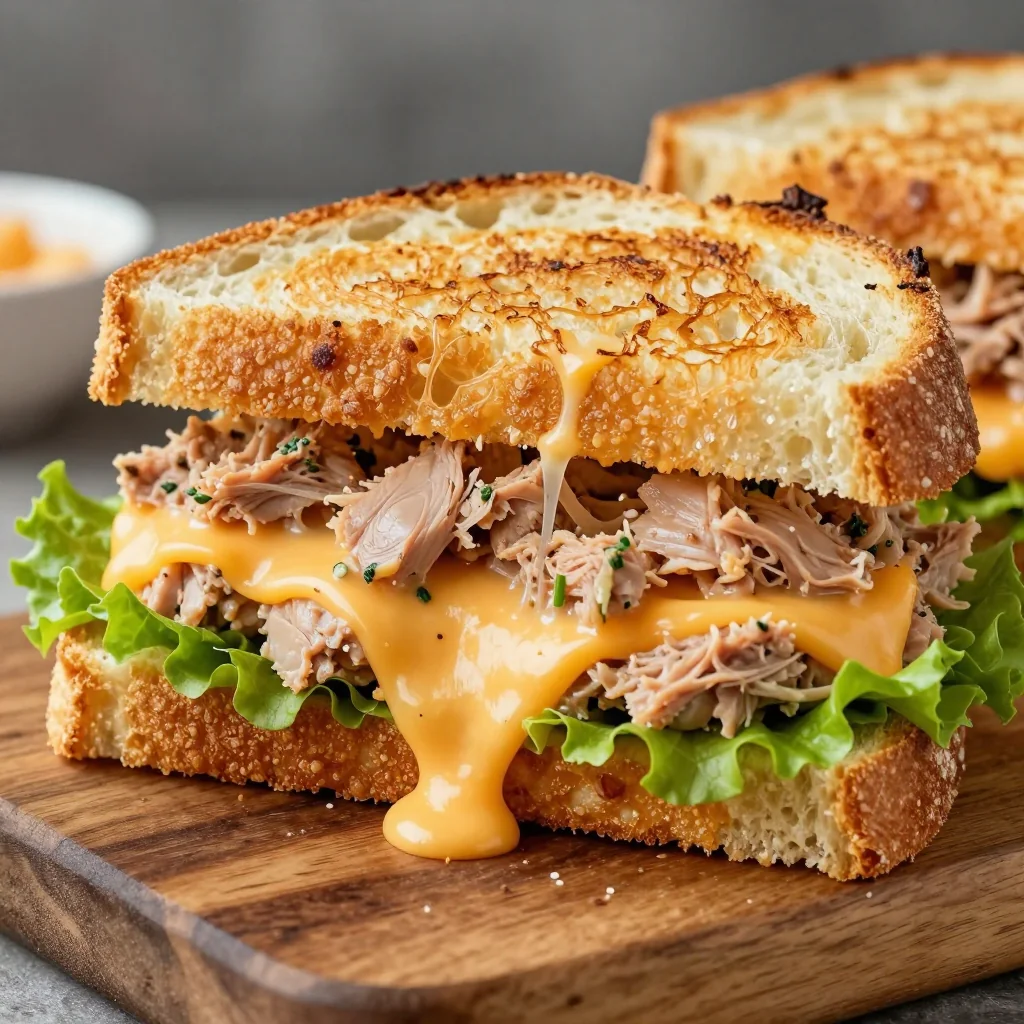
When the clock strikes noon and your stomach starts rumbling louder than the notifications on your phone, nothing saves the day quite like a crispy, cheesy tuna melt assembled entirely from shelf-stable staples. This is the sandwich that carried me through graduate-school all-nighters, through cross-country moves when every pot was already packed, and through the past three years of working-from-home lunches when a trip to the grocery store felt like planning an expedition. One bite of the golden, buttery bread giving way to molten cheddar and savory tuna salad flecked with sweet relish, and you’ll understand why this humble pantry hero has earned permanent residency in my kitchen.
I still remember the first time I served these to my in-laws—on a rainy Saturday when the fridge was practically empty except for a rogue can of tuna and the tail-end of a loaf of sandwich bread. I braced myself for polite nibbles, but instead watched in amazement as my father-in-law devoured two whole melts in five minutes flat, finally pushing his plate away with a satisfied sigh: “Restaurant-quality, but better.” That moment cemented the recipe’s place in our family lore, and now we affectionately call them “Emergency Elevensies.” Whether you’re feeding picky kids between Zoom meetings, assembling a late-night study snack, or simply craving comfort food that won’t break the bank, this 15-minute tuna melt delivers big flavor on the tightest of budgets.
Why This Recipe Works
- Pantry-Powered: Every ingredient is shelf-stable, so you can whip up lunch even when the fridge is bare.
- Lightning-Fast: From can-opener to plate in under 15 minutes—perfect for busy weekdays.
- Kid-Friendly, Adult-Approved: Creamy, cheesy, and familiar, yet easily elevated with a dash of hot sauce or fancy mustard.
- Budget Hero: Each sandwich costs well under $1.50, even with today’s grocery prices.
- One Skillet Wonder: Minimal dishes mean you’ll spend more time savoring than scrubbing.
- Customizable Crunch: Swap in celery seed, diced pickles, or even crushed potato chips for texture you love.
- Freezer-Friendly Tuna Mix: Double the filling and freeze portions for future 5-minute meals.
Ingredients You'll Need
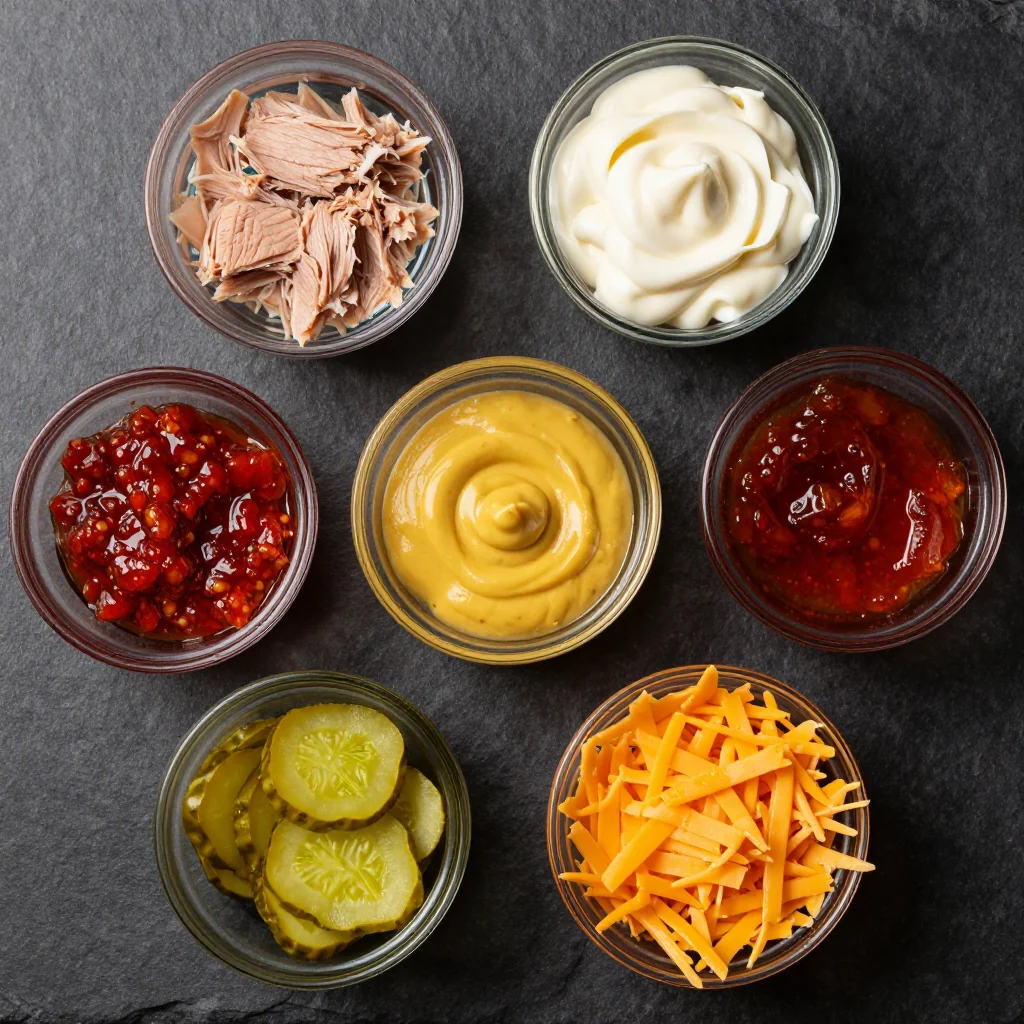
Canned Tuna in Water: Opt for chunk-light tuna—it's usually the most affordable and flakes beautifully. If you prefer albacore for its milder flavor, go for it, but drain exceptionally well to avoid soggy sandwiches. For sustainability, look for “pole-and-line caught” on the label.
Mayonnaise: The glue that transforms tuna into a luscious salad. If you’re out, a smashed avocado or plain Greek yogurt works, but mayo keeps the pantry dream alive. I keep a squeeze bottle in the fridge door at all times; it lasts months past the printed date.
Sweet Relish: Tiny jars are cheap and virtually indestructible on the shelf. The hit of sugar balances the briny tuna and sharp cheese. No relish? Finely dice bread-and-butter pickles or add a pinch of sugar plus a splash of vinegar.
Dijon Mustard: Adds subtle heat and complexity. Generic yellow mustard is perfectly acceptable; just cut the quantity slightly to tame the tang.
Bread & Butter: Any sliced bread you have—whole wheat, sourdough, or even hot-dog buns pressed flat. Butter (or margarine) ensures that gorgeous golden crust. For dairy-free diners, drizzle the exterior with olive oil and sprinkle a little nutritional yeast for color.
Cheddar Cheese: Pre-shredded is convenient, but block cheese melts silkier and is cheaper per ounce. Sharp cheddar delivers that classic diner vibe; mild or mozzarella keep things kid-friendly.
Optional Extras: A pinch of smoked paprika, diced red onion, or a few capers elevate the mix without complicating the method. Keep a “flavor booster” basket near your canned goods so inspiration is never out of reach.
How to Make Budget-Friendly Pantry Tuna Melt for Quick Lunch
Drain & Flake the Tuna
Open the can completely and press the lid down while tilting over the sink to squeeze out every last drop of liquid. Transfer tuna to a medium bowl and break it into small flakes using a fork—this ensures even distribution of dressing and prevents chunky mouthfuls.
Mix the Filling
Add 2 tablespoons mayonnaise, 1 tablespoon relish, 1 teaspoon Dijon, and a pinch each of salt and pepper. Stir vigorously until the mixture holds together but isn’t overly wet. Taste and adjust—remember the cheese will add salt, so under-season slightly.
Butter the Bread
Lay out 4 slices of bread. Spread a thin, even layer of softened butter on one side of each slice, edge to edge. This prevents dry spots and promotes uniform browning. Keep buttered sides facing down on a sheet of parchment to avoid greasy counters.
Assemble Dry Side Up
Flip two slices over so the unbuttered side faces up. Divide the tuna mixture evenly and spread to the edges. Top each with 2 slices (or a generous handful of shredded) cheddar. Close the sandwiches with remaining bread, buttered side out. Press gently to adhere.
Preheat the Pan
Place a heavy skillet (cast iron is ideal) over medium-low heat for 90 seconds. A properly heated pan prevents sticking and encourages that slow, even crust. Sprinkle a few drops of water—if they dance, you’re ready.
Grill to Golden
Slide sandwiches into the pan. Cook 3–4 minutes until the underside is deep golden. Use a spatula to check; reduce heat slightly if browning too quickly. Bread should crunch softly when tapped.
Flip & Press
Gently flip each sandwich, pressing down with the spatula to encourage melty cohesion. If cheese seems shy, cover the pan with a lid for the final 2 minutes to trap heat and encourage gooeyness.
Rest, Slice, Serve
Transfer to a cutting board and let rest 1 minute—this sets the cheese and prevents tongue-burning lava flow. Slice diagonally (science says triangles taste better) and serve immediately while the crust crackles.
Expert Tips
Low & Slow Wins
Resist cranking the heat; medium-low renders the butter without burning milk solids, yielding an evenly crisp crust and fully melted cheese.
De-Sog the Filling
If your tuna mix feels loose, stir in a teaspoon of plain breadcrumbs. They absorb excess moisture and prevent the dreaded school-cafeteria drip.
Two-Zone Skillet
Push sandwiches to the cooler edge after browning both sides; the ambient heat finishes melting the cheese without scorching the bread.
Crust Boost
Add a pinch of grated Parmesan to the buttered exterior. It creates a frico-like crunch and salty umami punch.
Make-Ahead Filling
Tuna salad keeps 3 days refrigerated. Pack into lidded jars; assemble and grill only what you need to guarantee fresh, crispy bread every time.
Slice Smart
Use a serrated knife in gentle sawing motions; pressing down compresses the airy bread and squeezes out molten cheese.
Variations to Try
- Mediterranean: Swap relish for chopped kalamata olives, add a pinch of oregano, and use feta on top of cheddar for briny brightness.
- Spicy Sriracha: Whisk 1 tsp Sriracha into the mayo, add a handful of thin-sliced jalapeños inside the sandwich before grilling.
- Everything Bagel: Mix 1 tsp everything-bagel seasoning into the buttered exterior; sprinkle extra on the cheese for crunch.
- Apple & Cheddar: Add two paper-thin apple slices between cheese layers—sweet, tart contrast against salty tuna.
- Avocado Power: Mash ¼ ripe avocado into the tuna salad for extra creaminess and healthy fats—great for post-workout refuel.
- Gluten-Free: Use sturdy gluten-free bread and toast each slice 30 seconds before assembly to prevent breakage when flipping.
Storage Tips
Tuna Salad: Transfer to an airtight container, press plastic wrap directly onto the surface, and refrigerate up to 3 days. For longer storage, freeze in silicone muffin cups; thaw overnight in the fridge and stir well before using.
Assembled Uncooked Sandwiches: Wrap each melt individually in parchment, then foil; refrigerate up to 24 hours. Grill straight from the fridge, adding 1 extra minute per side.
Cooked Leftovers: Cool completely, wrap in foil, and refrigerate up to 2 days. Reheat in a dry skillet over medium-low, covered, 2 minutes per side. The microwave works in a pinch but sacrifices crunch.
Freezing Cooked Melts: Freeze sandwiches on a baking sheet until solid, then transfer to a zip-top bag with parchment between layers. Reheat from frozen in a 400 °F (200 °C) oven for 12–15 minutes, flipping halfway.
Frequently Asked Questions
Budget-Friendly Pantry Tuna Melt for Quick Lunch
Ingredients
Instructions
- Mix Filling: In a bowl, combine tuna, mayonnaise, relish, mustard, salt, and pepper. Stir until evenly blended.
- Butter Bread: Spread butter on one side of each bread slice.
- Assemble: Place two slices buttered-side-down. Top with tuna mixture and cheddar. Close with remaining bread, buttered-side-up.
- Preheat Pan: Heat skillet over medium-low for 90 seconds.
- Grill: Cook sandwiches 3–4 minutes per side until golden and cheese melts, pressing gently with a spatula.
- Serve: Rest 1 minute, slice diagonally, and enjoy hot.
Recipe Notes
For extra crunch, sprinkle 1 teaspoon grated Parmesan on the buttered bread before grilling. Store leftover tuna salad up to 3 days refrigerated.