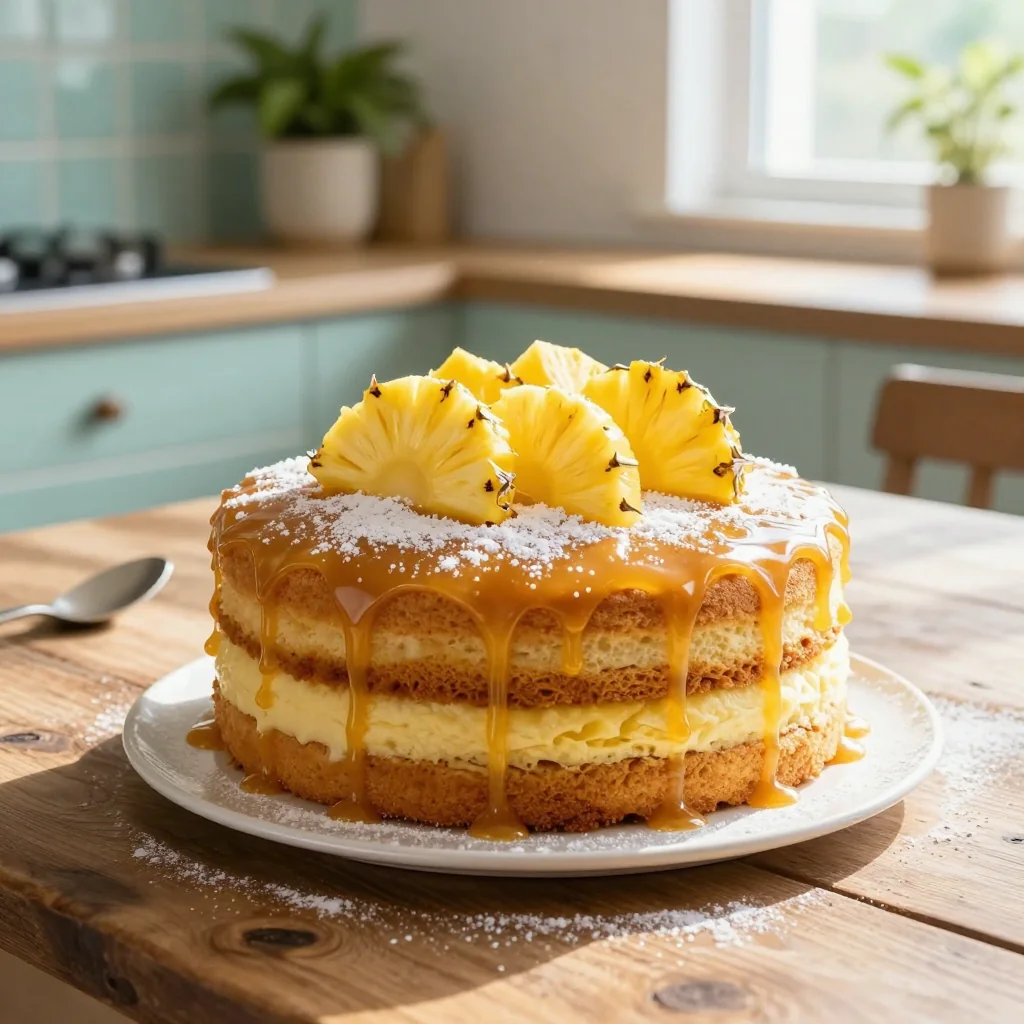
A bright, tropical cake that brings sunshine to every bite.
The first time I tasted a slice of Pineapple Sunshine Cake was on a breezy summer afternoon in Bali, where the scent of fresh pineapple mingled with the salty sea air. I was sitting on a bamboo deck, watching the sun dip below the horizon, and the cake’s bright, buttery crumb paired perfectly with the caramelized pineapple glaze. That moment sparked a lifelong love for tropical desserts that celebrate sunshine in every bite.
This cake draws inspiration from classic Caribbean pineapple upside‑down cakes, yet it has been re‑imagined with a light, fluffy sponge that lets the pineapple shine without being overpowered. The recipe honors the tradition of using fresh pineapple while adding a subtle citrus zest that lifts the flavor profile.
In this guide, you’ll learn how to balance the sweet acidity of pineapple with a moist, vanilla‑infused batter, how to achieve a glossy caramel glaze, and why each step matters for that perfect golden crust. I’ll also share the science behind the ingredients, so you’ll understand exactly why the cake rises the way it does.
I’m thrilled to share this radiant recipe with you, and I can’t wait to see how it lights up your kitchen and your guests’ faces.
🌟 Why This Recipe Will Capture Your Heart
Every bite of Pineapple Sunshine Cake feels like a mini‑vacation—sweet, tangy, and utterly unforgettable.
- ✨ Tropical Bliss: The combination of fresh pineapple and a buttery vanilla sponge transports you straight to a beachside paradise.
- ✨ Moisture Mastery: A secret blend of yogurt and pineapple juice keeps the crumb moist for days, making leftovers a delight.
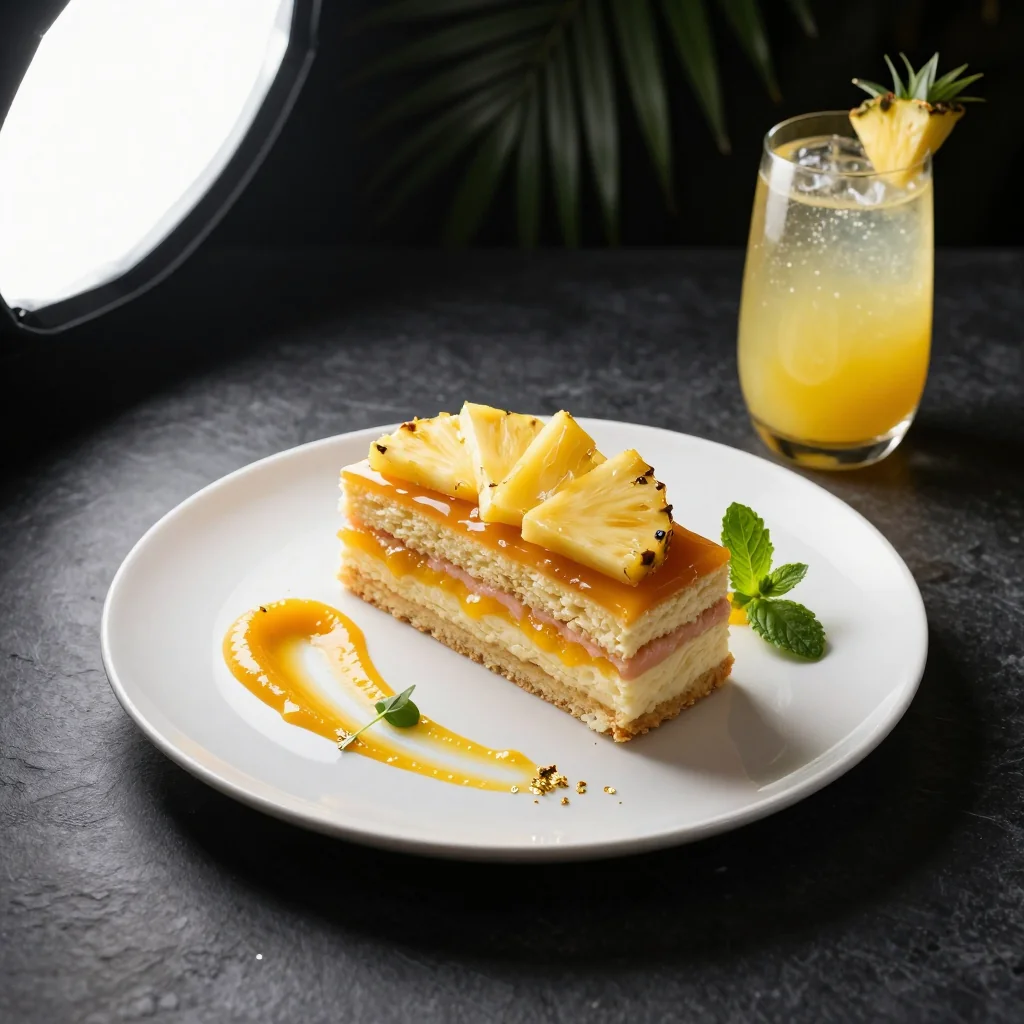
- ✨ Visual Wow Factor: The caramelized pineapple rings create a stunning, glossy top that looks as good as it tastes.
- ✨ Easy to Scale: Whether you’re feeding a small family or a large gathering, the portion adjuster lets you multiply the recipe with confidence.
- ✨ Health‑Smart: By swapping refined sugar for coconut sugar and using Greek yogurt, the cake offers a balanced sweetness with a protein boost.
- ✨ Crowd‑Pleaser: Its bright flavors appeal to both kids and adults, making it perfect for birthdays, brunches, or any celebration.
🥗 Ingredients
📝 Complete Ingredient List
For the Cake Batter:
For the Pineapple Topping:
For the Glaze (optional):

🔍 Focus on Key Ingredients
Fresh Pineapple
Fresh pineapple provides natural acidity that balances the sweet caramel glaze, while its high water content keeps the cake moist during baking. Choose a pineapple that yields a gentle give when pressed; this indicates peak ripeness and optimal flavor.
Greek Yogurt
Greek yogurt adds protein and a subtle tang, contributing to a tender crumb. Its acidity also reacts with the baking powder, creating a gentle lift without the need for excessive leavening agents.
Coconut Sugar
Coconut sugar lends a caramel‑like depth while keeping the glycemic index lower than refined white sugar. It also imparts a faint hint of toasted coconut that complements the tropical pineapple.
🔄 Quick Substitutions
| If you don’t have... | Use instead... |
|---|---|
| Greek yogurt | regular plain yogurt (same amount) |
| Coconut sugar | light brown sugar |
| Pineapple (fresh) | Canned pineapple in juice, well drained |
👨🍳 Step‑by‑Step Instructions
Follow these detailed steps to create a perfectly moist cake with a caramelized pineapple crown. Each phase is designed to build flavor layers and ensure a flawless texture.
📋 Phase 1: Preparation & Mise en Place
Gather, measure, and prep all components before you start baking.
Prepare the Pineapple Rings
Slice the pineapple into 1‑centimeter thick rings, then use a small cookie cutter or a knife to remove the core from each slice. Pat the rings dry with paper towels to remove excess moisture; this will help them caramelize evenly in the oven.
Mix Dry Ingredients
In a large bowl, whisk together flour, baking powder, and salt. This ensures the leavening agent is evenly distributed, preventing any pockets of bitterness.
🔥 Phase 2: Baking & Assembly
Create the batter, arrange the pineapple, and bake to golden perfection.
Combine Wet Ingredients
In a separate bowl, beat the eggs, melted butter, coconut sugar, and vanilla extract until smooth. The mixture should be glossy and slightly thick. Add the Greek yogurt, which will give the batter a velvety texture.
Incorporate Dry Ingredients
Gently fold the dry mixture into the wet mixture using a rubber spatula. Fold until just combined; a few lumps are acceptable. Over‑mixing will develop gluten, resulting in a dense texture.
Arrange Pineapple Rings in the Pan
Lightly grease a 9‑inch (23 cm) springform pan. Arrange the pineapple rings in a single layer, overlapping them slightly to form a decorative circle. Drizzle the melted butter and brown sugar mixture over the pineapple rings, spreading it evenly.
Pour Batter Over Pineapple
Gently pour the batter over the arranged pineapple rings, spreading it evenly with a spatula. The batter will flow around the rings, creating a beautiful crown as it bakes.
Bake the Cake
Preheat your oven to 180°C (350°F). Bake for 30‑35 minutes, or until a toothpick inserted into the centre comes out clean and the pineapple edges turn a deep amber. The caramel will thicken as it cools, forming a glossy glaze.
✨ Phase 3: Finishing & Serving
Finalize the cake, add optional glaze, and serve with style.
Cool and Unmold
Allow the cake to cool in the pan for 10 minutes, then carefully invert it onto a serving plate. The caramelized pineapple will now crown the cake, forming a glossy, caramel‑rich top.
Optional Glaze
If you love an extra glossy finish, whisk powdered sugar, pineapple juice, and lemon zest together until smooth. Drizzle the glaze over the cooled cake, allowing it to set for 10 minutes before serving.
Serve
Serve the cake warm or at room temperature, optionally with a dollop of whipped coconut cream or a scoop of vanilla ice cream. The contrast between the warm cake and cool ice cream creates a delightful contrast.
💡 Expert Tips & Tricks
🛒 Choosing the Right Ingredients
When selecting pineapples, look for fruits that have a sweet aroma at the base and feel slightly soft to the touch. Avoid pineapples with brown spots or a sour smell; they may be over‑ripe and mushy. For butter, use unsalted to control the salt level, and melt it gently over low heat to preserve its flavor.
🔪 Preparation Techniques
When removing the core from pineapple rings, use a small paring knife and gently twist the the core. This keeps the ring intact for a clean presentation. For the batter, gently fold the dry ingredients into the wet mixture using a silicone spatula; this avoids over‑mixing and keeps the crumb light.
🌡️ Mastering the Baking Process
Preheat the oven fully before inserting the cake; this ensures an even rise. Use an oven thermometer if your oven tends to run hot or cold. When the caramel begins to bubble, it indicates the sugar is caramelizing; keep a close eye to avoid burning.
🍽️ Presentation & Service
For a polished presentation, drizzle the optional glaze in a spiral pattern from the center outward. Garnish with a few fresh mint leaves or a dusting of toasted coconut flakes for extra texture. Serve on a white porcelain plate to let the bright colors of the pineapple and glaze stand out.
🏆 Pro Tips
Professional bakers know that the difference between a good cake and a show‑stopping masterpiece lies in the details.
- 🎯 Precise Temperature Control: Use an oven thermometer and preheat the oven for at least 10 minutes. A stable temperature ensures even rise and prevents the pineapple from burning before the cake is cooked through.
- 🎯 Proper Butter Integration: Melt butter slowly over low heat; overheating can cause it to separate, leading to a greasy cake. Melt in a double boiler for best results.
- 🎯 Balancing Sweetness: Coconut sugar provides a caramel note, but if you prefer a less sweet cake, reduce the amount by up to 20 % and increase the coconut sugar with a pinch of sea salt to balance flavors.
- 🎯 Controlling Caramelization: Adding a splash of rum to the caramel glaze not only adds flavor but also lowers the boiling point, helping the glaze set faster and achieve a glossy finish.
- 🎯 Portion Scaling: Use the portion adjuster to scale the recipe up to 20 servings. The JavaScript automatically recalculates each ingredient based on the ratio of new servings to the base 8 servings.
- �/i> 🎯 Presentation Tricks: For a professional finish, dust the top with finely grated zest of lime after glazing. The citrus zest adds a fresh aroma and a splash of color that contrasts beautifully with the golden glaze.
"A cake is not just a dessert; it’s a story you tell with flavors and textures." — Chef Thomas Keller
🔄 Variations and Adaptations
The Pineapple Sunshine Cake is a versatile canvas. Below are several adaptations to suit various dietary needs, flavor preferences, and dietary restrictions.
🥬 Vegetarian / Vegan Version
Replace the eggs with a flax‑egg mixture (1 tbsp ground flaxseed + 3 tbsp water per egg) and substitute the butter with coconut oil. Use a plant‑based yogurt (such as coconut or almond yogurt) in place of Greek yogurt. The result is a moist, dairy‑free cake that retains the tropical character.
- Replace 4 large eggs with 4 “egg‑flax” mixtures.
- Swap 100 g butter for 100 g melted coconut oil.
- Use 150 g plain soy yogurt instead of Greek yogurt.
🌶️ Flavor Variations
The base recipe is a canvas for many flavor twists. Below are three popular variations.
Spicy Version
Add ½ tsp cayenne pepper to the batter and a dash of chili‑infused rum to the glaze. The heat balances the sweetness and adds a subtle kick.
Mediterranean Version
Incorporate ¼ cup chopped toasted almonds into the batter and drizzle a honey‑thyme glaze (honey mixed with fresh thyme) over the finished cake.
Asian Fusion Version
Replace the vanilla extract with 1 tsp matcha powder, and add 1 tbsp toasted sesame seeds to the topping. Finish with a light drizzle of black sesame paste for an earthy note.
⚠️ Dietary Adaptations
Gluten‑Free
Substitute the all‑purpose flour with a 1‑to‑1 gluten‑free blend, ensuring the blend contains xanthan gum for structure.
Lactose‑Free
Use lactose‑free butter or coconut oil, and replace Greek yogurt with lactose‑free yogurt or coconut yogurt.
Low‑Calorie
Reduce the sugar by 25 % and replace part of the butter with unsweetened applesauce (50 g). This cuts calories while preserving moisture.
👶 Family/Children Version
For younger palates, reduce the rum and omit the optional glaze. Serve the cake with a dollop of vanilla yogurt and fresh berries. The reduced sweetness and softer texture make it kid‑friendly.
📦 Conservation & Reheating
🧊 Storage
Refrigerator
- Duration: Up to 4 days
- Container: Airtight plastic container or covered cake dome
- Tip: Place a paper towel under the cake to absorb any excess moisture.
Freezer
- Duration: Up to 2 months
- Method: Wrap the cake tightly in cling film, then in aluminum foil.
- Defrosting: Transfer to the refrigerator overnight, then let sit at room temperature for 30 minutes before serving.
💡 Note: The glaze may become slightly cloudy after freezing; a quick re‑heat will restore its shine.
♨️ Reheating
Oven (Recommended)
- Preheat to 160 °C (320 °F).
- Cover the cake loosely with aluminum foil.
- Heat for 10‑12 minutes, until warmed through.
- Remove foil and heat an additional 3‑4 minutes to crisp the glaze.
Microwave (Quick)
- Place a slice on a microwave‑safe plate.
- Cover with a microwave‑safe lid or parchment.
- Heat at medium power for 30‑45 seconds.
- Check and repeat in 10‑second intervals if needed.
Stovetop (Pan‑Sear)
Heat a non‑stick skillet over low heat, add a teaspoon of butter, and warm a slice for 2‑3 minutes, pressing gently for a caramelized edge.
🍷 Perfect Pairings
🥗 Side Dishes
- Fresh Tropical Fruit Salad: A mix of mango, kiwi, and passion fruit adds bright acidity that balances the cake’s sweetness.
- Coconut‑Lime Quinoa: Light, fluffy quinoa flavored with coconut milk and lime zest offers a subtle, nutty backdrop.
- Light Green Salad with Citrus Vinaigrette: The crisp greens and citrus dressing cleanse the palate between bites.
🍷 Wine / Drink Pairings
- Riesling (Off‑Dry): The wine’s natural acidity and slight sweetness echo the pineapple while cutting through the richness.
- Moscato d'Asti: Light, fizzy, and aromatic, it enhances the tropical flavors without overwhelming.
- Non‑Alcoholic Option – Pineapple‑Mint Spritzer: Sparkling water mixed with pineapple juice, fresh mint, and a splash of lime.
🍰 To Complete the Meal
Start with a light coconut‑infused gazpacho or chilled cucumber soup for a refreshing opening. Follow the cake with a simple vanilla bean ice cream or a dollop of whipped coconut cream, which adds a creamy contrast without competing with the pineapple.
❓ Frequently Asked Questions
Q: Can I use canned pineapple instead of fresh?
Yes, you can use canned pineapple in juice (not syrup). Drain it well, pat dry, and adjust the glaze sweetness because canned pineapple is often sweeter. You may also reduce the added sugar by 1‑2 tbsp.
Q: How do I prevent the pineapple from burning?
Keep the oven temperature at 160‑180 °C (320‑350 °F) and monitor the glaze. If the edges start to darken too quickly, tent the cake with foil. Adding a splash of rum helps the caramel stay glossy and prevents hardening.
Q: What if I don’t have a spring‑form pan?
A regular 9‑inch cake pan works fine; just ensure the pineapple rings are evenly spaced. You can also use a silicone mold, but be aware that the glaze may spread slightly more.
Q: Can I make this cake gluten‑free?
Absolutely. Replace the all‑purpose flour with a gluten‑free blend that contains xanthan gum. The texture will remain tender, though the crumb may be slightly denser.
Q: How long does the cake stay fresh?
At room temperature, it stays fresh for up to 2 days. In the refrigerator, it can last up to 4 days. For longer storage, freeze it for up to 2 months.
Q: Can I prepare the cake ahead of time?
Yes. Bake the cake a day in advance, then store it covered in the fridge. Reheat gently before serving, and add a fresh glaze if desired.
🎉 Let’s Get Baking!
Pineapple Sunshine Cake is more than a dessert; it’s a celebration of sunshine, tropical flavors, and the joy of sharing sweet moments with loved ones. Its moist crumb, caramelized pineapple crown, and optional citrus glaze make it a standout centerpiece for any gathering, whether it’s a casual brunch or an elegant evening soirée.
I hope you feel inspired to try this recipe, adapt it to your own tastes, and make it a beloved staple in your kitchen. The bright colors, fragrant aroma, and delightful texture will surely brighten any table.
Have you tried this recipe?
Leave a comment and rating below! Share your photos on Instagram with #PineappleSunshineCake to be featured on our page.
Pineapple Sunshine Cake
A bright, tropical cake that brings sunshine to every bite.
📝 Ingredients
For the Cake Batter
For the Pineapple Topping
Optional Glaze
👨🍳 Instructions
- 1 Slice pineapple into 1‑cm rings, remove the core, and pat dry.
- 2 Whisk together flour, baking powder, and salt in a bowl.
- 3 In another bowl, beat eggs, melted butter, coconut sugar, and vanilla until smooth.
- 4 Fold the dry mixture into the wet mixture, then stir in Greek yogurt.
- 5 Arrange pineapple rings in a greased 9‑inch springform pan, drizzle with melted butter and brown sugar mixture.
- 6 Pour batter over the pineapple rings, smoothing the top.
- 7 Bake at 180 °C (350 °F) for 30‑35 minutes until a toothpick comes out clean.
- 8 Allow to cool 10 minutes, then invert onto a serving plate.
- 9 If desired, whisk powdered sugar, pineapple juice, and lemon zest for a glaze; drizzle over the cake.
- 10 Serve warm or at room temperature, optionally with vanilla ice cream or coconut whipped cream.
🥗 Nutritional Information (per serving)
*Values are estimates based on standard ingredient measurements.

💬 Comments & Reviews
Leave a Comment
No comments yet. Be the first to share your experience!