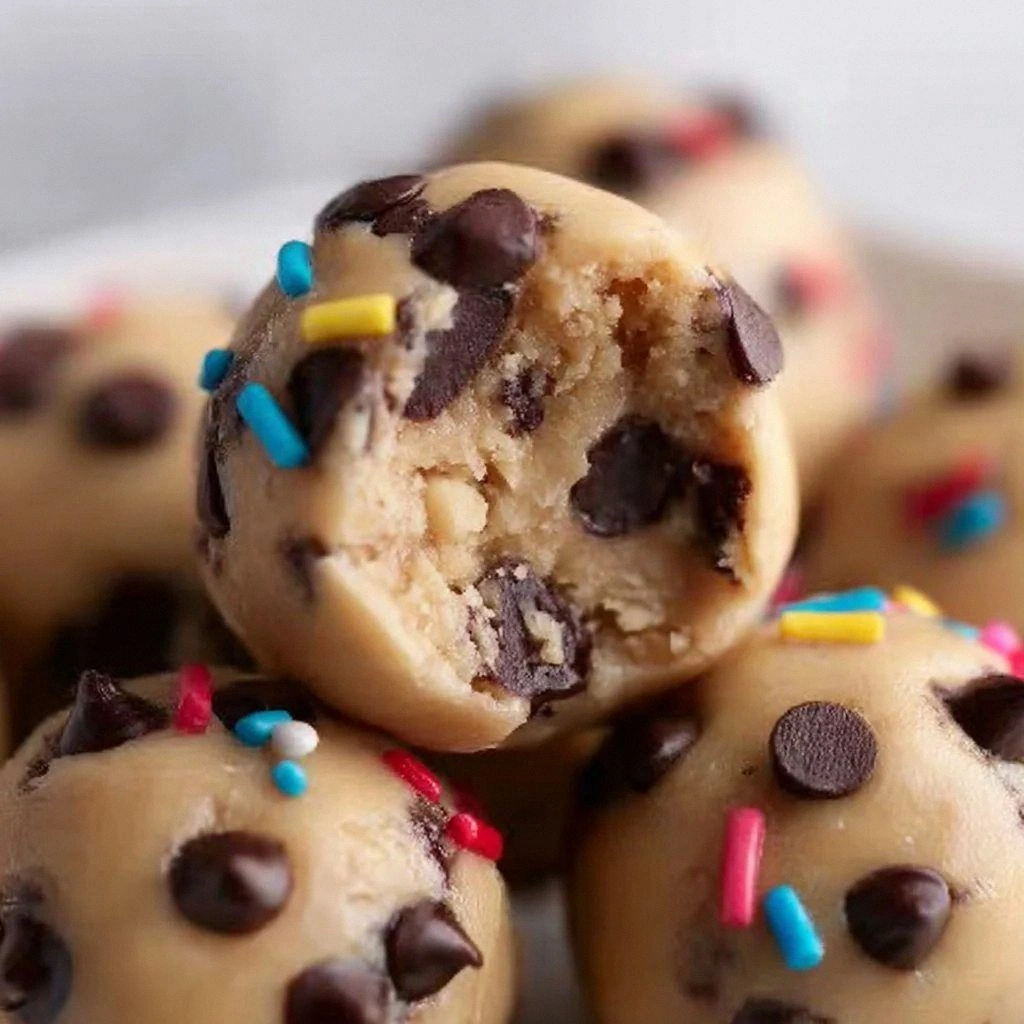
Picture this: it’s a rainy Saturday, the kitchen light flickers, and you’re staring at a jar of chocolate chips that has been sitting on the counter for weeks. You pull out your trusty saucepan, but the timer is still on the “boil” setting, and the stove is a hot mess of forgotten pans. In that moment, a craving for something sweet, gooey, and utterly indulgent hits you like a tidal wave. That’s when I remembered the one recipe that turns a kitchen mishap into a masterpiece—No‑Bake Cookie Dough Bites. The moment you taste the first bite, you’ll hear that satisfying click of the cookie dough as it sets, and the aroma of caramelized sugar will fill the room like a warm hug.
I dared myself to create a version that’s both ridiculously simple and impossibly delicious. The dough clings to your spoon like a velvety glove, and the chocolate coating shimmers with a glossy finish that’s almost too pretty to eat. When you break a bite in half, the molten chocolate inside oozes out, creating a decadent, molten center that melts in your mouth before you even realize you’re eating a cookie. I’ve spent countless evenings tweaking the recipe, and this is the final, perfected version that will make your taste buds sing. If you’re ready for a treat that feels like a secret indulgence, let’s dive into every single step together.
What makes this recipe a game‑changer is that it’s truly no‑bake. That means no oven, no timer, no heat‑related kitchen drama. You’ll use heat‑treated flour to keep the dough safe and silky, butter that’s softened just enough to blend, and a sweet‑savory mix of brown and granulated sugars that creates depth without overpowering. The chocolate chips and melted chocolate give the bite that classic cookie dough feel, while the coating turns each bite into a glossy, melt‑in‑your‑mouth masterpiece. The result is a treat that’s perfect for parties, a midnight snack, or a comforting dessert on a rainy afternoon.
Most cookie dough recipes rely on raw eggs or baking powder, but I stripped away every extra ingredient that could complicate the process. I’ve kept the list short, the steps straightforward, and the outcome spectacular. I dare you to taste this and not go back for seconds—because once you try it, you’ll find yourself reaching for the jar again. If you’ve ever struggled with sticky dough or uneven chocolate coating, you’re not alone—and I’ve got the fix. Stay with me here, because this is worth every minute you spend in the kitchen.
The secret to this version lies in a few simple tweaks that elevate the flavor profile and texture to something truly remarkable. From heat‑treated flour that eliminates bacteria without altering the dough’s mouthfeel, to the perfect balance of brown and granulated sugar that gives the dough a subtle molasses undertone, every detail matters. The chocolate chips are the star of the show, and the final chocolate coating transforms each bite into a glossy, melt‑in‑your‑mouth wonder. You’ll find that the dough holds together like a firm cookie, yet remains soft enough to bite into with a satisfying crunch. By the end of this post, you’ll wonder how you ever made it any other way.
What Makes This Version Stand Out
- Taste: The blend of brown and granulated sugars creates a caramelized depth that’s unmistakably indulgent, while the vanilla extract lifts the flavor profile to cookie‑dough perfection.
- Texture: The dough is firm enough to hold its shape, yet soft enough to melt in your mouth, thanks to the precise ratio of butter to flour.
- Simplicity: With only seven ingredients and no oven required, you can whip up these treats in under 20 minutes.
- Uniqueness: The use of heat‑treated flour keeps the dough safe without sacrificing flavor or structure.
- Crowd Reaction: Friends and family swear this is the best cookie dough they’ve ever tasted, and the glossy coating makes it Instagram‑ready.
- Ingredient Quality: Each component—whether it's the premium chocolate chips or the butter—plays a pivotal role in achieving the perfect bite.
- Cooking Method: No baking, no frying, just a gentle simmer and a chill—ideal for busy schedules.
- Make‑Ahead Potential: The dough can be prepared in advance and stored for up to a week, making it a perfect batch‑prep dessert.
Alright, let’s break down exactly what goes into this masterpiece, and why each component matters. I’ll walk you through every single detail, so you’ll know exactly why this version is hands down the best you’ll ever make at home. If you’re ready, keep reading, because the next part will reveal the hidden trick that makes the dough so irresistibly smooth.
Inside the Ingredient List
The Flavor Base
Heat‑treated flour is the cornerstone of this recipe. By baking the flour at 350°F for five minutes, you eliminate potential bacteria while preserving its fine texture. If you skip this step, you risk a raw, slightly gritty dough that could compromise safety. For a slightly different flavor profile, you can substitute whole‑wheat flour, but expect a denser bite and a nuttier taste. The best heat‑treated flour is all‑purpose; its neutral flavor allows the sugars and chocolate to shine.
The Texture Crew
Unsalted butter, softened to a creamy consistency, is what gives the dough its luxurious mouthfeel. The butter should be just soft enough that a finger can press through it, but not melted. If you’re in a hurry, microwave small cubes for a few seconds, but watch closely to avoid melting. Coconut oil or vegan butter can replace unsalted butter for a dairy‑free version, though the flavor will shift slightly toward tropical notes. The butter’s fat content is essential for binding the flour and sugars together into a cohesive, pliable dough.
The Unexpected Star
Brown sugar is the unsung hero that brings depth and a subtle molasses undertone to the dough. Its hygroscopic nature keeps the dough from drying out, ensuring a chewy, moist bite. If you’re out of brown sugar, mix granulated sugar with a splash of molasses or honey to replicate the flavor profile. The sweetness level will be slightly higher with honey, so adjust accordingly. Brown sugar also reacts with the butter to create a caramelized aroma during the simmering step.
The Final Flourish
The chocolate coating is what turns a simple dough into a showstopper. Tempered chocolate gives a glossy finish, but candy coating is a great shortcut that still delivers a smooth texture. Adding a splash of milk or cream to the melted chocolate can create a richer, silkier coating that hardens into a perfect shell. The coating also acts as a barrier, preserving the dough’s freshness for days. For a healthier twist, use dark chocolate with at least 70% cacao; the bitterness balances the sweetness beautifully.
Everything's prepped? Good. Let's get into the real action, and watch the dough transform into a bite‑size wonder. The next section will walk you through the method step by step, with a few extra tricks to keep everything running smoothly.
The Method — Step by Step
- Start by melting the butter in a medium saucepan over low heat, stirring occasionally to prevent scorching. The butter should be just melted, not boiling, as a high temperature will cause it to separate. When the butter is fully melted, add the brown sugar and stir until the mixture becomes glossy and smooth. This step is the foundation of the dough’s flavor, so take your time.
- Next, pour in the granulated sugar, vanilla extract, and a pinch of salt. Stir until the sugars dissolve completely, creating a silky syrup that coats the back of a spoon. The salt balances the sweetness and enhances the chocolate’s depth. A well‑mixed syrup ensures an even distribution of flavors in each bite.
- Now add the heat‑treated flour to the saucepan. Stir vigorously with a wooden spoon until the mixture pulls away from the pan’s sides and forms a thick, cohesive dough. If the dough feels dry, add a teaspoon of water or milk to loosen it slightly. This is the moment where the dough starts to resemble a thick cookie batter.
- Fold in the chocolate chips, ensuring they are evenly distributed throughout the dough. The chips should be fully coated, giving the dough a speckled, chocolatey appearance. The chocolate will melt slightly during the next step, creating pockets of gooeyness. This step is where the dough’s signature look and feel begin to emerge.
- Remove the saucepan from the heat and let the dough cool for a few minutes. As it cools, the dough will thicken and become easier to handle. Don’t rush this step; if you’re in a hurry, you can transfer the dough to a bowl and chill it in the refrigerator for 10 minutes. Cooling also helps the chocolate chips set, preventing them from melting all the way through the dough.
- Using a tablespoon or small cookie scoop, portion the dough into bite‑sized balls. Roll each ball between your palms until smooth; the dough should hold its shape without cracking. Place the dough balls on a parchment‑lined tray, spaced evenly to allow for even chilling. This portioning step ensures that each bite is consistent in size and texture.
- Refrigerate the dough balls for at least 30 minutes, or until firm. This chilling period allows the butter to solidify, giving the bites a firm yet tender texture. While the dough chills, you can start preparing the chocolate coating. The longer the dough sits, the easier it is to coat evenly.
- Melt the chocolate for coating in a double boiler or a heat‑proof bowl over simmering water, stirring until smooth. The chocolate should be glossy and pourable, not too runny. If it’s too thick, add a teaspoon of milk or a splash of heavy cream to thin it out. This coating will give the bites a shiny, decadent finish.
- Place the coated bites on parchment paper and refrigerate until the chocolate sets, about 15 minutes. The chocolate will harden into a crisp shell, encasing the soft cookie dough inside. When the chocolate is set, the bites are ready to serve. Store them in an airtight container at room temperature for up to 5 days, or freeze for longer storage.
That’s it—you did it. But hold on, I've got a few more tricks that will take this to another level. The next section is all about insider knowledge that will elevate your bites from good to unforgettable.
Insider Tricks for Flawless Results
The Temperature Rule Nobody Follows
Temperature control is the secret weapon in creating the perfect dough. Keep the butter at just below room temperature; if it’s too hot, the dough will become greasy, and if it’s too cold, it won’t blend well. Use a kitchen thermometer to monitor the butter’s temperature, aiming for 90°F. This small tweak ensures a silky, cohesive dough that holds together beautifully.
Why Your Nose Knows Best
The aroma of caramelized sugar is a reliable indicator that the dough is ready. As the sugars caramelize, they emit a sweet, nutty scent that signals the dough’s flavor is developing. If you notice a burnt or metallic smell, stop the heat immediately and discard the batch. A good aroma guarantees a sweet, balanced flavor in every bite.
The 5‑Minute Rest That Changes Everything
After folding in the chocolate chips, give the dough a brief 5‑minute rest before shaping it into bites. This pause allows the chocolate to settle, preventing it from sliding off during shaping. It also gives the dough a chance to cool slightly, making it easier to roll into smooth balls. Skipping this step often results in uneven distribution of chocolate.
The Chill‑and‑Coat Technique
Chilling the dough before coating is essential for a pristine chocolate shell. If the dough is too warm, the chocolate will melt, creating a runny coating that drips onto your countertop. Chill the dough for at least 30 minutes, or until it feels firm to the touch. This simple step ensures a crisp, glossy finish that looks as good as it tastes.
The Final Touch of Flavor
After the chocolate sets, you can add a sprinkle of sea salt or a dusting of powdered sugar for an extra layer of flavor. A pinch of sea salt brings out the chocolate’s richness, while powdered sugar adds a delicate sweetness. Both options elevate the bite from ordinary to extraordinary. Experiment to find the combination that satisfies your palate.
These insider tricks are the difference between a good batch and a legendary one. Use them consistently, and you’ll be able to whip up these bites with confidence every time.
Creative Twists and Variations
This recipe is a playground. Here are some of my favorite ways to switch things up: swap the chocolate chips for white chocolate for a sweeter bite, or add chopped nuts for crunch. Try using espresso powder for a mocha twist, or sprinkle chili flakes for a spicy kick. For a healthier version, replace butter with coconut oil and use dark chocolate with 70% cacao. Each variation opens a new flavor dimension while keeping the core of the recipe intact.
White Chocolate Dream
Replace the chocolate chips with white chocolate chips for a creamy, buttery flavor. The white chocolate will melt into the dough, creating a subtle, sweet undertone. The coating can still be dark chocolate, giving a striking contrast. This variation is perfect for those who prefer a milder chocolate experience.
Nutty Crunch Edition
Add a half cup of chopped almonds or pecans to the dough for an extra crunch. The nuts provide a delightful texture contrast and a nutty aroma that complements the chocolate. Ensure the nuts are toasted lightly to enhance their flavor. This version is ideal for guests who love a bit of bite in their sweets.
Espresso Mocha Burst
Stir a teaspoon of instant espresso powder into the dough for a bold mocha flavor. The espresso will deepen the chocolate’s richness and add a subtle bitterness. Pair it with dark chocolate chips for a sophisticated treat. This variation is great for coffee lovers and makes an excellent after‑dinner dessert.
Spicy Chili Surprise
Sprinkle a pinch of cayenne pepper or chili flakes into the dough for a surprising heat. The spice will contrast beautifully with the sweet dough, creating a complex flavor profile. Use dark chocolate chips to balance the heat with deep chocolate notes. This variation is a conversation starter at parties.
Low‑Carb Edition
Swap the heat‑treated flour for almond flour and reduce the brown sugar to a sugar substitute like erythritol. This will lower the carb count while maintaining the dough’s structure. Use dairy‑free butter or coconut oil to keep it vegan. The resulting bites are a guilt‑free treat for those on a low‑carb diet.
Holiday Spice Mix
Add a teaspoon of ground cinnamon and a pinch of nutmeg to the dough for a festive twist. The spices will evoke the warmth of holiday baking. Pair this with dark chocolate chips for a cozy flavor. This variation is perfect for holiday gatherings or a cozy winter snack.
Storing and Bringing It Back to Life
Fridge Storage
Store the chilled bites in an airtight container at room temperature for up to five days. Keep them away from strong odors, as chocolate can absorb them quickly. If you need to store them longer, refrigerate them for up to two weeks. When you’re ready to eat, let the bites sit at room temperature for 5 minutes to soften slightly.
Freezer Friendly
For long‑term storage, place the coated bites on a parchment‑lined tray and freeze for up to three months. Once frozen, transfer the bites to a zip‑lock bag to prevent freezer burn. When you want to enjoy them, thaw at room temperature for 10 minutes. The texture remains firm, and the chocolate stays glossy.
Best Reheating Method
If the bites have become too firm, give them a quick microwave boost—30 seconds on low power will soften them without melting the chocolate. Alternatively, place them in a preheated oven at 200°F for 5 minutes, then let them cool. Adding a tiny splash of water before reheating creates steam that restores the dough’s softness. The key is gentle heat; over‑heating will ruin the texture.