Picture this: a cramped kitchen, a simmering pot of tomato sauce that smells like it’s been on the stove forever, and you, armed with a handful of shredded chicken, feeling like a culinary daredevil. I was halfway through a weeknight dinner, and the fridge was a barren wasteland of leftovers that had lost all flavor. Then I remembered a midnight craving that had haunted me for weeks—cheesy, saucy, and utterly comforting. I flipped the switch on my stove, and the kitchen filled with the rich scent of melted cheese and toasted tortillas. That moment was the spark that ignited this version of queso chicken enchiladas.
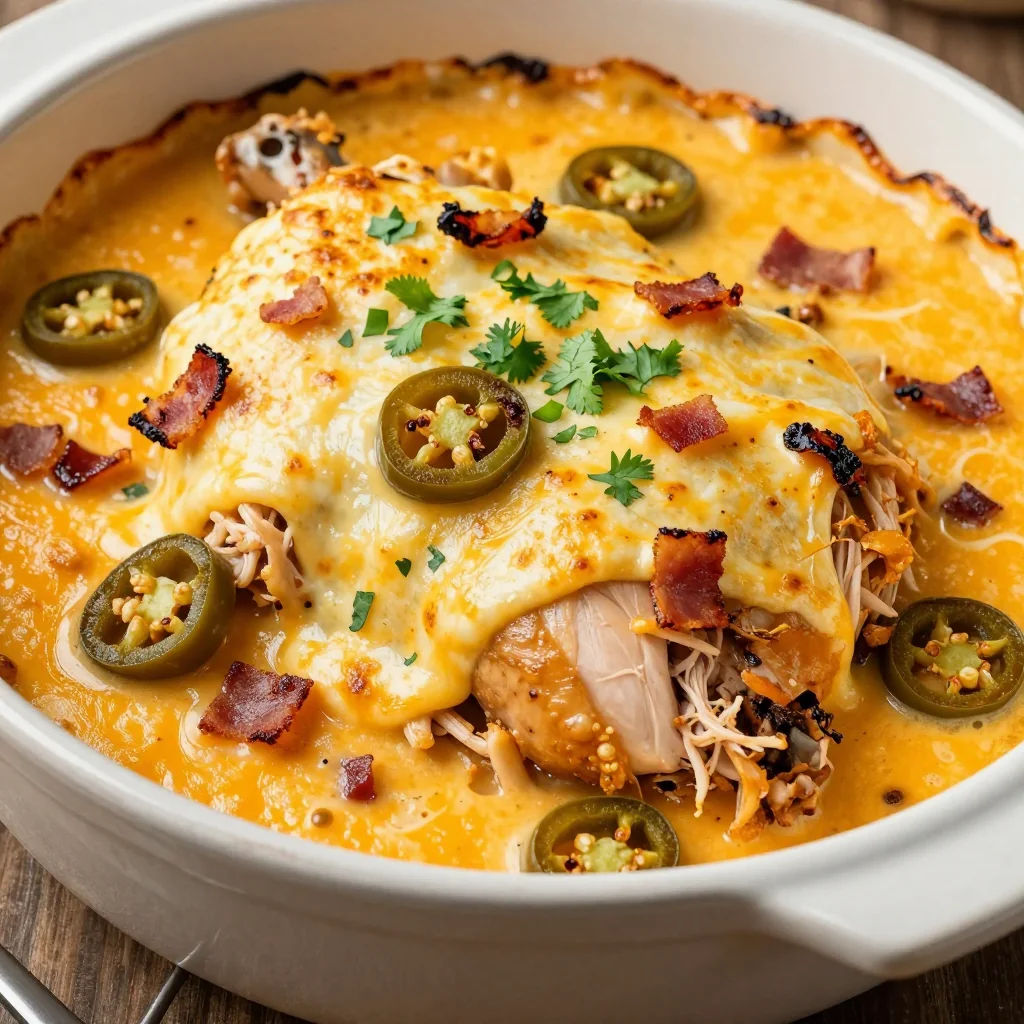
The first thing you notice is the glossy sheen of the sauce, glistening like a midnight lake under a full moon. As you lift a spoon, the aroma of cumin, chili powder, and a whisper of garlic dances in the air, promising warmth. The texture is a perfect balance: the sauce is thick enough to cling to the tortillas yet fluid enough to pour over the filling like a silky blanket. The tortillas themselves are golden, slightly charred on the edges, with a faint crunch that gives way to a tender interior. Every bite delivers a burst of umami, a gentle heat, and the comforting embrace of melted cheese.
I’m not just talking about any enchiladas; this is the kind that makes people gasp, “I dare you to taste this and not go back for seconds.” It’s hands down the best version you’ll ever make at home. The secret? A sauce that coats the chicken like velvet and a cheese blend that melts into a gooey, savory cloud. I’ve spent hours tweaking this recipe, and every tweak has been a revelation—think about the difference between a thin, watery sauce and one that clings to every surface.
If you’ve ever struggled to get the right balance of heat and cheese, you’re not alone—and I’ve got the fix. Picture yourself pulling this out of the oven, the whole kitchen smelling incredible, and the table set for a feast that feels like a hug in a bowl. The first bite is a revelation: the sauce is rich, the chicken tender, and the cheese melts in your mouth with that satisfying stretch. The second bite is the same, but the flavor lingers, making you want to reach for another spoonful. And if you’re thinking this is just another recipe, think again—this is a game-changer.
Let me walk you through every single step—by the end, you’ll wonder how you ever made it any other way. I’ll share the techniques that make this dish shine, the ingredients that elevate it, and the hacks that save you time and keep the flavor intact. Whether you’re a seasoned chef or a kitchen newbie, this recipe will become your new go-to comfort food. So grab your apron, set your timer, and let’s dive into the world of queso chicken enchiladas.
What Makes This Version Stand Out
- Flavor: The sauce is a symphony of cumin, chili powder, and diced green chiles, creating a depth that outshines bland, store-bought versions.
- Cheese Blend: Combining Monterey Jack and sharp cheddar gives a melt that’s creamy yet with a sharp bite, unlike the single-cheese options.
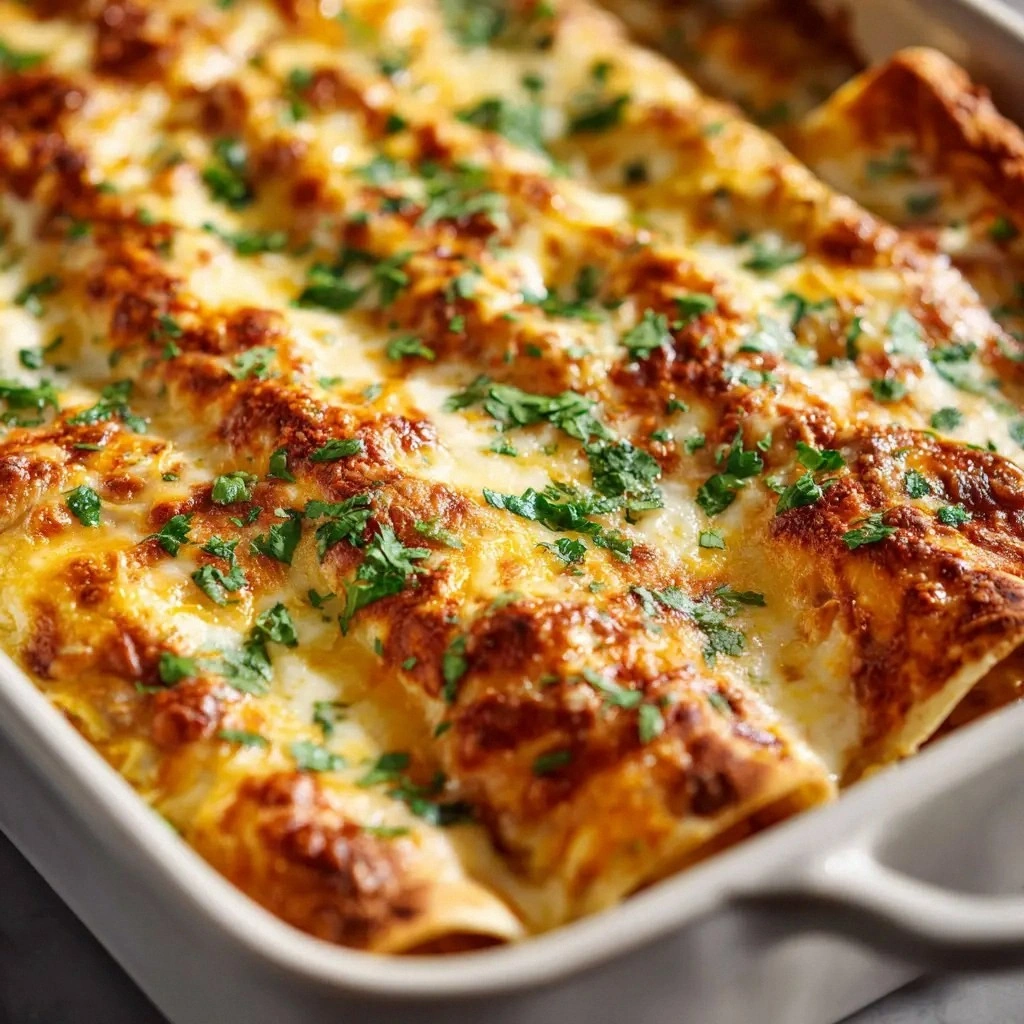
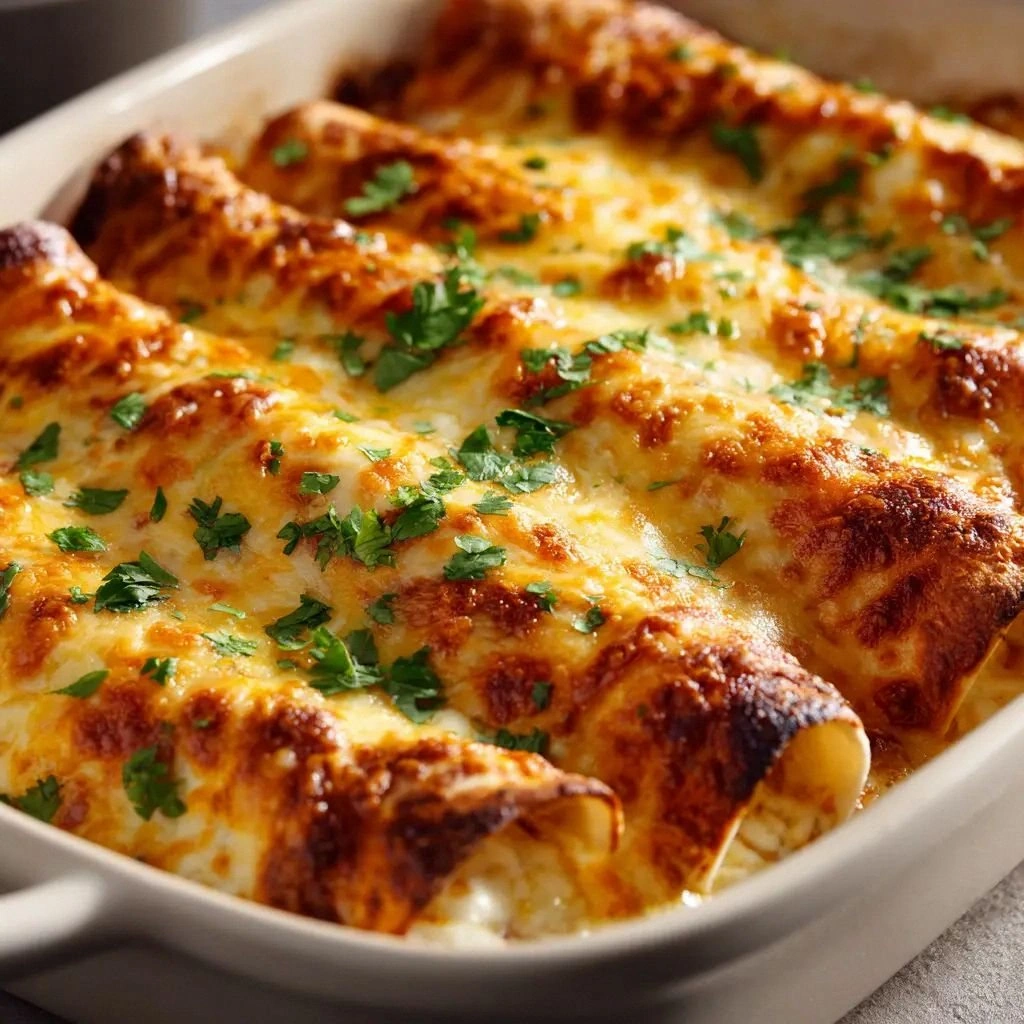
- Texture: The tortillas are lightly toasted, providing a slight crunch that contrasts beautifully with the silky sauce.
- Ease: All the work is done before baking—no last-minute scrambling, making it perfect for busy weeknights.
- Make‑Ahead: You can assemble the enchiladas and refrigerate for up to 24 hours; they bake just as well.
- Versatility: Swap chicken for beef, pork, or beans, and the dish stays delicious.
- Presentation: The golden, bubbling top is visually stunning, making it a crowd‑pleaser at gatherings.
- Nutrition: Balanced macros with a good protein punch, making it a satisfying yet not overly heavy meal.
Alright, let's break down exactly what goes into this masterpiece…
Inside the Ingredient List
The Flavor Base
The sauce begins with diced green chiles, which provide a subtle heat that’s more complex than plain chili powder. Cumin adds an earthy, nutty undertone that grounds the dish, while chili powder contributes a gentle smokiness. If you skip the cumin, the sauce will taste flat and less layered. For a milder version, replace the green chiles with roasted poblano or a pinch of smoked paprika.
The Texture Crew
Butter and flour create a roux that thickens the sauce into a velvety consistency. The roux must be cooked until it turns a light golden hue; a darker roux would introduce a bitter note that clashes with the cheese. Whole milk provides creaminess without the heaviness of heavy cream, keeping the dish light. If you’re lactose intolerant, substitute with oat milk or a dairy‑free alternative, but be aware the sauce may be slightly thinner.
The Unexpected Star
Monterey Jack and sharp cheddar together give the dish a unique melt profile—Monterey Jack melts smoothly, while cheddar adds a sharp finish. The combination prevents the sauce from becoming too one‑dimensional. If you can’t find Monterey Jack, mozzarella or a blend of mozzarella and cheddar will still work, though the flavor profile will shift slightly toward a milder, sweeter cheese. The key is to use cheeses that melt well and have distinct textures.
The Final Flourish
Fresh cilantro not only adds a burst of color but also introduces a bright, herbal note that cuts through the richness. The cilantro should be chopped just before serving to preserve its flavor. If cilantro is not your thing, parsley or a sprinkle of chopped green onions can serve as a suitable substitute. The garnish also gives a visual contrast, making the dish look more appetizing.
Everything's prepped? Good. Let's get into the real action…
The Method — Step by Step
- Step 1: Preheat the Oven – Set your oven to 375°F (190°C). A preheated oven ensures even cooking and a golden top. While the oven warms, gather all ingredients to keep the process smooth. This step might seem trivial, but a correctly heated oven is the foundation of a perfectly baked enchilada.
- Step 2: Toast the Tortillas – Place the flour tortillas on a dry skillet over medium heat for 30 seconds on each side, just until they’re pliable. Lightly brush with olive oil to prevent tearing. The toasted edges will add a subtle crunch that contrasts with the creamy filling. If you’re in a hurry, you can skip the oil and toast directly; just keep an eye on them to avoid burning.
- Step 3: Make the Roux – Melt the butter in a saucepan over medium heat. Stir in the flour, cooking until it forms a pale, slightly golden paste. This is your roux, the thickening agent that turns the sauce into velvet. If you notice a raw flour taste, let the roux cook for an additional 30 seconds.
- Step 4: Build the Sauce – Gradually whisk in the whole milk, stirring constantly until the mixture thickens. Add the diced green chiles, cumin, and chili powder. Let the sauce simmer for 5 minutes, allowing the spices to bloom. The sauce should be thick enough to coat the back of a spoon but still pourable. If it’s too thick, add a splash of milk to reach the desired consistency.
- Step 5: Add the Chicken and Cheeses – Stir in the shredded chicken, Monterey Jack, and sharp cheddar. The heat will melt the cheeses, creating a gooey, cohesive filling. Taste and season with salt; remember that cheese adds saltiness, so adjust accordingly. If the mixture is too dry, sprinkle a little more milk to loosen it.
- Step 6: Assemble the Enchiladas – Spoon a generous amount of the cheesy sauce onto the center of each tortilla. Roll tightly, placing the seam side down in a greased baking dish. The sauce should be visible between the layers, creating a colorful, appetizing look. If you’re making a large batch, keep the rolled enchiladas stacked to prevent them from flattening.
- Step 7: Bake the Enchiladas – Cover the baking dish with foil and bake for 20 minutes. Remove the foil and bake for an additional 10 minutes, or until the top is bubbling and slightly golden. The foil traps moisture, ensuring the enchiladas stay tender. Once out of the oven, let them rest for 5 minutes before serving.
- Step 8: Garnish and Serve – Sprinkle fresh cilantro over the top, adding a bright, herbal contrast. Slice each enchilada in half to reveal the colorful interior. Serve hot, accompanied by a side of guacamole or a simple green salad. The first bite will hit you with a wave of creamy cheese, spiced sauce, and tender chicken—an explosion of comfort.
That's it — you did it. But hold on, I've got a few more tricks that'll take this to another level…
Insider Tricks for Flawless Results
The Temperature Rule Nobody Follows
Many cooks bake enchiladas at 400°F, which can scorch the top before the interior is cooked. Lowering the temperature to 375°F gives the cheese time to melt evenly and the sauce to thicken without burning. I once baked at 400°F and the top was black while the inside was still underdone. The next time, I followed this rule, and the result was a perfectly golden, gooey masterpiece.
Why Your Nose Knows Best
Smell is your best judge of doneness. When the sauce is ready, it should emit a toasty, nutty aroma from the roux and a subtle spice from the chiles. If the smell is faint or raw, give it a few more minutes on the stove. This sensory cue ensures the flavors are fully developed before you add the cheese.
The 5-Minute Rest That Changes Everything
After baking, let the enchiladas rest for exactly 5 minutes. This allows the sauce to set, preventing it from spilling out when you cut. It also lets the heat distribute evenly, so every bite is warm and consistent. I once cut them immediately and the filling oozed out; the rest period saved the day.
Keep the Tortillas Flexible
If you’re rolling the tortillas in a dry environment, they’ll crack. Keep them warm and slightly moist by wrapping them in a clean towel after toasting. This step is small but critical for a smooth roll and a professional appearance.
Add a Splash of Lime Juice
A squeeze of fresh lime juice just before serving brightens the dish and cuts through the richness. The acidity balances the cheese and adds a refreshing zing that lifts the overall flavor. I’ve tried this in every batch, and it’s become a staple.
Use a Baking Dish with a Lid
If you have a covered baking dish, use it to trap steam. The steam keeps the enchiladas moist and prevents the tortillas from drying out. Even a simple plastic wrap can serve the same purpose if you’re careful not to let it touch the cheese.
Creative Twists and Variations
This recipe is a playground. Here are some of my favorite ways to switch things up:
The Veggie Fiesta
Swap the chicken for sautéed bell peppers, zucchini, and corn. The vegetables add crunch and a burst of color. Use the same cheese blend for a vegetarian version that’s just as indulgent. This variation is perfect for a lighter dinner or a family that loves a veggie kick.
The Mexican Street Taco Twist
Add a dollop of guacamole and a sprinkle of chopped tomatoes on top before serving. The guacamole’s creaminess pairs beautifully with the cheese, while the tomatoes add a fresh, juicy bite. This version feels like a street taco in a casserole form.
The Sweet & Spicy Surprise
Incorporate diced pineapple and a dash of chipotle powder. The pineapple brings a subtle sweetness that balances the heat, while chipotle adds a smoky depth. This twist turns the dish into a tropical adventure.
The Breakfast Boost
Use breakfast sausage instead of chicken and sprinkle with shredded cheddar. Serve with a side of scrambled eggs for a hearty brunch. The sausage’s savory flavor complements the cheese, creating a breakfast that’s both filling and flavorful.
The Gluten‑Free Edition
Replace flour tortillas with corn tortillas or a gluten‑free tortilla brand. The corn base adds a subtle sweetness that pairs well with the cheese. This version is safe for those with gluten sensitivities while maintaining the dish’s integrity.
Storing and Bringing It Back to Life
Fridge Storage
Cool the enchiladas to room temperature, then cover tightly with plastic wrap or foil. Store in the refrigerator for up to 2 days. When you’re ready to eat, reheat in the oven at 350°F for 15-20 minutes, or until heated through. The cheese will remain creamy, and the tortillas will stay tender.
Freezer Friendly
Pack the enchiladas in a freezer‑safe container or zip‑lock bag. Freeze for up to 3 months. Thaw overnight in the refrigerator before reheating. For best results, bake at 375°F for 25-30 minutes, or until the top is bubbly. The flavor stays intact, and the texture is just as delightful.
Best Reheating Method
To revive the sauce’s silkiness, add a splash of milk or cream before reheating. Cover with foil to trap steam, and heat gently. The added liquid prevents the sauce from drying out, ensuring each bite is as luscious as the first. A quick microwave step works too, but the oven keeps the tortillas from becoming soggy.