It was a rainy Thursday, and I found myself staring at the pantry like a detective searching for clues. The only thing that seemed to match the mood were the stale Oreo cookies that had been left out for weeks. I imagined a haunted kitchen, a ghostly figure rummaging through the crumbs, and suddenly the idea hit me: what if those cookies could become something spooky and delicious? I reached for a tub of cream cheese, a bag of white chocolate chips, and a jar of black decorating icing, and the kitchen started to feel like a laboratory of confectionery alchemy.
The moment the oven preheats, the air fills with the faint scent of chocolate and a whisper of vanilla from the cream cheese. The sound of the timer ticking is almost hypnotic, and the anticipation is palpable, like a drumbeat before a thunderstorm. When the first bite lands on the tongue, the crunch of the cookie gives way to a silky, rich cream that melts like velvet, and the white chocolate coating adds a sweet, buttery finish. I dare you to taste this and not go back for seconds, because the flavors will linger long after the last crumb is gone.
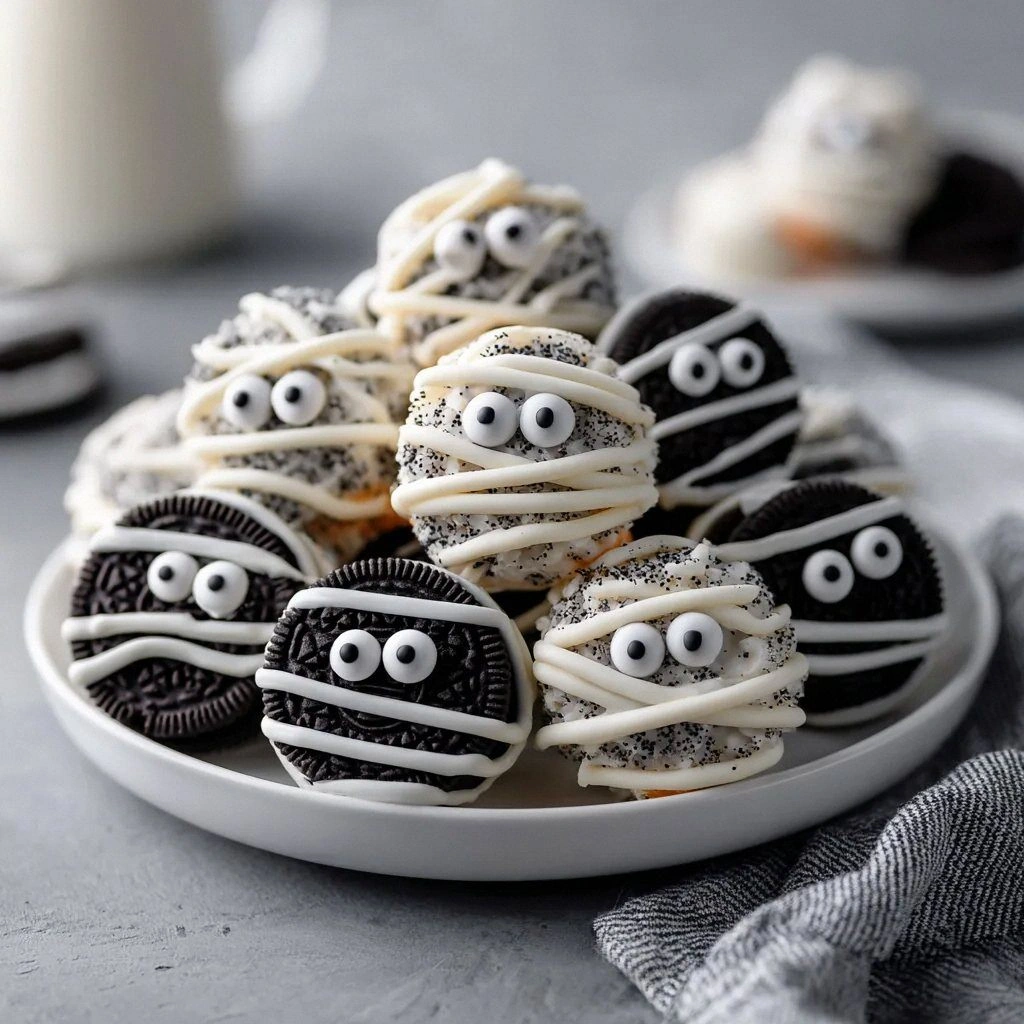
This version is hands down the best you’ll ever make at home because it balances sweetness and texture in a way that feels both nostalgic and fresh. The black icing is not just decorative; it adds a subtle bitterness that cuts through the richness, making each truffle a bite-sized masterpiece. I’ve spent months tweaking ratios, and the final formula feels like a secret handshake between childhood and culinary adventure. The result is a treat that looks like a miniature mummy, but tastes like a decadent chocolate dream.
Picture yourself pulling this out of the fridge, the whole kitchen smelling incredible, and watching the little bandages of icing curl around the edges like a mummy’s bandage. The first bite is a revelation: the crisp cookie, the creamy center, and the glossy white chocolate all harmonize in a single, unforgettable moment. I’ve seen people pause, eyes wide, and then smile as they realize they’ve discovered a new favorite dessert. Stay with me here — this is worth it, because I’ll show you every single step, and by the end, you’ll wonder how you ever made it any other way.
What Makes This Version Stand Out
- Texture: The crushed Oreos create a crunchy base that contrasts perfectly with the smooth, melted cream cheese center, offering a multi-sensory experience in each bite.
- Flavor Balance: The white chocolate coating provides a sweet, buttery finish that balances the slightly salty, chocolatey crunch of the cookies.
- Visual Appeal: The black icing bandages give the truffles a spooky, mummy-like appearance that is both fun and photogenic.
- Ease of Prep: No baking or complex techniques are required; the entire process is under 30 minutes, making it ideal for busy evenings.
- Make‑Ahead Potential: These truffles can be prepared hours in advance and kept in the fridge, making them perfect for parties or last‑minute dessert needs.
- Ingredient Quality: Using high‑quality Oreos and cream cheese ensures a richer flavor profile that can’t be replicated with cheaper substitutes.
- Kid‑Friendly: The recipe is simple enough for children to help with, turning dessert time into a fun family activity.
- Party Appeal: The mummy theme makes them a hit at Halloween or any themed gathering, while the flavor satisfies any sweet tooth.
Alright, let's break down exactly what goes into this masterpiece...
Inside the Ingredient List
The Flavor Base
Oreo cookies are the cornerstone of this recipe. Their chocolatey flavor and crunchy texture set the stage for the creamy center. If you use a different cookie, the flavor profile will shift dramatically; a vanilla wafer, for example, would yield a milder taste. The key is to choose a cookie that has a strong chocolate presence and a crisp bite.
The Texture Crew
Cream cheese acts as the binder and brings a silky, slightly tangy richness that balances the sweetness of the chocolate. Softening the cream cheese at room temperature before mixing prevents lumps and ensures a smooth mixture. Skipping the cream cheese will leave the truffles dry and crumbly, so it’s essential for that luxurious mouthfeel.
The Unexpected Star
White chocolate chips are melted to create a glossy coating that adds a sweet, buttery finish. They also provide a subtle contrast to the dark Oreos, making each bite visually appealing. If you prefer a deeper flavor, you can substitute dark chocolate chips; just be aware the coating will taste more bitter.
The Final Flourish
Black decorating icing is used to create the mummy bandages and spooky eyes. It dries quickly and holds its shape, giving the truffles a professional look. If you don’t have black icing, a mixture of dark cocoa powder and a tiny amount of water can work as a makeshift alternative.
Everything's prepped? Good. Let's get into the real action...
The Method — Step by Step
- Place the Oreo cookies in a food processor and pulse until finely crushed. The goal is a texture that resembles coarse sand, which will hold the cream cheese together. If you don’t have a food processor, a zip‑lock bag and a rolling pin work just as well.
- In a large bowl, combine the softened cream cheese with the crushed Oreos. Mix with a wooden spoon until the mixture is smooth and homogeneous. The mixture should be firm enough to hold its shape when scooped.
- Using a melon baller or a small spoon, scoop out small balls of the Oreo‑cream cheese mixture. Roll each ball between your hands to form a perfect sphere. The size should be about the diameter of a golf ball; this ensures a balanced bite.
- Place the truffles on a parchment‑lined tray and refrigerate for at least 20 minutes. Chilling them helps the coating set and gives the truffles a firm bite.
- Melt the white chocolate chips in a double boiler or in the microwave on low, stirring every 30 seconds. The chocolate should be glossy but not overly hot, to avoid burning the truffles when dipped.
- Dip each chilled truffle into the melted white chocolate, letting the excess drip off. Use a fork to lift and tap gently to remove excess coating. The coating should be smooth and even.
- Allow the chocolate to set for a minute before adding the icing bandages. This prevents the icing from smudging on the still-soft chocolate.
- Using a small pastry bag fitted with a fine tip, pipe the black icing along the top of each truffle to create the mummy bandage effect. Add two small dots for the eyes. If you’re nervous about precision, a toothpick can help guide the icing.
That's it — you did it. But hold on, I've got a few more tricks that'll take this to another level...
Insider Tricks for Flawless Results
The Temperature Rule Nobody Follows
Always let the truffles chill for at least 30 minutes before coating. A cooler surface ensures the chocolate sets quickly and the icing stays crisp. I once tried coating them while they were still warm, and the result was a soggy, melted mess.
Why Your Nose Knows Best
The aroma of melted white chocolate is a good indicator of the right consistency. When it smells buttery and slightly sweet, it’s ready to dip. If it smells too strong, it might be too hot.
The 5-Minute Rest That Changes Everything
After piping the icing, let the truffles rest for exactly five minutes before storing. This brief pause allows the icing to set fully, preventing smudges when you move them.
The Visual Finish
A light dusting of powdered sugar over the final product adds a subtle crunch and a touch of elegance. It also masks any slight imperfections in the icing bandage.
The Secret Ingredient
A splash of vanilla extract in the cream cheese mixture adds depth without overpowering the chocolate. I use just 1/2 teaspoon; it makes the truffles feel more complex.
Creative Twists and Variations
This recipe is a playground. Here are some of my favorite ways to switch things up:
Minty Mummy Delight
Add a few drops of mint extract to the cream cheese mixture. The mint provides a refreshing contrast to the chocolate, making it perfect for summer parties.
Nutty Bandage Edition
Sprinkle chopped toasted almonds or pecans between the Oreo layers before mixing. The crunch adds a new dimension and a nutty aroma.
Cocoa‑Infused Mummy
Replace white chocolate chips with dark chocolate chips for a richer, less sweet coating. The darker hue also gives a more dramatic look.
Spiced Mummy Surprise
Stir a pinch of cinnamon or nutmeg into the cream cheese mixture. The warm spices bring an aromatic depth that pairs well with the chocolate.
Caramel Mummy Twist
Drizzle caramel sauce over the finished truffles for an indulgent glaze. The caramel adds a gooey texture that complements the crispy bandages.
Storing and Bringing It Back to Life
Fridge Storage
Store the truffles in an airtight container in the refrigerator for up to 5 days. Keep them away from strong-smelling foods to preserve the chocolate flavor.
Freezer Friendly
For longer storage, place the truffles in a freezer‑safe bag and freeze for up to 3 months. Thaw slowly in the refrigerator to avoid condensation.
Best Reheating Method
If you need to warm them up, microwave on low for 10‑15 seconds or place in a preheated oven at 300°F for 5 minutes. Add a tiny splash of water before reheating to create steam, which helps restore the creamy texture.