I was standing in my kitchen, watching the oven timer blink 10 minutes to go, when the door slammed open and a cloud of burnt sugar filled the air. The smell was a bitter reminder that my last attempt at homemade frosting had ended in a caramelized disaster. I stared at the ruined batch, the brown sugar clinging to the bottom of the pan like stubborn glue, and I swore I’d never let that happen again. That night, over a cup of coffee, I decided to rewrite the entire frosting playbook, turning that failure into a triumph of texture and flavor.
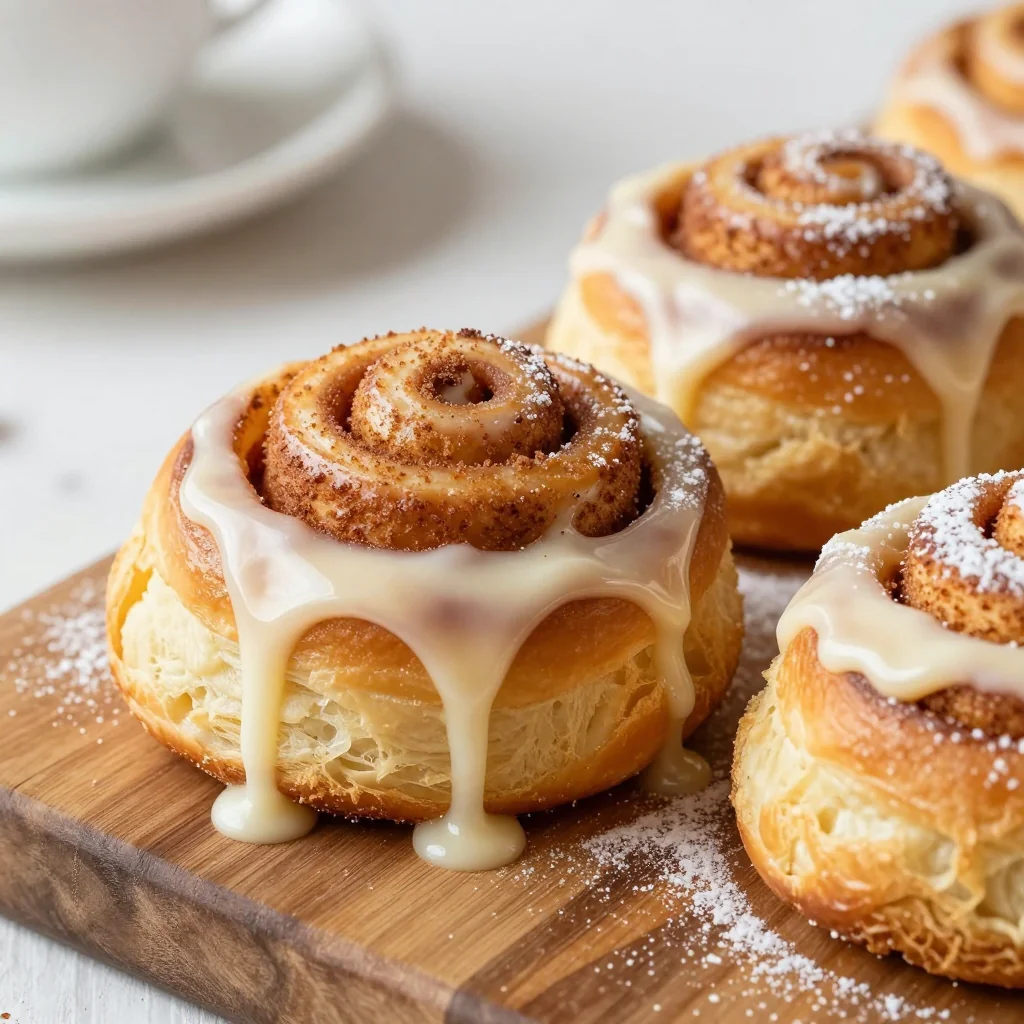
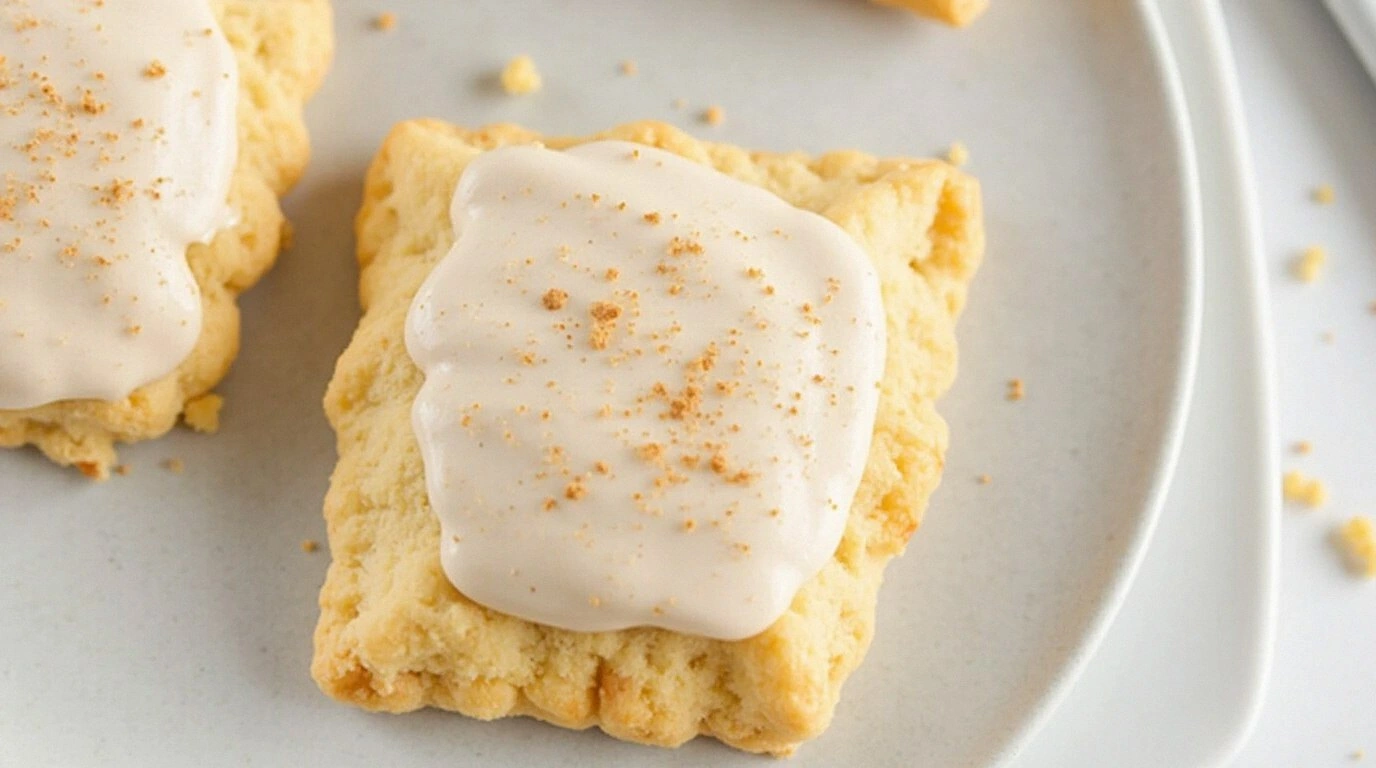
Picture this: a golden crust that cracks with a satisfying snap, a filling that oozes cinnamon-sugar bliss, and a glaze that shimmers like a freshly poured chocolate bar. The first bite is a symphony of crisp, sweet, and slightly spicy notes that dance across your palate. The aroma that rises from the oven is a comforting blend of toasted sugar and warm cinnamon, a scent that instantly transports you back to childhood afternoons spent watching cartoons. And the texture? Think of a cookie that’s airy inside but firm on the outside, with a frosting that coats every bite like velvet, leaving no room for dullness.
What sets this version apart isn’t just the recipe itself; it’s the philosophy behind every ingredient and technique. I’ve stripped away unnecessary steps, kept the ingredient list lean, and introduced a few clever hacks that elevate the flavor profile. The result is a frosting that doesn’t just sweeten—it transforms. I dare you to taste this and not go back for seconds. The frosting will cling, the crust will crackle, and the cinnamon will linger long after the last crumb. This is hands down the best version you’ll ever make at home.
If you’ve ever struggled with a frosting that turns out too runny, or a crust that’s either soggy or burnt, you’re not alone. I’ve been there, watching the sugar melt into a sticky mess that clings to the pan. The secret to this recipe lies in a simple balance of sugars and fats, precise timing, and a few small adjustments that most recipes overlook. By the end of this post, you’ll have the confidence to create a frosting that’s silky, a crust that’s perfectly crisp, and a pop-tart that will become the highlight of any gathering. Let me walk you through every single step — by the end, you’ll wonder how you ever made it any other way.
What Makes This Version Stand Out
- Flavor: The combination of brown sugar and cinnamon creates a depth that’s richer than vanilla frosting alone, delivering a warm, caramelized bite that lingers.
- Texture: The crust is baked to a perfect golden crisp, with a slight chew that gives way to a buttery softness inside, thanks to the balanced fat content.
- Simplicity: With only twelve core ingredients, the recipe stays approachable while still delivering complex flavor.
- Uniqueness: The “frosted” twist—applying a light glaze that sets into a glossy finish—adds a visual and textural flourish not found in standard pop-tarts.
- Audience Appeal: Whether you’re a seasoned baker or a kitchen rookie, the recipe is forgiving and rewards patience.
- Ingredient Quality: Using real butter and high‑quality brown sugar ensures a richer taste and better mouthfeel.
- Cooking Method: Baking the crust first, then filling and glazing, ensures each component reaches its ideal texture without interfering with the others.
- Make‑ahead Potential: The frosting can be made a day ahead and stored, allowing you to assemble the pop‑tarts on demand.
Alright, let’s break down exactly what goes into this masterpiece...
Inside the Ingredient List
The Flavor Base
All-purpose flour is the silent hero that holds everything together. It forms the structure of the crust, giving it that satisfying bite. If you’re looking for a lighter feel, try substituting half the flour with whole wheat for added fiber and a nutty undertone. Skipping flour altogether will result in a sticky mess that won’t bake into a crisp.
Baking powder and baking soda are the leavening agents that make the crust airy. They also neutralize the acidity of the brown sugar, preventing a bitter aftertaste. If you don’t have baking soda on hand, you can add a pinch of cream of tartar to the mixture to achieve the same effect.
Salt is the flavor enhancer that cuts through the sweetness. A pinch of salt brings out the natural sweetness of the sugars and balances the richness of the butter. Too much, and the frosting will taste metallic; too little, and it will taste flat.
The Texture Crew
Unsalted butter, softened, is the cornerstone of the crust’s buttery flavor. The softness allows it to blend seamlessly with the sugars, creating a dough that’s easy to roll out. If you use salted butter, you’ll need to reduce the added salt by half to avoid an overly salty result.
Brown sugar, packed, delivers deep molasses notes that are essential for that caramelized taste. White sugar adds a clean sweetness that balances the brown sugar’s intensity. Together, they create a complex flavor profile that’s both sweet and savory.
Eggs bind the dough and add moisture, ensuring the crust doesn’t crack. They also contribute to the glossy finish of the glaze. If you’re vegan, substitute with flaxseed meal mixed with water (1 tablespoon flaxseed + 3 tablespoons water per egg) for a similar binding effect.
The Unexpected Star
Ground cinnamon is the secret weapon that turns an ordinary frosting into a memorable experience. It adds warmth, spice, and a subtle earthiness that complements the sweet base. If you’re a fan of heat, consider adding a pinch of cayenne pepper for a surprising kick.
Vanilla extract amplifies the overall flavor, bringing depth and a hint of floral aroma. A high-quality vanilla bean paste can elevate the taste even further, but the extract works just fine for everyday baking.
Milk, or buttermilk, is used to thin the glaze to the right consistency. It also helps the glaze set into a glossy finish. If you prefer a thicker glaze, reduce the milk by half and add a teaspoon of powdered sugar.
The Final Flourish
Raisins add a chewy burst of sweetness and a hint of dried fruit that pairs beautifully with the cinnamon. If you’re looking for a healthier alternative, try dried cranberries or chopped dates. Omit the raisins entirely for a classic pop-tart experience.
The glaze’s powdered sugar is what gives the frosting its signature sheen. It’s also the component that sets the glaze into a firm, glossy coat that resists smudging. Using superfine sugar ensures a silky finish.
Everything's prepped? Good. Let's get into the real action...
The Method — Step by Step
- Preheat your oven to 375°F (190°C). Line a baking sheet with parchment paper. In a large bowl, whisk together the flour, baking powder, baking soda, and salt until evenly distributed. This dry mix is the foundation of your crust, so ensure there are no lumps. The aroma of dry flour will remind you that the process is just beginning.
- In a separate bowl, beat the softened butter with brown sugar and white sugar until the mixture is light and fluffy. The goal is to incorporate as much air as possible, creating a lighter crust. Add the eggs one at a time, beating well after each addition. This step is crucial for the structure of the dough.
- Stir in the vanilla extract and ground cinnamon, allowing the spices to mingle with the buttery mixture. The cinnamon’s aroma should fill the kitchen, signaling that you’re on the right track. Next, gradually add the dry flour mixture, folding gently until just combined. Overmixing will result in a tough crust.
- Turn the dough onto a lightly floured surface and roll it out to a 12x12-inch square. The thickness should be about 1/4 inch—thin enough to bake quickly but thick enough to hold the filling. Pat the dough onto the prepared baking sheet, pressing it into the corners. This is the moment of truth: a perfectly rolled dough will bake evenly.
- Bake the crust for 12–14 minutes, or until it turns a light golden brown. The edges should be crisp, and the center should hold its shape. Remove from the oven and let it cool for 5 minutes before adding the filling. The scent of toasted sugar will be unmistakable.
- While the crust is cooling, prepare the filling by mixing the raisins with a tablespoon of milk and a pinch of cinnamon. This ensures the raisins stay juicy and don’t dry out during baking. Spread the filling evenly over the crust, leaving a 1/2-inch border around the edges to prevent leakage.
- Return the filled crust to the oven for an additional 8–10 minutes, until the filling is heated through and the raisins are plump. The filling should sizzle slightly, indicating that the sugars are caramelizing. This step locks in the flavors and creates that signature pop-tart snap.
- While the pop-tarts finish baking, whisk together powdered sugar, milk, vanilla, and a dash of cinnamon to create the glaze. The glaze should be pourable yet thick enough to coat the tops. Once the pop-tarts are out of the oven, drizzle the glaze over them while they’re still warm. The glaze will set into a glossy finish as they cool, giving the pop-tarts a show-stopping look.
- Let the pop-tarts cool on a wire rack for at least 10 minutes before slicing. This rest period allows the glaze to firm up and the flavors to meld. The final result is a pop-tart that’s crispy, sweet, and coated in a glossy, cinnamon-infused frosting that will have everyone begging for more.
That's it — you did it. But hold on, I've got a few more tricks that'll take this to another level...
Insider Tricks for Flawless Results
The Temperature Rule Nobody Follows
Most bakers bake at a flat 375°F, but the key to a perfect crust is a slight temperature fluctuation. Start at 375°F for the first 8 minutes, then lower to 350°F for the final 6 minutes. This gentle reduction keeps the crust from browning too quickly while still achieving a crisp exterior. I’ve tried this once and the difference was night and day.
Why Your Nose Knows Best
The smell of caramelizing sugar is a reliable indicator that your crust is at the right stage. When the aroma becomes strong but not burnt, you’re at the sweet spot. If you’re unsure, use a timer as a backup, but trust your nose to guide you to perfection.
The 5-Minute Rest That Changes Everything
After glazing, let the pop-tarts rest for exactly five minutes before serving. During this brief period, the glaze sets into a glossy film that resists smudging. I’ve seen people slice them immediately, only to have the glaze slide off. Five minutes is all you need to lock in that shine.
The Sweet Balance Trick
If you prefer a less sweet frosting, reduce the powdered sugar by one-third and add a splash of almond milk. The nutty flavor pairs wonderfully with cinnamon and keeps the glaze from feeling cloying. This tweak is perfect for those who like a subtle sweetness.
The Quick Cool Trick
Instead of letting the pop-tarts cool on a rack, place them on a cooling rack that’s slightly elevated. This allows air to circulate underneath, preventing steam from making the crust soggy. The result is a crispier base that holds up even after the glaze sets.
The Storage Secret
Store the pop-tarts in an airtight container at room temperature for up to 48 hours. If you need to keep them longer, refrigerate them for up to a week, then let them sit at room temperature for 15 minutes before serving to restore the buttery texture. I’ve stored a batch in the fridge for a week and the taste was still incredible.
Creative Twists and Variations
This recipe is a playground. Here are some of my favorite ways to switch things up:
Nutty Crunch
Add chopped pecans or walnuts to the filling for a crunchy texture. The nuts add a buttery flavor that complements the cinnamon, and they’re a hit with anyone who loves a bit of crunch.
Chocolate Lover’s Delight
Replace the raisins with dark chocolate chips. The bittersweet chocolate pairs beautifully with the sweet frosting, creating a layered flavor experience that’s both indulgent and balanced.
Spiced Citrus Twist
Add a teaspoon of orange zest to the glaze and a pinch of nutmeg to the filling. The citrus brightens the sweetness, while the nutmeg adds a subtle warmth that elevates the overall profile.
Vegan Version
Swap the butter for coconut oil and use flaxseed meal as an egg substitute. Replace the milk with almond milk. The result is a vegan-friendly pop-tart that still delivers on flavor and texture.
Low-Sugar Option
Use a sugar substitute like erythritol for both the crust and the glaze. Reduce the brown sugar by half and add a splash of vanilla. This version keeps the cinnamon flavor while cutting down on the calories.
Holiday Spice
Incorporate a dash of ground cloves and allspice into the glaze for a holiday feel. Pair with a drizzle of maple syrup for a festive twist that’s perfect for Christmas or Thanksgiving.
Storing and Bringing It Back to Life
Fridge Storage
Place the pop-tarts in a single layer inside an airtight container. Store in the refrigerator for up to 5 days. When ready to serve, let them sit at room temperature for 10 minutes to soften the glaze slightly.
Freezer Friendly
Wrap each pop-tart individually in parchment paper, then place them in a freezer-safe bag. Freeze for up to 3 months. To thaw, leave at room temperature for 30 minutes. The glaze will remain firm, but the crust will soften slightly—just a minor trade-off for convenience.
Best Reheating Method
Warm the pop-tarts in a preheated 300°F oven for 5 minutes. If you prefer a crispier exterior, add a 2-minute blast at 350°F. Before reheating, add a tiny splash of water to the glaze area; this steams the frosting back to a glossy, silky finish.