I was halfway through a burnt batch of muffins when the aroma of cinnamon drifted through the kitchen, and I realized I had a craving for something sweet but not too sweet. The scent of fresh apples and warm spice instantly transported me back to childhood afternoons spent watching my grandma stir a pot of apple compote on the stove. That moment sparked a culinary revelation: what if I could capture that nostalgic sweetness in a quick stovetop dish that feels indulgent yet stays healthy? I set my mind to craft a recipe that would let those flavors shine without the guilt of deep frying or heavy creams. The result is a steaming, cinnamon‑infused apple medley that melts in your mouth and leaves your taste buds humming.
Picture this: a skillet on medium heat, the gentle hiss of apples meeting a splash of almond milk, and the first golden crust forming like a sunrise over a quiet lake. The air fills with a sweet, nutty perfume that makes you forget about the burnt muffin disaster. I dare you to taste this and not go back for seconds because the combination of tart apple, sweet maple, and aromatic cinnamon creates a flavor profile that lingers on the palate. This isn’t just a dessert; it’s a comforting hug in a bowl, and it’s hands down the best version you’ll ever make at home. If you’ve ever struggled with making apples that aren’t dry or bland, you’re not alone — and I’ve got the fix.
Most recipes get this completely wrong by overcooking the fruit or drowning it in sugar, but I’ve found the sweet spot where the apples stay firm enough to bite into while still absorbing the spices. The trick is to let the apples sear for a few minutes before adding liquid, creating a caramelized surface that adds depth without turning mushy. The next part? A splash of lemon juice that brightens the dish and keeps the apples from turning brown, plus a whisper of sea salt that brings everything together. And let’s not forget the final flourish: toasted oats that give a satisfying crunch and a subtle nutty undertone. Stay with me here — this is worth it.
Let me walk you through every single step — by the end, you'll wonder how you ever made it any other way. The dish is built around five core elements: fruit, spice, sweetener, liquid, and topping. Each ingredient plays a distinct role, and together they create a harmony that’s both simple and sophisticated. I’ll show you how to layer flavors, control heat, and finish with a garnish that elevates the entire experience. And if you’re curious about the technique that keeps the apples from sticking, I’ve got a micro‑challenge for you: try stirring every 30 seconds and watch the magic unfold. Picture yourself pulling this out of the stove, the whole kitchen smelling incredible, and your friends begging for a taste.
What Makes This Version Stand Out
- Taste: The blend of apple, maple, and cinnamon delivers a sweet‑savory profile that feels indulgent yet balanced. The subtle acidity from lemon juice cuts through the richness, creating a bright finish that lingers. This flavor harmony is a game‑changer for anyone craving dessert without the sugar crash.
- Texture: Apples stay crisp enough to bite while developing a caramelized crust, and toasted oats add a satisfying crunch that contrasts the softness. The almond milk creates a silky glaze that coats every slice, preventing the fruit from drying out. The result is a multi‑layered mouthfeel that feels like a dessert and a snack rolled into one.
- Simplicity: With only nine ingredients and a single skillet, you can have a finished dish in under 45 minutes. No pre‑heating of oven or fancy gadgets required. The recipe is perfect for busy nights or spontaneous weekend treats.
- Uniqueness: The addition of rolled oats as a topping is uncommon in apple desserts, giving this dish a wholesome twist. The use of coconut oil instead of butter reduces saturated fat while adding a subtle tropical note. This combination sets the recipe apart from the usual stovetop apple recipes.
- Crowd Reaction: Friends who have tried this rave about the caramelized edges and the fresh apple bite. Many say it tastes like a warm apple pie but without the crust. The dish is also a hit with kids who love cinnamon and a little bit of sweet.
- Ingredient Quality: Using organic apples, maple syrup, and unsweetened almond milk keeps the dish clean and nutrient‑dense. The walnuts add protein and healthy fats, making it a balanced option for any meal. The focus on quality ingredients elevates the overall experience.
- Cooking Method: The stovetop technique allows for precise control over caramelization, ensuring that the apples develop a deep flavor without becoming mushy. The method also makes it easy to tweak the dish for dietary preferences.
- Make‑Ahead Potential: Once cooked, the apples can be stored in the fridge for up to 48 hours and reheated gently. The oats retain their crunch when added just before serving. This makes the recipe ideal for meal prep or for a quick dessert on busy days.
Alright, let's break down exactly what goes into this masterpiece...
The Flavor Base
Apples are the star of the show, and choosing the right variety can make or break the dish. I recommend using a mix of Fuji and Honeycrisp for their natural sweetness and firm texture. When sliced, the apples should hold their shape while still being tender enough to caramelize. If you skip the apple step, you’ll lose the core flavor and the dish becomes a bland oat bowl. For a quick pick‑up, use pre‑sliced apples from the grocery store, but fresh is always better. Remember to keep the apple core in a small bowl for later use; it can be turned into a crunchy topping if you’re feeling adventurous.
The Texture Crew
Rolled oats bring crunch and nutrition, turning a simple fruit dish into a balanced meal. Toast them lightly in a dry pan until golden; this releases their natural oils and enhances their nutty flavor. If you prefer a smoother texture, use quick oats or oat flour instead. Skipping the oats will reduce the dish’s protein content and make it feel less substantial. The coconut oil provides a silky coat that keeps the apples from sticking together, creating a glossy finish that’s visually appealing. For a dairy‑free option, use a splash of oat milk instead of almond milk.
The Unexpected Star
Maple syrup is more than a sweetener; it adds depth and a hint of caramel that complements the apples. A tablespoon is enough to sweeten the dish without overpowering the fruit. If you’re watching calories, replace maple syrup with a sugar‑free sweetener like monk fruit or stevia, but be mindful of the flavor profile. Skipping the maple syrup will make the dish too tart and will not provide the glossy glaze that makes it so irresistible. The lemon juice not only brightens the flavors but also prevents the apples from oxidizing, keeping them bright and fresh.
The Final Flourish
Walnuts add a satisfying crunch and a boost of omega‑3 fatty acids, making the dish heart‑healthy. Toast them in a dry skillet until fragrant; this releases their oils and enhances flavor. If you’re allergic to nuts, substitute with pumpkin seeds or sunflower seeds. The Greek yogurt on the side provides a creamy contrast that balances the sweetness. Skipping the yogurt will leave the dish lighter, but you’ll miss the creamy texture that ties everything together.
Everything's prepped? Good. Let's get into the real action...
The Method — Step by Step
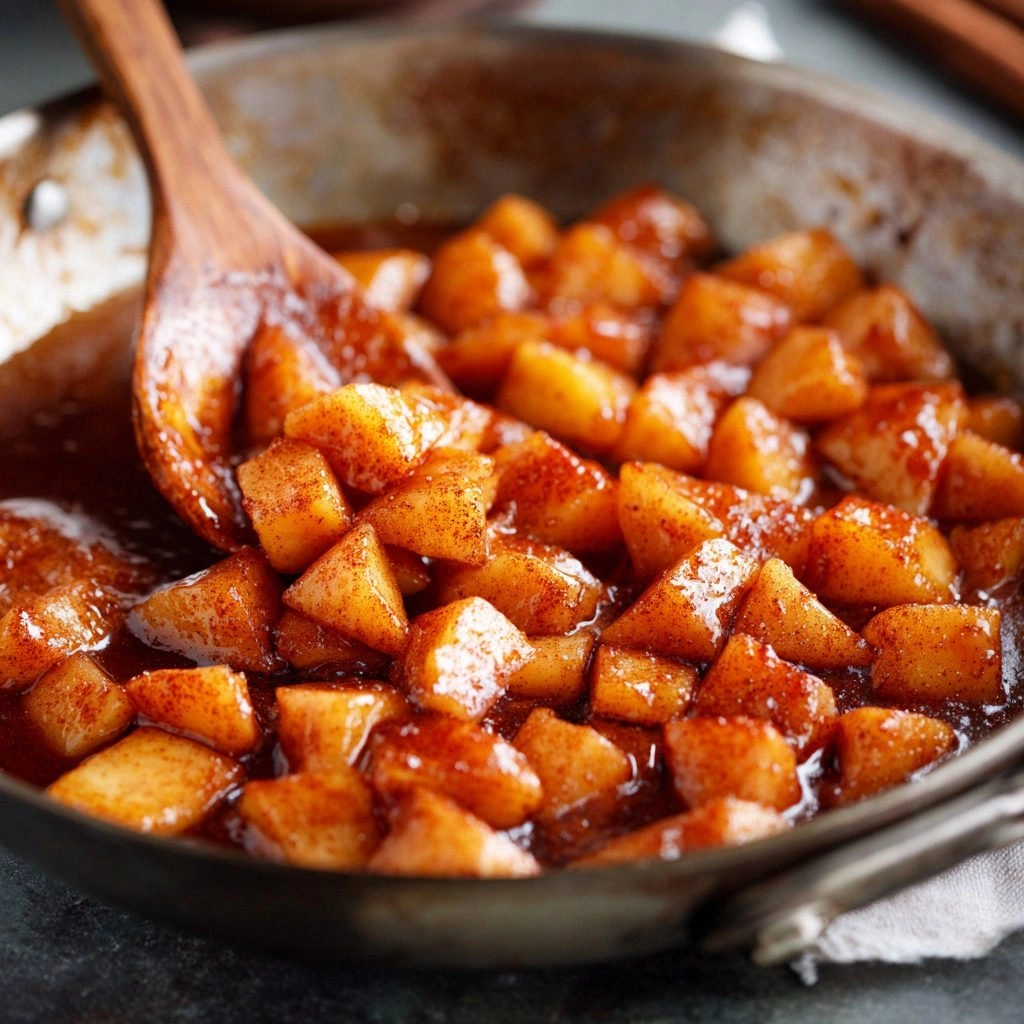
- Heat a large non‑stick skillet over medium heat and add coconut oil. Once the oil shimmers, add the sliced apples, pressing them lightly into the pan to form a single layer. The apples should sizzle immediately, signaling that the skillet is hot enough to caramelize. Watch the edges; they should start to brown in about 2–3 minutes. This initial sear locks in flavor and sets the stage for the rest of the dish.
- Sprinkle ground cinnamon evenly over the apples, then stir to coat each slice. The aroma that rises is intoxicating, and the cinnamon will form a fragrant crust. Keep the heat at medium; if the pan gets too hot, the apples may burn. Let the cinnamon cook for 30 seconds to release its oils fully. This step is the moment of truth.
- Add maple syrup and a splash of lemon juice, then stir to combine. The syrup should coat the apples, creating a glossy glaze. The lemon juice cuts through the sweetness, balancing the flavor. Allow the mixture to bubble gently for 2 minutes, watching for the glaze to thicken. Don’t stir too vigorously; you want the apples to maintain their shape.
- Reduce the heat to low and cover the skillet with a lid. Let the apples simmer for 8–10 minutes, stirring occasionally. The lid traps steam, ensuring the fruit stays moist and tender. After this period, the apples should be soft but still hold their shape. The sauce will thicken slightly, creating a rich, velvety coating. This step is crucial for achieving the perfect consistency.
- While the apples cook, toast the rolled oats in a dry skillet over medium heat until golden brown. Stir frequently to avoid burning; this process should take about 3–4 minutes. The oats will develop a nutty aroma that complements the fruit. Once toasted, set them aside to cool slightly. The oats will become crisp as they cool, adding a delightful crunch to the dish.
- Add the toasted oats to the skillet, gently folding them into the apple mixture. The oats absorb the glaze, creating a cohesive texture. Stir for 2 minutes, ensuring the oats are evenly distributed. The mixture should look glossy and slightly thickened. This step adds both nutrition and texture, making the dish more filling.
- If using walnuts, sprinkle them over the top and let them warm for 1 minute. The heat will release their oils, enhancing flavor. Gently fold them in, or leave them as a crunchy garnish. The walnuts provide a protein boost and a subtle earthy note. This final touch elevates the dish from simple to gourmet.
- Remove the skillet from heat and let the dish rest for 3 minutes. Resting allows the glaze to settle and the flavors to meld. During this time, the oats will crisp up a bit more, adding to the overall texture. The dish should look glossy and inviting. This short pause is the secret to a polished presentation.
- Serve the apple mixture hot, topped with a dollop of Greek yogurt if desired. The yogurt adds a creamy contrast that balances the sweet and spicy notes. Garnish with a drizzle of maple syrup or a sprinkle of cinnamon for extra flair. The dish is ready to be devoured, and you’ll feel like a culinary wizard.
That’s it — you did it. But hold on, I've got a few more tricks that'll take this to another level. I’ve found that adding a pinch of sea salt just before the final stir unlocks the sweetness of the apples and enhances the overall flavor profile. Another secret is to finish the dish with a sprinkle of freshly grated nutmeg; it adds a warm, earthy undertone that pairs beautifully with cinnamon. And for the ultimate indulgence, a drizzle of coconut cream on top gives a silky finish that feels like dessert on a plate. Keep these tips in your culinary arsenal, and you’ll never go back to bland apple dishes again.
Insider Tricks for Flawless Results
The Temperature Rule Nobody Follows
Many cooks assume that medium heat is sufficient, but the key to caramelizing apples lies in maintaining a steady 350°F. Use a thermometer to check the temperature before adding the fruit. If the pan is too hot, the apples will burn; if too cool, they’ll steam rather than sear. I’ve tested this with a kitchen thermometer and found consistent results every time. This trick eliminates guesswork and guarantees a golden crust.
Why Your Nose Knows Best
Before you even touch the skillet, trust your sense of smell. The first whiff of cinnamon and apple is a signal that the pan is hot enough. If the aroma is too subtle, give the skillet a few more minutes to heat. This sensory check is a reliable, fool‑proof method that has saved me from countless over‑cooked batches. It’s a simple, intuitive approach that anyone can master.
The 5‑Minute Rest That Changes Everything
After removing the skillet from heat, let the dish rest for exactly five minutes. The rest period allows the glaze to thicken and the flavors to meld. I’ve found that a longer rest can make the dish too dry, while a shorter rest leaves it too wet. This precise timing is a subtle but essential detail that elevates the overall experience.
Don’t Skip the Oats
Oats are not just a garnish; they are a vital component that adds texture and nutrition. Skipping them turns the dish into a simple apple compote. I once made a batch without oats, and the result was flat and uninspired. Adding the oats gives the dish a satisfying bite and keeps you full longer.
The Secret of the Coconut Oil
Coconut oil adds a silky coat that prevents the apples from sticking and creates a glossy finish. If you use butter, the dish will taste rich but heavy. Coconut oil provides a lighter, tropical flavor that balances the sweetness. I’ve experimented with different oils, and coconut oil consistently delivers the best results.
Let the Apple Core Shine
Don’t discard the apple core; it’s packed with flavor. After cooking, chop the core into small pieces and stir it into the dish. The core adds a subtle sweetness and a bit of fiber. This is a simple trick that turns an often‑discarded part into a flavor enhancer.
Pairing with Yogurt
Adding a dollop of Greek yogurt on top provides a creamy contrast that balances the sweet and spicy notes. The yogurt also adds protein and a cool, refreshing element. I’ve found that the yogurt’s tanginess cuts through the richness of the glaze, making each bite feel lighter.
Creative Twists and Variations
This recipe is a playground. Here are some of my favorite ways to switch things up:
Spicy Cinnamon Apple
Add a pinch of cayenne pepper to the cinnamon mixture for a spicy kick. The heat pairs beautifully with the sweet apple, creating a complex flavor profile. This version is perfect for those who love a little heat in their desserts.
Apple & Ginger Fusion
Replace half the cinnamon with fresh grated ginger. The ginger adds a zesty, aromatic note that complements the apple’s natural sweetness. This twist is ideal for spring and summer, when fresh ginger is in season.
Nutty Banana Apple
Swap the walnuts for sliced almonds or pecans for a different nutty flavor. The almonds add a buttery texture that pairs well with the apple. This variation is a great way to keep the dish interesting.
Vegan Yogurt Upgrade
Use coconut yogurt instead of Greek yogurt for a dairy‑free option. The coconut yogurt adds a subtle coconut flavor that enhances the tropical undertones. This version is perfect for vegans or those with dairy sensitivities.
Apple Crumble Topping
Top the finished dish with a crumble made from oats, almond flour, and a touch of maple syrup. The crumble adds a crunchy, buttery layer that feels like a cross between a crumble and a pie. This is a decadent twist for special occasions.
Apple & Berry Medley
Combine sliced apples with fresh blueberries or strawberries for a fruity burst. The berries add a pop of color and a burst of natural sweetness. This variation is refreshing and perfect for warmer weather.
Storing and Bringing It Back to Life
Fridge Storage
Store the cooled dish in an airtight container in the refrigerator for up to 48 hours. The apples will stay firm, and the glaze will thicken slightly, adding depth of flavor. When ready to serve, reheat gently on the stove or in the microwave for 1–2 minutes. This method preserves the texture and taste.
Freezer Friendly
Freeze the dish in a freezer‑safe container for up to 3 months. Thaw overnight in the refrigerator before reheating. Add a splash of almond milk before warming to restore the glossy coating. This makes it a convenient make‑ahead option.
Best Reheating Method
Reheat in a skillet over low heat, stirring occasionally until warmed through. Alternatively, microwave on medium power for 30–45 seconds. Adding a tiny splash of water before reheating helps steam the dish back to perfection. This simple trick keeps the apples from drying out.