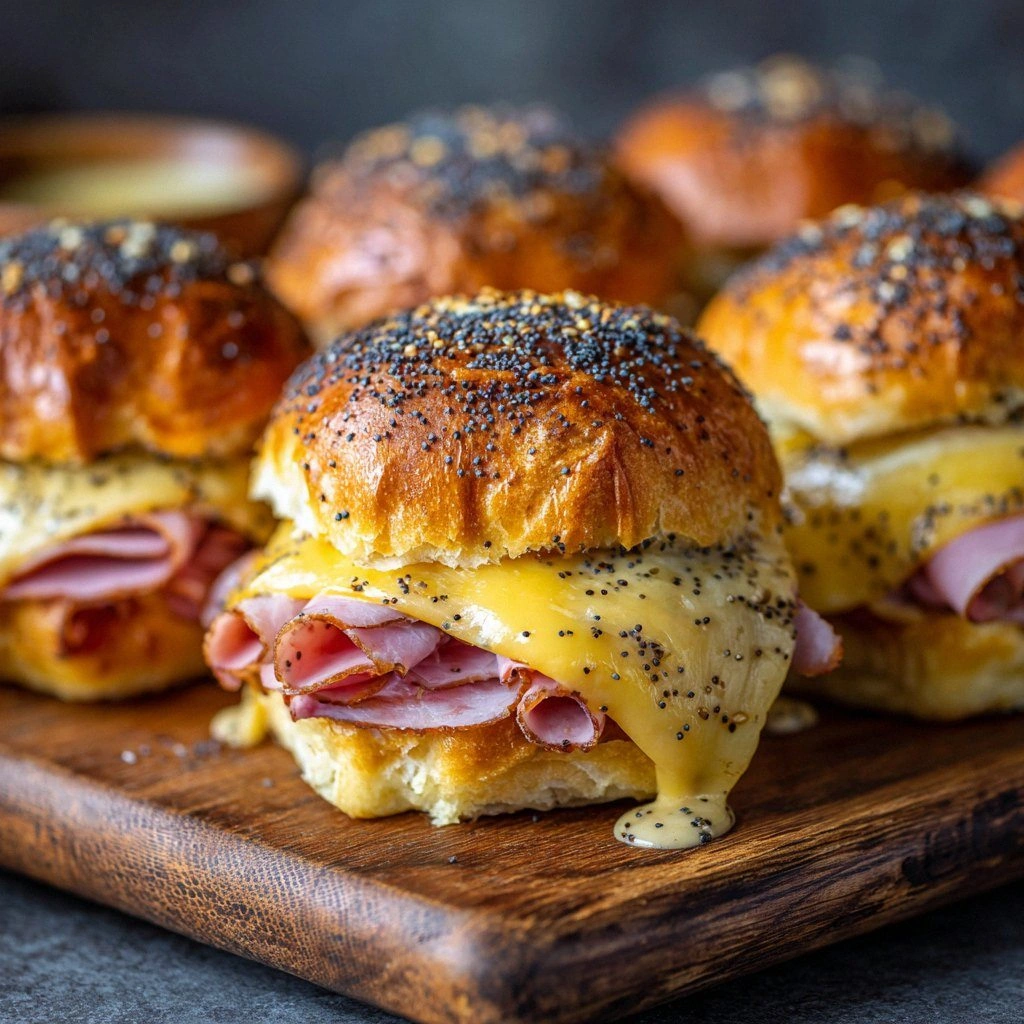
Picture this: you’re in a cramped kitchen, the oven timer beeping like a nervous drummer, and you’ve just realized that the ham you bought yesterday is still in its original packaging, a little too dry for the party you’re planning. You’ve stared at it for an hour, wondering if you should toss it or salvage it somehow. That moment of culinary crisis turned into the most delicious revelation I’ve ever had. I grabbed a skillet, a jar of mustard, and a block of butter, and with a splash of imagination I transformed that stubborn slice into a melt‑in‑your‑mouth, buttery‑glazed slider that still has me dreaming about it at midnight. If you’ve ever been stuck with a dry ham that seems doomed, this is the antidote you’ve been waiting for.
I’m not just talking about a sandwich. I’m talking about a handheld, bite‑sized experience that combines the comforting familiarity of a ham sandwich with the playful texture of a slider. The bread is buttery and slightly sweet, the ham is smoky and savory, the cheese melts into a gooey ribbon, and the mustard‑butter glaze coats everything in a glossy, tangy sheen. It’s a symphony of textures: crisp edges that crackle like thin ice, a soft interior that yields to your bite, and a glaze that sticks to your fingers, making every mouthful a little adventure. The aroma that fills the kitchen as the sliders bake is a heady mix of butter, garlic, and the faint scent of cured meat—an invitation you can’t ignore.
What makes this version stand out? It’s not just the ingredients; it’s the technique, the balance of flavors, and the sheer audacity to treat a humble ham slice like a star. I dared to glaze the ham before baking, letting the butter and mustard mingle and caramelize, turning a dry slice into a silky, buttery treasure. I used a specific type of cheese that melts beautifully without becoming greasy, and I cut the buns just so that they hold everything together without falling apart. The result? A slider that looks like a mini gourmet sandwich but tastes like a party in your mouth. I dare you to taste this and not go back for seconds.
Let me walk you through every single step—by the end, you’ll wonder how you ever made it any other way. I’ll share micro‑challenges to keep you on your toes, bold claims to prove this is hands‑down the best version you’ll ever make at home, and confessions of my own kitchen escapades. If you’ve ever struggled with sliders that fall apart or cheese that doesn’t melt, you’re not alone— and I’ve got the fix. Picture yourself pulling these out of the oven, the whole kitchen smelling incredible, the sliders steaming, and the first bite sending a wave of buttery, cheesy bliss through your palate. Okay, ready for the game‑changer?
What Makes This Version Stand Out
- Flavor: The mustard‑butter glaze gives a tangy, buttery kick that cuts through the richness of the ham and cheese, creating a layered taste that keeps you coming back for more.
- Texture: The buns are lightly toasted to a golden crisp, while the cheese melts into a silky ribbon, giving a satisfying contrast between crunch and melt.
- Simplicity: All you need is a handful of pantry staples and a few minutes of prep—no fancy equipment or hard‑to‑find ingredients.
- Uniqueness: Glazing the ham before baking is a twist that most recipes overlook, turning a dry ham into a silky, caramelized delight.
- Crowd‑pleasing: These sliders are perfect for parties, game nights, or a quick family dinner, and they always disappear faster than you can say “more, please.”
- Ingredient Quality: Using high‑quality, thinly sliced ham and a sharp cheddar ensures that every bite bursts with flavor.
- Cooking Method: Baking the sliders allows the flavors to meld, the cheese to melt evenly, and the glaze to develop a glossy sheen.
- Make‑Ahead Potential: You can assemble and refrigerate the sliders before baking, saving time on busy nights.
Inside the Ingredient List
The Flavor Base
The foundation of any great slider is the bread. For these, I use pre‑made slider buns that are soft yet sturdy enough to hold the generous fillings. The buns are lightly brushed with melted butter before baking, which creates a golden crust that adds both flavor and texture. If you’re adventurous, swap the standard buns for brioche or pretzel rolls for an extra buttery, slightly sweet bite. Remember, the bread should be fresh; stale buns will soak up the glaze and lose their bite.
The Texture Crew
Ham slices are the star of the show, but the way you treat them makes all the difference. I choose a thinly sliced, smoked ham that has been cured but not dried out. The glaze—made from butter, Dijon mustard, and a dash of honey—coats the ham, giving it a glossy, caramelized surface. The cheese I use is a sharp cheddar that melts without becoming oily; it forms a creamy ribbon that ties the flavors together. If you prefer a milder cheese, a Swiss or provolone will work, but you’ll lose that sharp bite that makes the sliders memorable.
The Unexpected Star
A splash of garlic powder adds a subtle depth that complements the ham’s smokiness. This isn’t a huge amount—just a pinch—but it lifts the overall flavor profile. Some people love to add a touch of smoked paprika for a smoky kick, but I keep it simple to let the ham shine. If you’re a fan of heat, a drizzle of sriracha in the glaze adds a spicy finish that’s surprisingly balanced.
The Final Flourish
Once the sliders are assembled, a final brush of the mustard‑butter glaze over the tops before baking locks in moisture and creates a beautiful sheen. After baking, a quick broil gives the cheese a golden, slightly crisp finish. The result is a slider that feels luxurious, with a buttery crust, a savory ham center, and a melty cheese ribbon that oozes with every bite. The glaze’s tangy sweetness cuts through the richness, making each bite feel light and indulgent.
Everything’s prepped? Good. Let’s get into the real action…
The Method — Step by Step
- Prep the Oven and Buns: Preheat your oven to 375°F (190°C). While the oven heats, lightly brush each slider bun with melted butter. This step not only adds flavor but also creates a barrier that keeps the bread from becoming soggy when the glaze is applied.
- Glaze the Ham: In a small saucepan, melt 4 tablespoons of butter over medium heat. Add 2 tablespoons of Dijon mustard and a splash of honey. Stir until the mixture is smooth and glossy. Brush this glaze generously over each ham slice, ensuring every inch is coated. The glaze will caramelize in the oven, giving the ham a buttery, slightly sweet finish.
- Assemble the Sliders: Place a slice of ham on the bottom half of each bun. Add a slice of sharp cheddar on top of the ham. Cover with the top half of the bun. If you’re making them ahead, stack the assembled sliders on a parchment‑lined tray and refrigerate until ready to bake.
- Apply Final Glaze: Brush the tops of the assembled sliders with a thin layer of the remaining mustard‑butter glaze. This step creates a shiny, caramelized surface that will crisp slightly during baking.
- Bake: Place the tray in the preheated oven. Bake for 12–15 minutes, or until the cheese is melted and the buns are golden brown. The glaze should be bubbly and slightly caramelized. Watch the edges; they should pull away from the buns, indicating a crisp crust.
- Broil for the Finish: Switch the oven to broil. Broil the sliders for 1–2 minutes, watching closely to prevent burning. This step gives the cheese a golden, slightly crisp top and enhances the glaze’s glossy sheen.
- Rest and Serve: Remove the sliders from the oven and let them rest for 2 minutes. This short rest allows the cheese to set slightly, preventing a runny mess when you bite into them. Serve immediately while hot and melty.
- Optional Garnish: For a pop of color and extra flavor, sprinkle a pinch of fresh chopped chives or a dash of smoked paprika over the finished sliders. A side of pickles or a fresh green salad pairs beautifully, balancing the richness.
That’s it — you did it. But hold on, I’ve got a few more tricks that will take this to another level. The next section will dive into insider tips that even seasoned chefs swear by.
Insider Tricks for Flawless Results
The Temperature Rule Nobody Follows
Many people bake sliders at 350°F, but this temperature can cause the cheese to melt unevenly and the glaze to burn. I recommend 375°F, which allows the cheese to melt uniformly while giving the glaze time to caramelize without scorching. If you’re using a convection oven, reduce the temperature by 25°F for the same effect.
Why Your Nose Knows Best
Before you even touch the sliders, pause and sniff the glaze. If it smells buttery and slightly sweet, you’re on the right track. If it has a sharp, metallic scent, it may have over‑cooked. Trust your nose; it’s a reliable indicator of readiness.
The 5‑Minute Rest That Changes Everything
After baking, let the sliders rest for exactly five minutes. This brief pause allows the cheese to set just enough to hold its shape, preventing a gooey mess that spills onto your hands. It also lets the glaze thicken slightly, giving each bite a richer coating.
The Garlic Powder Secret
A pinch of garlic powder, sprinkled over the ham before glazing, adds depth without overwhelming the ham’s natural flavor. It’s a subtle, savory note that elevates the overall taste profile.
The Broil Finish
Broiling for 1–2 minutes gives the cheese a golden crust and the glaze a glossy sheen. Watch closely; the moment it starts to brown is the moment to pull them out. Over‑broiling can lead to a burnt, bitter flavor that ruins the otherwise perfect sliders.
Creative Twists and Variations
This recipe is a playground. Here are some of my favorite ways to switch things up:
Pesto‑Ham Slider
Swap the mustard‑butter glaze for a pesto drizzle. The basil’s herbal notes pair beautifully with the ham’s smokiness, creating a fresh, aromatic experience.
Cheese Lover’s Stack
Add a slice of provolone or mozzarella between the ham and cheddar for a double‑cheese delight. The extra cheese creates a gooey, decadent layer that melts into the glaze.
Spicy Jalapeño Slider
Incorporate thinly sliced jalapeños into the assembly for a fiery kick. The heat balances the buttery glaze and adds a vibrant color contrast.
Vegetarian Veggie Slider
Replace the ham with a grilled portobello mushroom cap, brush it with the glaze, and add a slice of Swiss cheese. This version is hearty, earthy, and surprisingly satisfying.
Breakfast Slider
Swap the cheddar for a slice of cheddar‑cheese omelet, add a fried egg on top, and serve with a side of maple syrup. Breakfast meets comfort food in a single bite.
Storing and Bringing It Back to Life
Fridge Storage
Cool the sliders completely before refrigerating. Store them in an airtight container for up to 2 days. When ready to reheat, place them on a baking sheet and warm in a 350°F oven for 5–7 minutes until heated through.
Freezer Friendly
Wrap each slider tightly in plastic wrap, then place them in a freezer bag. They’ll keep for up to 3 months. To reheat, thaw overnight in the fridge, then bake at 350°F for 10 minutes.
Best Reheating Method
The key to a great reheated slider is adding a splash of water to the baking dish before reheating. This creates steam, keeping the buns from drying out and the cheese from becoming rubbery. Cover the dish with foil to lock in moisture.