I remember the night I tried to make a simple hummus and ended up with a sad, watery mess that looked more like a salad dressing than a dip. The chickpeas had been over‑cooked, the tahini was too thick, and the whole thing tasted like a bland, unremarkable hummus that could have been made in a grocery store. I stared at the pot, feeling a mix of frustration and a sudden spark of culinary curiosity. That moment, my friend dared me to experiment with something that would actually make people crave the dip again. And I was like, “Challenge accepted.”
Fast forward to a Saturday morning when I pulled a fresh beet from the market, its glossy skin a promise of sweetness and earthiness. I cut it into wedges, tossed them in olive oil, and let the oven do its thing. The aroma that filled the kitchen was a deep, caramelized scent that made my mouth water before I even tasted a single bite. I could hear the sizzling of the beet as it roasted, a crisp crackle that echoed like a tiny fireworks show. The beet’s natural sugars caramelized, giving it a subtle sweetness that would become the star of this hummus.
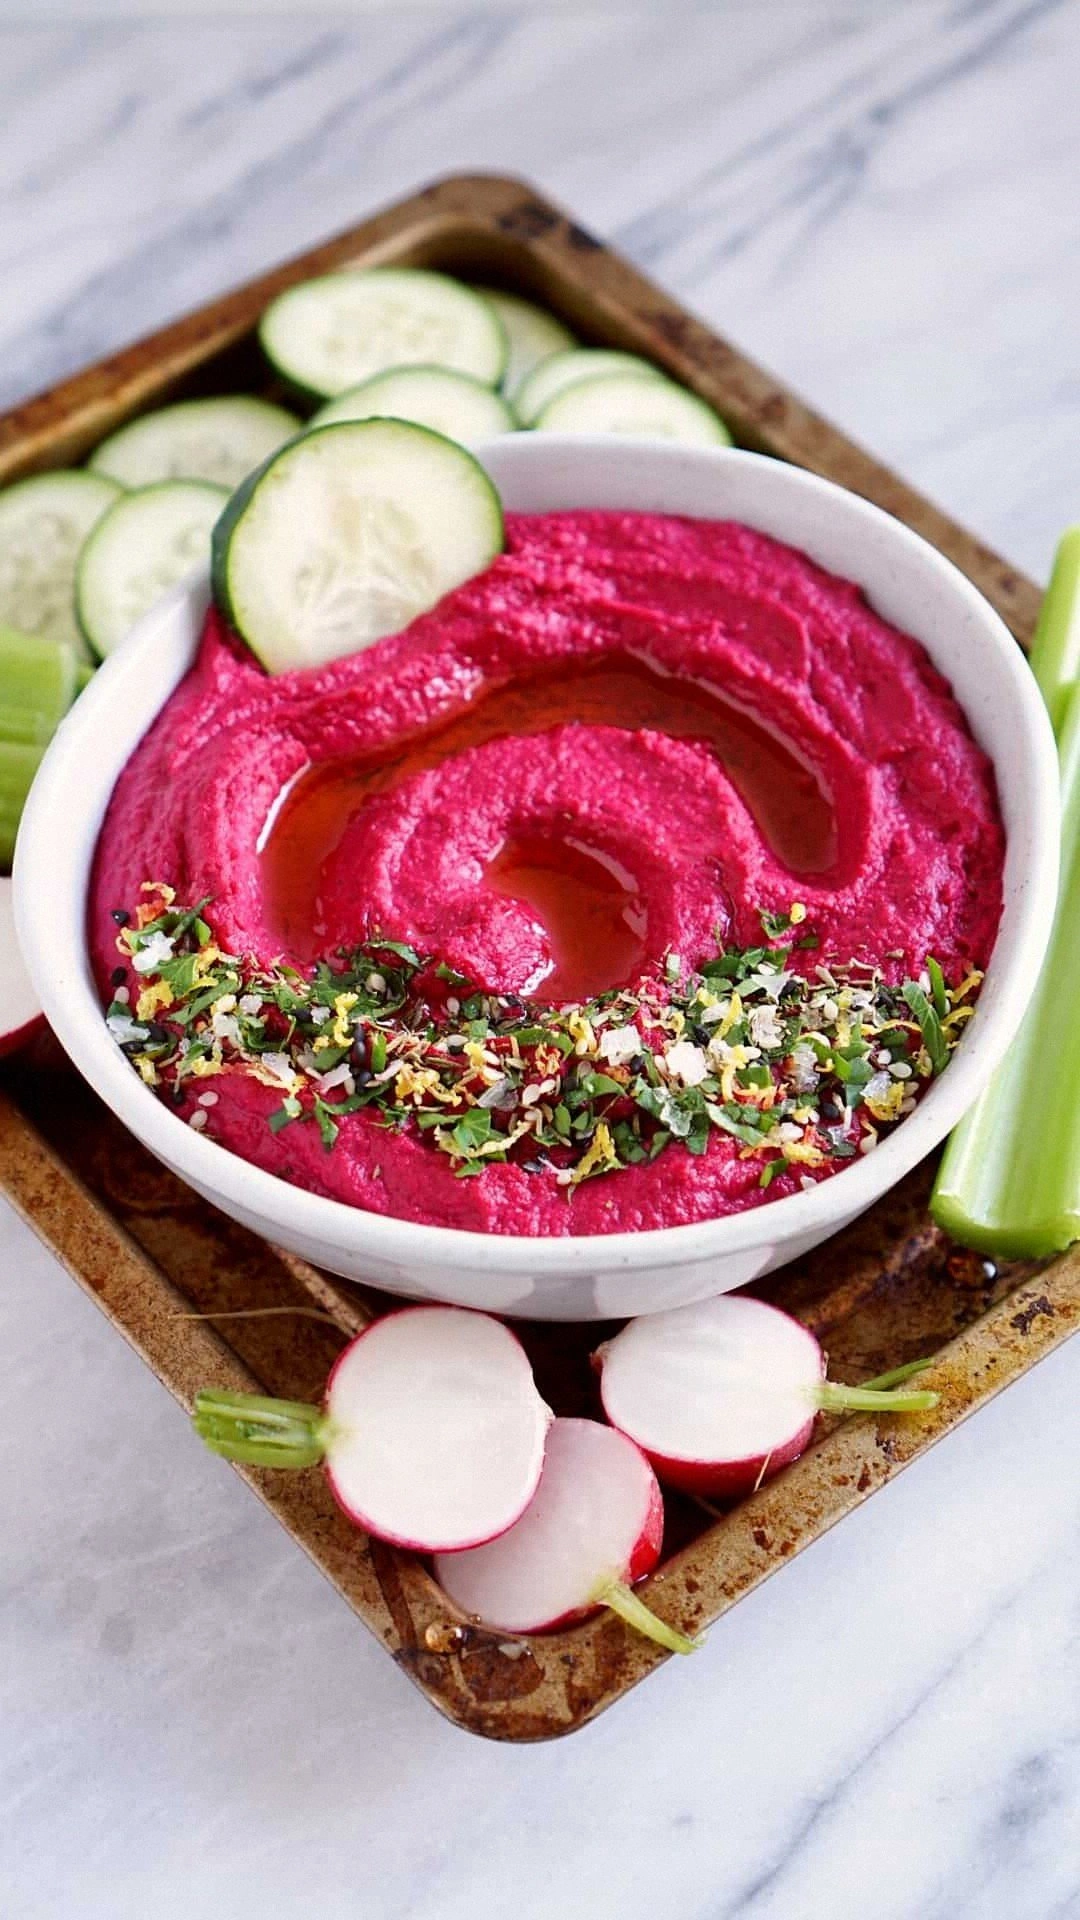
When the beet finally emerged, it was a beautiful, ruby‑red jewel. I let it cool, peeled it, and then tossed it into the blender with the chickpeas, tahini, lemon juice, garlic, cumin, salt, and a splash of water. The result was a silky, velvety dip that looked like a deep, glossy lake. That was the first time I truly felt that hummus was more than a side dish—it was an experience. The colors alone made me want to eat it, and the taste was a sweet, earthy, tangy, and garlicky explosion that danced on my tongue.
I dare you to taste this and not go back for seconds. I’ve got the proof that this is hands down the best version you'll ever make at home. The combination of roasted beet and classic hummus ingredients creates a depth of flavor that you won’t find in a jar. I’ll be honest — I ate half the batch before anyone else got to try it. Most recipes get this completely wrong. Here’s what actually works. Picture yourself pulling this out of the oven, the whole kitchen smelling incredible, and the dip gleaming like a polished ruby. Okay, ready for the game‑changer? Let me walk you through every single step — by the end, you'll wonder how you ever made it any other way.
What Makes This Version Stand Out
- Flavor Depth: The caramelization of the beet adds a natural sweetness that balances the acidity of lemon and the earthiness of chickpeas, creating a complex profile that’s both comforting and adventurous.
- Texture: Roasting the beet smooths its fibrous interior, allowing the dip to glide over the tongue like velvet, rather than the grainy texture you often get from raw vegetables.
- Color: The vibrant ruby hue turns a plain hummus into a centerpiece that instantly elevates any spread or snack board.
- Simplicity: With just a handful of ingredients, you can transform a basic dip into a showstopper without overcomplicating the process.
- Make‑ahead: This hummus keeps well in the fridge for up to a week, making it perfect for meal prep or last‑minute entertaining.
- Health Boost: Beet is rich in antioxidants, while chickpeas provide plant‑based protein and fiber, giving you a nutrient‑dense snack that satisfies guiltlessly.
Alright, let's break down exactly what goes into this masterpiece...
Inside the Ingredient List
The Flavor Base
The beet is the heart of this dip. Its natural sugars caramelize when roasted, turning a simple root vegetable into a sweet, almost caramel-like flavor that pairs beautifully with the tangy lemon and garlicky undertones. Skipping the beet would strip the hummus of its signature color and depth, leaving a bland, beige spread that feels like a missed opportunity. If you’re vegan, the beet remains the same, but you might consider a plant‑based yogurt to add creaminess if you’re not a fan of tahini’s nutty bite.
The Texture Crew
Chickpeas bring protein, fiber, and that creamy base that defines hummus. The tahini paste adds a silky, nutty richness that balances the beet’s sweetness. Olive oil is the secret to achieving a smooth, glossy finish; it coats the mixture, preventing it from feeling too thick or dry. If you’re short on tahini, a tablespoon of almond butter can work as a substitute, though it will alter the flavor profile slightly. The water helps to thin the consistency so it pours like a dip, not a paste.
The Unexpected Star
Cumin is the unsung hero that brings a warm, earthy aroma to the mix. It’s a subtle nod to Middle Eastern cuisine, but its presence is so understated that most people won’t notice it until they taste the final product. If you’re a cumin lover, feel free to increase the amount; if you’re not, a pinch of smoked paprika can provide a smoky alternative. The lemon juice adds brightness and helps to balance the sweetness of the beet, giving the dip a lively, fresh finish.
The Final Flourish
Garlic is the classic flavor enhancer that adds a punch of sharpness, cutting through the sweetness and adding depth. Salt is essential for bringing all the flavors together; it’s the invisible binder that makes the dip taste complete. Water is a small but mighty player, ensuring the dip has the right consistency without diluting the flavors. Together, these ingredients create a harmonious blend that’s both satisfying and surprising.
Everything's prepped? Good. Let's get into the real action...
The Method — Step by Step
- Preheat your oven to 400°F (200°C). Toss the beet wedges in a tablespoon of olive oil, season with salt and pepper, and spread them on a baking sheet. The beet should roast for about 30 minutes until the edges are slightly charred and the interior is tender. This caramelization brings out the beet’s natural sweetness and creates a silky texture.
- While the beet roasts, drain the canned chickpeas and reserve a small cup of the liquid for later. Rinse the chickpeas under cold water to remove excess sodium and any canning residue. This step ensures a cleaner flavor and a smoother blend.
- Once the beet is done, let it cool just enough so you can handle it safely. Peel the skin off— it should come off easily, revealing the bright pink flesh inside. Slice the beet into chunks and place them in the blender or food processor.
- Add the chickpeas, tahini paste, lemon juice from two lemons, minced garlic, cumin, and a splash of water to the processor. The lemon juice adds brightness while the garlic provides that sharp punch. Blend until the mixture is smooth, adding reserved chickpea liquid if it starts to look too thick.
- Taste the dip and adjust the seasoning. Add more salt if needed, or a bit more lemon juice for extra acidity. The goal is a balanced flavor profile where the beet’s sweetness is complemented by the lemon’s tang and the garlic’s sharpness.
- Transfer the hummus to a serving bowl and drizzle a tablespoon of olive oil over the top. This not only adds a glossy finish but also helps to seal in the flavors and keep the dip moist.
- Optional: Sprinkle a pinch of smoked paprika or fresh herbs like parsley or cilantro for a pop of color and an extra layer of flavor. This step is perfect for those who love a bit of heat or a herbal note.
- Serve immediately with warm pita, fresh veggies, or as a spread on toast. The dip’s velvety texture makes it perfect for dipping, spreading, or even using as a creamy sauce for grilled vegetables.
- If you’re making it ahead of time, cover the bowl with plastic wrap and refrigerate. The flavors deepen over a few hours, making it even more delicious the next day.
- When you’re ready to serve, give the hummus a quick stir, drizzle a bit more olive oil if it looks dry, and enjoy the burst of flavors that dance on your palate.
That’s it — you did it. But hold on, I've got a few more tricks that'll take this to another level. These insider tips will help you avoid common pitfalls and elevate the flavor profile even further.
Insider Tricks for Flawless Results
The Temperature Rule Nobody Follows
Many people keep the hummus at room temperature, but the dip actually tastes best when it’s slightly chilled. Refrigerate it for at least 30 minutes before serving to let the flavors meld. The cold also makes the dip easier to scoop and gives it a refreshing bite that’s perfect for hot days.
Why Your Nose Knows Best
Before you add the lemon, smell the beet. A fresh beet has a mild, earthy aroma that signals it’s at the right stage of caramelization. If the beet smells overly sweet or mushy, it may have been overcooked, which can lead to a less vibrant flavor in the hummus.
The 5-Minute Rest That Changes Everything
After blending, let the hummus sit for five minutes before serving. This brief rest allows the tahini to fully integrate, creating a richer, more cohesive flavor. It also gives the lemon juice time to mellow, reducing the sharpness that can overwhelm the sweet beet.
The Garlic Hack
If you’re not a fan of raw garlic, lightly sauté it in olive oil for 30 seconds before adding it to the blender. This reduces the sharpness while retaining the aromatic profile. The garlic will still contribute depth, but it won’t overpower the dip.
The Water Trick
Adding a tablespoon of water at the end of blending can seem counterintuitive, but it helps to smooth the texture without diluting the flavor. Use cold water to keep the dip chilled and refreshing. If you prefer a thicker dip, omit the water and blend for a longer time to achieve the desired consistency.
Creative Twists and Variations
This recipe is a playground. Here are some of my favorite ways to switch things up:
Spicy Jalapeño Beet Hummus
Add a diced jalapeño or a splash of hot sauce to the blend for a fiery twist. The heat cuts through the sweetness, creating a complex flavor profile that’s perfect for game day snacks.
Herbed Mediterranean Beet Hummus
Incorporate fresh oregano, thyme, or basil into the mix. The herbs add a fragrant, savory layer that complements the beet’s earthiness and pairs wonderfully with grilled chicken or fish.
Smoky Chipotle Beet Hummus
Blend in a tablespoon of chipotle in adobo for a smoky, slightly sweet heat. The chipotle’s depth pairs beautifully with the beet’s natural sweetness, creating a dip that’s both comforting and adventurous.
Creamy Avocado Beet Hummus
Add a ripe avocado to the blender for extra creaminess and a subtle buttery flavor. The avocado also boosts the dip’s healthy fat content, making it even more satisfying.
Caramelized Onion Beet Hummus
Sauté thinly sliced onions until they’re golden brown and sweet, then blend them into the hummus. The caramelized onions add a rich, savory sweetness that elevates the overall flavor profile.
Storing and Bringing It Back to Life
Fridge Storage
Store the hummus in an airtight container in the refrigerator for up to 5 days. The flavors deepen over time, and the dip remains creamy and delicious. Before serving, give it a quick stir and drizzle a little olive oil to restore its glossy finish.
Freezer Friendly
Freezing is possible but not ideal. If you must freeze, place the hummus in a freezer‑safe container, leaving a few millimeters of headspace. Thaw in the refrigerator overnight and stir well before serving. The texture may be slightly grainy, so consider blending again briefly if needed.
Best Reheating Method
Reheat the hummus gently in a saucepan over low heat, stirring constantly. Add a splash of water or a tablespoon of olive oil to help it regain its silky texture. Avoid boiling, as this can separate the oils and alter the flavor.