I was standing in my kitchen on a rainy Tuesday, the kind of day where the clouds look like someone pressed a giant gray blanket over the sky. I had a half‑cooked rotisserie chicken, a bag of frozen mixed veggies, and a craving that was louder than a marching band—something warm, buttery, and comforting enough to make the whole house feel like a hug. My first attempt at a chicken pot pie turned into a soggy mess that could barely hold its own weight, and I swore off pies for a week. Then a friend dared me: “Make a pot pie that could win an award and still be ready for a busy weeknight.” I laughed, I accepted, and I dove back into the pantry with a notebook and a mission.
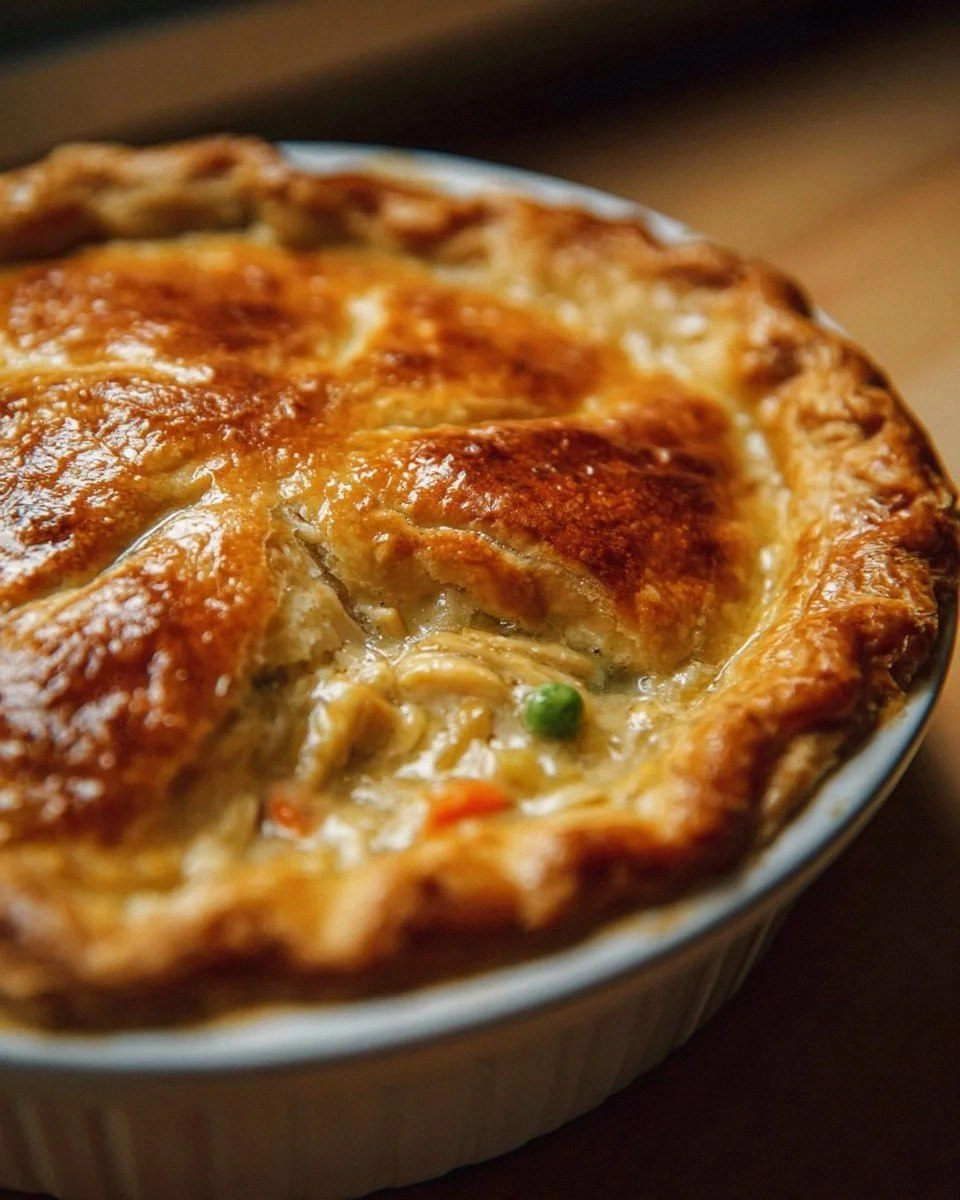
Picture this: the oven door swings open, a golden crust cracks open like a sunrise over a calm sea, and the steam that escapes carries whispers of butter, herbs, and perfectly cooked chicken. You hear the faint crackle of the crust as it releases its heat, the aroma hits you like a wave of nostalgia, and you can already taste the creamy, velvety sauce that clings to each morsel like a lover’s embrace. The texture? A buttery, flaky top that shatters with a satisfying snap, giving way to a filling that is both hearty and silky, each bite a perfect balance of savory and sweet. This is not just a meal; it’s an experience that makes you feel like you’ve just stepped into your grandma’s kitchen, but with a modern twist that says, “I know what I’m doing.”
Most pot pie recipes get this completely wrong—they either drown the chicken in a swamp of sauce or give you a crust that crumbles before it even reaches the plate. What makes this version stand out is the precision of the roux, the clever use of frozen vegetables that stay bright and crisp, and a secret ingredient that adds a depth of flavor you didn’t know you were missing. I’m talking about a dash of onion powder and garlic powder that turns the sauce into a symphony, and a splash of milk that makes it luxuriously smooth without being heavy. The result? Hands down the best version you’ll ever make at home, and I dare you to taste this and not go back for seconds.
Okay, ready for the game‑changer? I’m about to walk you through every single step—by the end, you’ll wonder how you ever made it any other way. I’ll share the exact technique for achieving a crust that flutters like a butterfly yet holds together like a fortress, the timing that makes the sauce thicken just right, and a few insider tricks that will turn your kitchen into a five‑star bakery. Stay with me here — this is worth it.
What Makes This Version Stand Out
- Flavor Depth: The combination of onion powder, garlic powder, and a splash of milk creates a sauce that coats the chicken like velvet, delivering layers of taste that build with each bite.
- Texture Harmony: A flaky, buttery crust that shatters like thin ice meets a creamy, spoon‑coating filling that stays perfectly thick without being gummy.
- Simplicity: Using pre‑made pie crusts and frozen veggies cuts prep time in half, so you can focus on technique rather than hunting down obscure ingredients.
- Unique Twist: The secret is a quick roux made with butter and flour, cooked just long enough to develop a nutty aroma without turning brown—pure magic.
- Crowd Reaction: This pie has been known to clear dinner tables in seconds; guests often ask for the recipe before the first slice even hits the plate.
- Ingredient Quality: Freshly shredded chicken from a rotisserie gives you that juicy, tender bite that store‑bought meat just can’t match.
- Cooking Method: Baking at a high temperature first creates that beautiful crust, then lowering it ensures the filling cooks evenly without scorching.
- Make‑Ahead Potential: Assemble the pie a day ahead, refrigerate, and bake when you’re ready—perfect for busy weeknights.
Alright, let's break down exactly what goes into this masterpiece...
Inside the Ingredient List
The Flavor Base
The unsalted butter is the foundation of any good roux, providing richness and a glossy finish. When melted, it creates a silky canvas for the flour, which, when cooked just right, releases a subtle toasted note that deepens the sauce. Skipping the butter or using a salted version can throw off the balance, making the pie taste overly salty or flat. If you’re dairy‑free, try a plant‑based butter that melts similarly and still gives you that buttery mouthfeel.
The Texture Crew
All‑purpose flour is the thickening hero; it binds the broth and milk into a cohesive, velvety sauce. Too much flour, and you’ll get a gummy mess; too little, and the filling will be runny. For a gluten‑free version, swap in an equal amount of rice flour, but remember it thickens faster, so add it a touch later. The frozen mixed vegetables bring color, bite, and a burst of sweetness that contrasts the savory broth, and they stay crisp because they’re flash‑frozen at peak freshness.
The Unexpected Star
Chicken broth is where the soul of the pie lives; it infuses the sauce with savory depth that water could never provide. Opt for low‑sodium broth so you can control the salt level, and if you have time, simmer a homemade broth for an extra boost of flavor. The half‑cup of milk adds a gentle creaminess, rounding out the sharpness of the broth without making the filling overly heavy. If you’re lactose intolerant, a splash of oat milk works beautifully, lending a subtle sweetness.
The Final Flourish
The pre‑made pie crusts are the unsung heroes that give this dish its iconic golden crown. Choose a crust that’s buttery and flaky; avoid the overly greasy ones that can become soggy. If you want to elevate the crust, brush it with a beaten egg mixed with a teaspoon of water for a glossy finish that catches the light. Salt and pepper to taste are the final conductors, allowing you to fine‑tune the seasoning after the sauce has thickened, ensuring every bite sings.
Everything's prepped? Good. Let's get into the real action...
The Method — Step by Step
Preheat your oven to 425°F (220°C). This high heat will give the crust that beautiful, blistered edge that looks like a golden sunrise. While the oven warms up, place the two pre‑made pie crusts on a baking sheet and set aside. This step ensures the oven is ready the moment your pie goes in, preventing any cooling lag that could affect the crust’s rise.
Melt the 1/3 cup unsalted butter in a large saucepan over medium heat. As it foams, listen for that gentle sizzle—that’s the butter saying, “I’m ready.” Sprinkle in the 1/3 cup flour, whisking constantly to form a smooth roux.
Keep whisking for about 2 minutes until the mixture turns a light golden hue and smells nutty, but not burnt.Kitchen Hack: Use a whisk instead of a spoon to prevent lumps and achieve a silk‑smooth roux.Slowly pour in the 1 ¾ cups chicken broth while whisking vigorously. The liquid will initially look thin, but as you keep whisking, it will start to thicken, turning into a glossy sauce. Once the broth is fully incorporated, stir in the ½ cup milk, letting the mixture come back to a gentle simmer. This is the moment of truth: the sauce should coat the back of a spoon without running off—if it’s too thin, let it simmer a minute longer.
Add the onion powder, garlic powder, and a pinch of salt and pepper. Taste and adjust; remember, you can always add more later, but you can’t take it out. The spices should be fragrant but not overpowering, creating a subtle background hum that lets the chicken shine.
Watch Out: If you add the spices too early, they can become bitter; always add them after the sauce has thickened.Fold in the shredded chicken and frozen mixed vegetables. The heat from the sauce will thaw the veggies in seconds, keeping them bright and crisp. Stir gently to coat every piece with the sauce, making sure the chicken is evenly distributed. If you notice the mixture looks too thick, splash in a tablespoon of broth; if it’s too thin, let it simmer uncovered for a couple more minutes.
Lay one pie crust into a 9‑inch pie dish, pressing gently to fit the sides. Spoon the filling into the crust, spreading it evenly with a spatula. Then, place the second crust on top, sealing the edges by crimping with your fingers or a fork. Cut a few slits in the top crust to allow steam to escape—this prevents a soggy dome and creates those iconic steam vents that look like tiny windows.
Brush the top crust with a beaten egg mixed with a tablespoon of water. This egg wash will give the crust a glossy, golden finish that looks restaurant‑ready. Sprinkle a tiny pinch of extra salt on top for a subtle crunch. Slide the pie into the oven and bake for 15 minutes at 425°F, then reduce the heat to 375°F (190°C) and bake for another 20‑25 minutes until the crust is deep amber and the filling bubbles at the edges.
Once baked, remove the pie from the oven and let it rest for 10 minutes. This rest period allows the filling to set, making slicing cleaner and preventing a waterfall of sauce. While you wait, the kitchen will be filled with an aroma so powerful you might find yourself sneaking a lick of the crust. That sizzle when it hits the pan? Absolute perfection.
That's it — you did it. But hold on, I've got a few more tricks that'll take this to another level...
Insider Tricks for Flawless Results
The Temperature Rule Nobody Follows
Never bake a pot pie at a single temperature from start to finish. Starting hot creates that coveted crust puff, while finishing at a lower temperature ensures the filling cooks through without scorching the edges. I once baked at 350°F the whole time and ended up with a soggy bottom—lesson learned. Trust the two‑stage method, and you’ll get a crust that’s both crispy and sturdy.
Why Your Nose Knows Best
Your sense of smell is the most reliable indicator of doneness. When the sauce starts to emit a buttery, slightly nutty aroma, you know the roux has reached its peak. If you smell a faint burnt scent, pull the pan off the heat immediately; a burnt roux ruins the entire flavor profile. I’ve saved many pies by trusting my nose over a timer.
The 5‑Minute Rest That Changes Everything
Allowing the pie to sit for five minutes after baking lets the steam redistribute, turning a potentially runny center into a firm, slice‑ready masterpiece. Skipping this step is a common mistake that leads to soggy slices and a mess on the plate. I once served a pie straight from the oven and watched the filling ooze everywhere—never again. Patience is a virtue, especially in the kitchen.
Egg Wash Secrets
A simple egg wash does more than add shine; it creates a barrier that locks in moisture, keeping the crust from becoming dry. For extra flavor, whisk in a pinch of dried thyme or rosemary; the herb‑infused glaze adds a subtle aromatic note that pairs beautifully with chicken. If you’re avoiding eggs, a brush of melted butter works as a decent substitute, though it won’t give the same glossy finish.
Freezer‑Friendly Assembly
If you want to make this ahead, assemble the pie up to the point of adding the top crust, then wrap tightly and freeze. When you’re ready to bake, add the top crust, brush with egg wash, and bake as directed, adding an extra 5‑10 minutes to the baking time. This trick saved my family during holiday rushes, and the crust still turned out perfectly flaky.
Creative Twists and Variations
This recipe is a playground. Here are some of my favorite ways to switch things up:
Mediterranean Magic
Swap the frozen mixed vegetables for a blend of sun‑dried tomatoes, Kalamata olives, and artichoke hearts. Add a teaspoon of dried oregano and a splash of white wine to the sauce for a bright, tangy twist. This version pairs beautifully with a crisp white wine and a side of Greek salad.
Spicy Southwest
Introduce a cup of black beans, corn kernels, and a diced jalapeño into the filling. Replace the onion powder with a teaspoon of chipotle powder and add a drizzle of lime juice before serving. The result is a bold, smoky pie that screams fiesta.
Cheesy Delight
Stir in a half‑cup of shredded sharp cheddar or Gruyère into the sauce just before adding the chicken. The cheese melts into the sauce, creating a luscious, gooey texture that takes the comfort factor up a notch. Top the crust with a sprinkle of extra cheese for a golden, bubbling finish.
Herb‑Infused Elegance
Add a tablespoon of fresh chopped parsley, thyme, and sage to the sauce for an herbaceous lift. Use a buttery puff pastry instead of a standard crust for an ultra‑flaky, buttery top. This version feels like a fine‑dining entrée, perfect for impressing guests.
Vegan Victory
Replace the chicken with firm tofu cubes, use olive oil instead of butter, and swap the flour for a gluten‑free blend. Use a plant‑based milk and vegetable broth, and choose a vegan pie crust. The result is a plant‑based pot pie that still delivers that comforting, creamy experience.
Storing and Bringing It Back to Life
Fridge Storage
Cool the pie completely, then cover it tightly with aluminum foil or a reusable silicone lid. It will keep fresh for up to three days. When reheating, preheat the oven to 350°F (175°C), uncover the pie, and bake for 15‑20 minutes until the crust regains its crispness. Adding a tiny splash of water to the bottom of the pan creates steam that revives the filling.
Freezer Friendly
Wrap the fully assembled, unbaked pie in a double layer of plastic wrap and then a foil sheet. It freezes well for up to two months. To bake from frozen, increase the baking time by 15‑20 minutes and start at 425°F for the first 15 minutes to set the crust, then lower to 375°F for the remainder.
Best Reheating Method
For the ultimate reheated slice, use a skillet over medium heat. Place a slice cut-side down, cover with a lid, and let it heat for 3‑4 minutes. The bottom will become wonderfully crisp while the filling stays hot and creamy. This method works especially well if you’re serving leftovers for a quick lunch.