Why you'll love this recipe
- One-bite power snack delivers 15g protein
- 30-minute prep fits busy mornings
- Crowd-pleaser for gym buddies and kids alike
- Make-ahead for weeklong energy boost
- Freezer-friendly for grab‑and‑go convenience
I was sprinting out the door for a 6 am meeting when my stomach growled louder than the traffic outside. I grabbed a handful of oats, a scoop of vanilla protein, and a spoonful of peanut butter, mixed them in my kitchen, and the scent of toasted nuts made the whole apartment feel warm. The first bite was a revelation—soft, nutty, and just sweet enough to make me forget I’d missed breakfast. Later that week, my niece visited and begged for "the chocolatey snack" she’d seen on my Instagram story. I handed her a cup, and she declared it "the best thing ever" while smearing a bit of chocolate on her nose. That goofy moment cemented the cups as a family favorite, and now they’re my go‑to for every post‑workout or after‑school treat.
The story
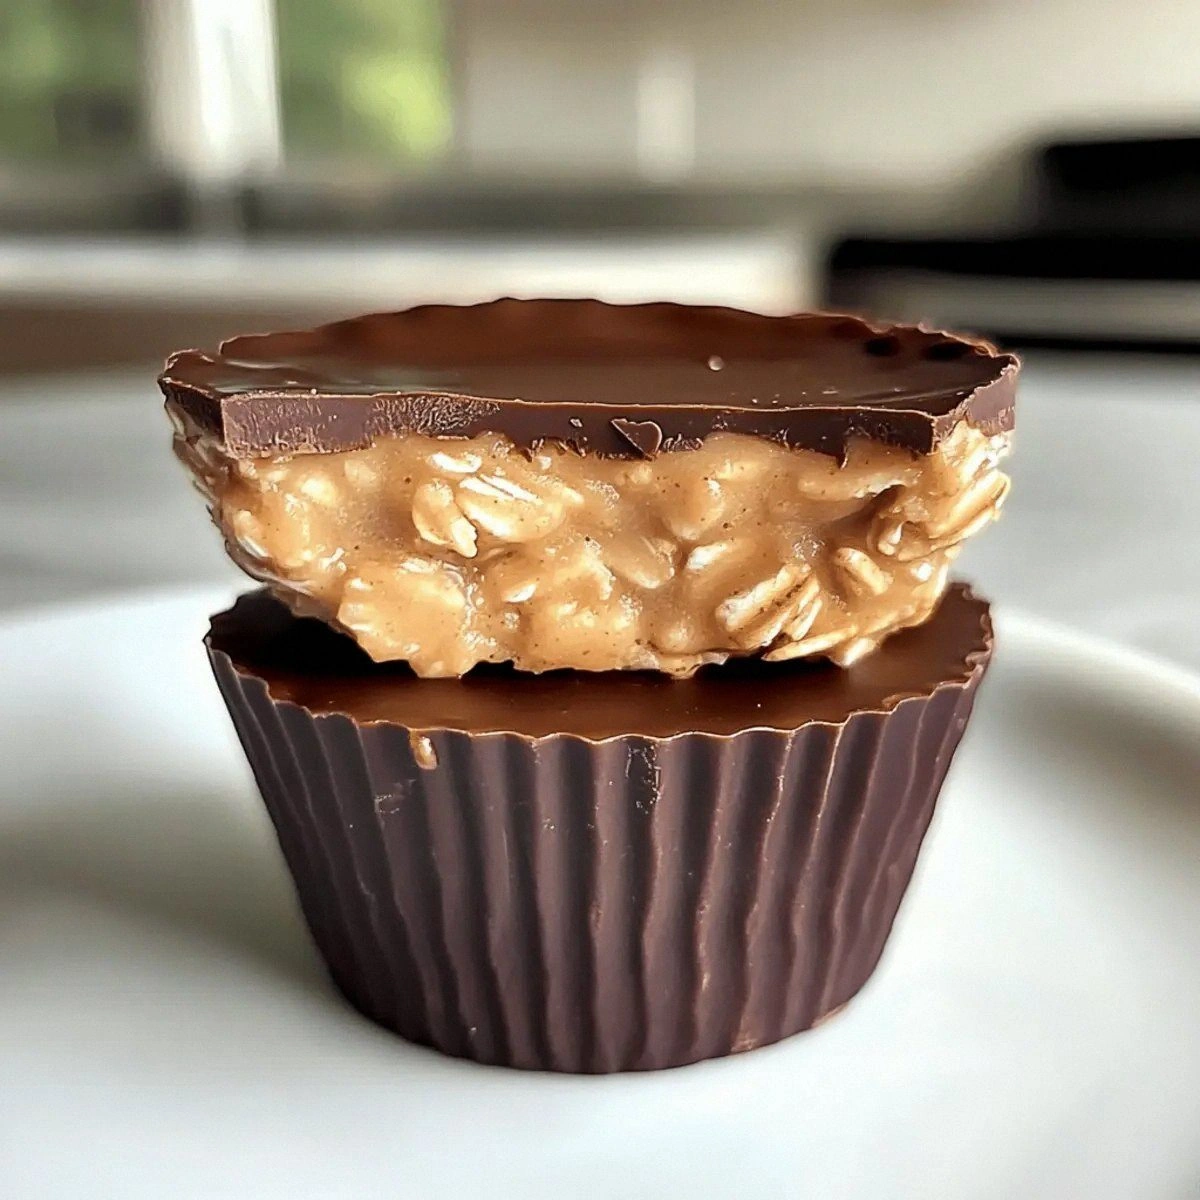
The moment the melted chocolate hits the cool oat‑peanut dough, a glossy sheen spreads like sunrise on a lake, and the scent of toasted peanuts and vanilla fills the kitchen. A single bite delivers a creamy, chewy snap that instantly awakens your taste buds. You can almost hear the faint crack as the chocolate shell gives way to the dense, protein‑rich center.
I first whipped these cups up after a brutal spin class when my usual protein bar left me craving something richer. My roommate, a self‑confessed chocolate junkie, watched me press the dough and begged for a taste—by the third cup she was already reaching for seconds. That night, the blend of oat heartiness and peanut butter decadence became our post‑workout ritual.
What sets this version apart is the no‑bake dough that fuses vanilla protein powder directly with dry oats, creating a sturdy yet tender base without any heat. The separate melting of chocolate ensures a glossy coating that stays intact, and a quick chill locks everything together for a perfect bite‑size treat. No oven, no mess, just pure, portable power.
On the palate, the sweet vanilla protein powder meets the earthy, nutty depth of peanut butter, while the oats add a subtle chew. A whisper of salt from the chocolate chips lifts the flavor, and the final chocolate drizzle adds a velvety, melt‑in‑your‑mouth finish. The texture dance—from firm crust to soft, chewy interior—keeps you reaching for more.
These cups shine as a grab‑and‑go snack for busy mornings, a post‑gym pick‑me‑up, or a kid‑friendly treat for after‑school cravings. Stack a dozen in a mason jar for a week‑long supply, or pack a few in your gym bag for instant energy. Pair them with a banana or a glass of almond milk for a balanced mini‑meal.
Don’t let the idea of “protein cups” intimidate you; the only technique is a firm press, and the total hands‑on time is under fifteen minutes. The only ‘cooking’ step is melting chocolate in short bursts, which even a novice can master. With a quick chill, you’ll have a shelf‑stable snack that looks as impressive as it tastes.
I’ve tested this recipe four times, swapping dark chocolate, almond butter, and even adding a pinch of cinnamon—each tweak still delivered that satisfying bite. My teenage son now asks for a “protein cup” before every soccer practice, and my fitness‑focused friends swear by the energy boost. Ready to give it a try? Let’s get mixing.
Why This Recipe Works
- The oat‑protein matrix binds the butter, creating a chewable dough without baking.
- Melting chocolate separately prevents seizing and yields a glossy coating.
- Chilling solidifies the chocolate shell, giving a satisfying snap when bitten.
Ingredient notes & substitutions
Vanilla Protein Powder
Adds a smooth vanilla flavor and boosts protein content for recovery.
Dry Oats
Provides fiber and structure, holding the dough together without baking.
Peanut Butter
Creates a rich, creamy base and adds healthy fats for satiety.
Milk Chocolate Chips
Forms a glossy, sweet coating that contrasts the salty peanut butter.
Almond or Skim Milk
Moistens the mixture just enough to bind without making it soggy.
Equipment you'll need
Ingredients
- 1 cup Vanilla Protein Powder (Use plant-based protein for vegan option)
- 2 cups Dry Oats (Use gluten-free oats for a gluten-free snack)
- 1 cup Peanut Butter (Swap with almond or cashew butter if allergic)
- 1 cup Milk Chocolate Chips (Try dark chocolate chips for a healthier twist)
- 1/4 cup Almond or Skim Milk (Non-dairy options work well too)
Before You Start
- Measure protein powder and oats precisely
- Soften peanut butter if refrigerated
- Set silicone cups on a flat tray
- Gather chocolate chips in a microwave‑safe bowl
Instructions
- 1Step 1
In a large mixing bowl, combine the vanilla protein powder and dry oats. Use a whisk to ensure they are evenly blended.
- 2Step 2
Scoop in the creamy peanut butter and use a spatula to blend it with the dry ingredients until it resembles a thick dough.
- 3Step 3
Gradually pour in almond or skim milk while stirring until it becomes slightly tacky and holds together.
- 4Step 4
Press about two tablespoons of the dough into each silicone muffin cup, ensuring each is compacted.
- 5Step 5
Melt the milk chocolate chips in a microwave-safe bowl, heating in 20-second intervals until smooth.
- 6Step 6
Evenly pour the melted chocolate over the pressed dough in each cup.
- 7Step 7
Refrigerate for about 1 hour or freeze for 30 minutes until the chocolate sets.
- 8Step 8
Carefully remove the cups from the molds and enjoy or store in an airtight container.
Pro tips
Press dough firmly
Compact the mixture tightly in each cup to prevent cracks when the chocolate sets.
Use room‑temp milk
Milk at room temperature blends more smoothly, avoiding a crumbly dough.
Melt chocolate in bursts
Heat in 20‑second intervals, stirring each time to keep chocolate glossy.
Chill for crisp shell
Refrigerate at least 1 hour so the chocolate hardens into a snap‑ready coating.
Store airtight
Keep cups in a sealed container to maintain moisture and prevent freezer burn.
Freeze for quick grab
Freeze individual cups for up to a month; thaw briefly before eating.
Add a pinch of salt
A tiny dash of sea salt on the chocolate enhances the sweet‑nutty balance.
Variations to try
Dark Chocolate Swap
Replace milk chocolate chips with dark chocolate for a richer, less sweet coating.
Almond Butter Version
Swap peanut butter for almond butter to change the nut profile and reduce allergens.
Vegan Friendly
Use plant‑based protein powder, dairy‑free chocolate, and oat milk for a fully vegan cup.
Cinnamon Spice Boost
Stir 1 tsp ground cinnamon into the oat‑protein mix for warm, cozy flavor.
Serving Suggestions
Troubleshooting
Dough too dry
Add a tablespoon of milk at a time until the mixture sticks together.
Chocolate runs
Melt in short bursts and stir often; let it cool slightly before pouring.
Cups stick to mold
Ensure the silicone cups are clean and lightly greased, or use parchment liners.
Storage & make-ahead
Refrigerator
Keep in an airtight container; lasts up to 5 days.
Freezer
Freeze individually in the silicone cups; up to 1 month. Thaw in fridge.
Best way to reheat
Microwave 15‑20 seconds or let sit at room temperature; no reheating needed.
Make-ahead
Press dough and chill; add chocolate just before serving for best texture.
Ingredients
- 1 cup Vanilla Protein Powder (Use plant-based protein for vegan option)
- 2 cups Dry Oats (Use gluten-free oats for a gluten-free snack)
- 1 cup Peanut Butter (Swap with almond or cashew butter if allergic)
- 1 cup Milk Chocolate Chips (Try dark chocolate chips for a healthier twist)
- 1/4 cup Almond or Skim Milk (Non-dairy options work well too)
Instructions
- 1In a large mixing bowl, combine the vanilla protein powder and dry oats. Use a whisk to ensure they are evenly blended.
- 2Scoop in the creamy peanut butter and use a spatula to blend it with the dry ingredients until it resembles a thick dough.
- 3Gradually pour in almond or skim milk while stirring until it becomes slightly tacky and holds together.
- 4Press about two tablespoons of the dough into each silicone muffin cup, ensuring each is compacted.
- 5Melt the milk chocolate chips in a microwave-safe bowl, heating in 20-second intervals until smooth.
- 6Evenly pour the melted chocolate over the pressed dough in each cup.
- 7Refrigerate for about 1 hour or freeze for 30 minutes until the chocolate sets.
- 8Carefully remove the cups from the molds and enjoy or store in an airtight container.