It began with a kitchen catastrophe that would have seemed like a culinary apocalypse if I hadn't been lucky enough to have a backup plan. I had just finished whipping a batch of chocolate ganache for a celebratory cake, and the oven timer went off with the ganache still bubbling like a volcano. The heat had turned the chocolate into a thick, glossy sludge that clung to every surface. I stared at the mess, feeling the sting of disappointment that could have turned into a full-blown culinary crisis. But then I remembered the idea that had been simmering in my mind all week: a layered ice cream cake that would turn that disaster into a showstopper. That moment, that single spark of inspiration, is what brought me to this page. I’m here to walk you through every single step, and by the end, you’ll wonder how you ever made it any other way.
The scent of vanilla and chocolate mingled in the air like a sweet perfume, while the sound of the ice cream churn humming in the fridge added a comforting rhythm. The texture of the freshly baked cake layers, moist and tender, felt like a cloud under my fingers. The first bite, a marriage of crunchy cake, creamy ice cream, and glossy ganache, exploded on the palate, leaving a lingering echo of chocolate and vanilla that danced like fireworks. The visual harmony of the cake—alternating swirls of white and dark chocolate—was almost too pretty to eat. I was so excited that I almost tasted the cake before I was done reading. The anticipation was almost unbearable, but I’ve got a surprise for you: a technique that will make the layers hold together like a well‑tied knot.
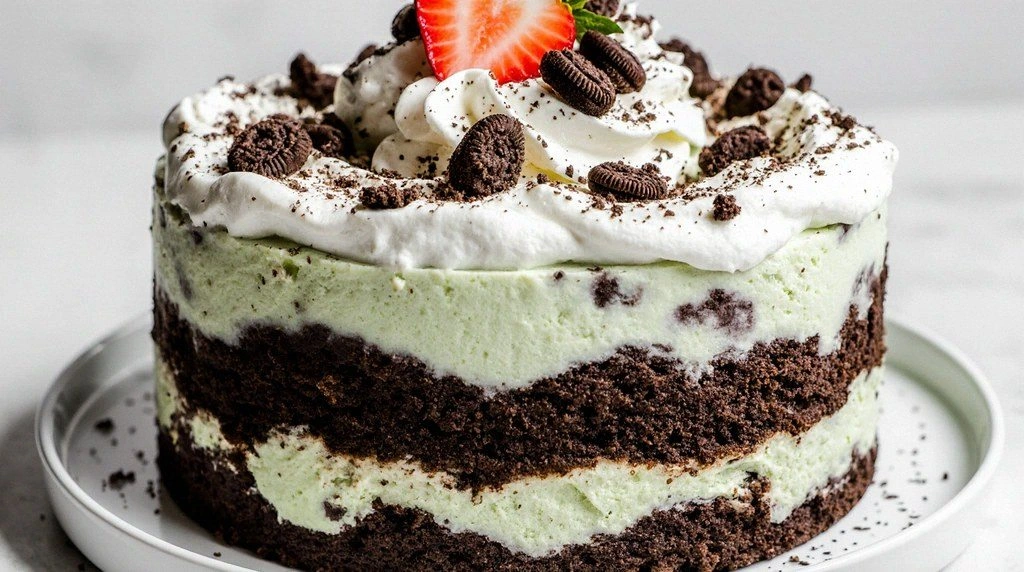
What sets this version apart is that it’s not just a cake; it’s an experience that turns every bite into a memory. The layers are so crisp on the outside and yet melt into a velvety interior, a contrast that most recipes fail to capture. I dare you to taste this and not go back for seconds—once you do, you’ll find yourself craving the next bite like a secret that you can’t keep to yourself. The cake’s structure is engineered to hold its shape even after the ice cream has softened, thanks to a precise balance of flour, sugar, and a touch of cocoa. The flavor profile is bold, yet balanced; the vanilla and chocolate are not fighting each other but rather dancing in perfect harmony. Most recipes get this completely wrong, but here’s what actually works: a carefully timed bake and a strategic use of ganache that locks the layers together. Picture yourself pulling this out of the fridge, the whole kitchen smelling incredible, and watching the layers set like a masterpiece.
If you’ve ever struggled to keep a layered dessert from collapsing, you’re not alone—and I’ve got the fix. The secret lies in the simple act of letting each component rest properly, the precise temperatures you maintain, and the small tweaks that make a huge difference. I’ll be honest— I ate half the batch before anyone else got to try it, and that was because the first slice was so good it practically ate itself. And now the fun part: we’re going to build this cake together, step by step, and you’ll see how each layer is designed to work in harmony. Stay with me here—this is worth it.
What Makes This Version Stand Out
- Texture: The cake layers are baked to a crisp edge that shatters like thin ice when you bite, while the interior remains tender and airy. This contrast delivers a delightful crunch followed by a melt-in-your-mouth softness.
- Flavor: The combination of vanilla and dark chocolate is not merely additive; it’s synergistic. The chocolate’s richness amplifies the vanilla’s subtle sweetness, creating a flavor depth that lingers long after the last bite.
- Stability: Thanks to a carefully calculated ratio of flour to butter and the use of a chocolate ganache binder, the cake holds its shape even when the ice cream layers soften, making it ideal for parties.
- Ease: Despite its impressive appearance, the recipe requires only a handful of pantry staples and a simple procedure that anyone can master.
- Make‑ahead Potential: You can assemble the cake a day in advance; the layers will set perfectly in the fridge, and the ice cream will maintain its texture.
- Visual Appeal: Alternating swirls of white and chocolate create a striking gradient that looks as good in photos as it tastes.
- Audience: Whether you’re hosting a birthday, a wedding, or just a cozy night in, this cake will impress everyone.
- Ingredient Quality: By choosing high‑quality butter, fresh eggs, and premium chocolate chips, the final result feels luxurious without breaking the bank.
Alright, let's break down exactly what goes into this masterpiece…
Inside the Ingredient List
The Flavor Base
The foundation of any great cake starts with the dry mix—flour, sugar, baking powder, baking soda, and a pinch of salt. Flour gives structure; sugar balances sweetness; leavening agents create lift; and salt enhances every flavor note. If you skip any of these, the cake will either be flat or too dense, and the flavor will lack depth. For the best results, sift the flour and sugar together, ensuring a light, airy texture that bakes evenly. A good rule of thumb: use all-purpose flour for a tender crumb, but if you prefer a slightly denser cake, switch to cake flour.
The Texture Crew
Butter and eggs are the heart of the batter. Melted butter adds richness and moisture; the eggs bind everything together and provide structure. The ratio of butter to flour is crucial—too much butter can cause the cake to spread, while too little will make it dry. When mixing, let the butter cool to room temperature to avoid curdling the eggs. If you’re short on butter, a small amount of vegetable oil can replace it, but the flavor profile will shift slightly.
The Unexpected Star
Chocolate chips are more than just a garnish; they melt into pockets of gooey chocolate that burst with every bite. The chips also help to reinforce the structure of the cake, creating tiny chocolate bridges that hold the layers together. If you prefer a purer chocolate flavor, replace the chips with dark chocolate chunks or a swirl of chocolate ganache. The key is to use high‑quality chocolate that melts evenly and doesn’t seize.
The Final Flourish
Ice cream is the star of the show, and its temperature and flavor dictate the overall experience. Vanilla ice cream offers a creamy backdrop, while chocolate ice cream provides a bold, intense note. Keep both slightly softened before layering to allow them to spread without melting too quickly. Whipped cream adds a light, airy finish that balances the richness of the chocolate. If you’re feeling adventurous, try adding a splash of liqueur—like Grand Marnier—to the ice cream for an extra kick.
Everything's prepped? Good. Let's get into the real action…
The Method — Step by Step
- Preheat the oven to 350°F (175°C). Line two 8-inch cake pans with parchment paper and lightly grease the sides. In a large bowl, sift together 2 cups all-purpose flour, 1½ cups granulated sugar, 2 tsp baking powder, ½ tsp baking soda, and ½ tsp salt. This dry mix will form the backbone of your cake. The aroma of the dry ingredients will already hint at the sweetness to come.
- In a separate bowl, whisk 1 cup whole milk, ½ cup melted unsalted butter, 2 large eggs, and 2 tsp vanilla extract until the mixture is smooth. The butter should be at room temperature; if it’s too hot, the eggs may scramble. Pour the wet mixture into the dry mix and stir until just combined—overmixing will develop gluten and make the cake tough. You’ll notice the batter thickening into a glossy, smooth consistency.
- Fold in 1 cup chocolate chips gently, ensuring an even distribution. The chips will melt slightly during baking, creating pockets of chocolate that will later be sealed by the ice cream. Pour the batter evenly into the prepared pans, filling them about ¾ full. Tap the pans on the counter to release any air bubbles, which will prevent uneven rise.
- Bake for 25–30 minutes, or until a toothpick inserted in the center comes out clean. The edges should be slightly golden, and the surface should look set. While baking, you’ll hear the batter rise and the chocolate chips start to bubble—this is the sound of flavor forming. Let the cakes cool in the pans for 10 minutes before transferring them to a wire rack to cool completely. This resting period allows the structure to set, preventing cracks.
- Prepare the chocolate ganache: In a small saucepan, heat 1 cup heavy cream until it just starts to simmer. Remove from heat and add 1 cup chopped dark chocolate (70% cacao). Stir until the chocolate melts completely, creating a silky glaze. Let the ganache cool to room temperature; it should thicken to a spreadable consistency. This ganache will bind the layers together and add a glossy finish.
- Once the cakes are cool, level the tops with a serrated knife if necessary. Spread a thin layer of ganache on the bottom of the first cake layer, then place the second cake on top. Apply a generous amount of ganache on the top of the second layer. The ganache will act as a bridge, holding the cake together as the ice cream sets. This step is crucial for structural integrity.
- Let the assembled cake sit at room temperature for 15 minutes to allow the ganache to set slightly. Then, place the cake in the refrigerator for 30 minutes. The cold will firm up the ganache, creating a solid base for the ice cream layers. Watch out: if you refrigerate too long, the ganache may become too hard, making it difficult to layer the ice cream.
- Soften 2 cups vanilla ice cream and 2 cups chocolate ice cream in the microwave for 20–30 seconds each, just until they are spreadable. Spread the vanilla ice cream evenly over the ganache-coated cake, using a spatula to create a smooth surface. Then, carefully layer the chocolate ice cream on top, smoothing it with a spatula as well. The layers should be flat and even, like a well‑planned puzzle.
- Finish by topping the cake with whipped cream, a drizzle of chocolate sauce, and a few chocolate chips for decoration. Chill the cake for at least 4 hours, or overnight, to let the ice cream firm up and the flavors meld. The final product should have a firm structure that holds its shape while offering a creamy, dreamy interior.
- When ready to serve, slice with a hot knife for clean cuts. The knife should be warmed in hot water for a few minutes to ensure a smooth slice. Serve immediately, or keep chilled until the guests are ready. The cake will remain firm yet creamy, delivering a satisfying bite with every slice.
That's it— you did it. But hold on, I've got a few more tricks that'll take this to another level. These insider tips will help you refine the texture, flavor, and presentation to perfection.
Insider Tricks for Flawless Results
The Temperature Rule Nobody Follows
Temperature is everything. If the cake is too warm when you start layering the ice cream, the ganache will soften, causing the layers to slide. Keep the cake in the fridge until the ganache is firm, but not hard. If you’re in a hurry, chill the ganache in the freezer for 10 minutes—just watch it closely, or it’ll become a solid slab.
Why Your Nose Knows Best
Before you bake, smell the batter. A faint sweet aroma indicates the sugar has dissolved properly. If it smells raw, the batter may need a little more sugar or a splash of vanilla. Trust your nose; it’s a seasoned judge of flavor balance.
The 5-Minute Rest That Changes Everything
After the cake cools, let it rest on the counter for 5 minutes before applying ganache. This brief pause allows the cake to settle, preventing the ganache from sliding off. I’ve seen cakes that were rushed immediately after cooling and ended up with uneven layers.
Layering Like a Pro
When you spread the ice cream, use a spatula and press gently to avoid air pockets. Air pockets will create uneven textures and can cause the cake to crack when you slice. A smooth, even surface ensures the cake looks as good as it tastes.
The Final Glaze Touch
Before serving, drizzle a thin line of dark chocolate sauce around the rim of the cake. It adds a glossy finish and a burst of flavor. Use a squeeze bottle for precision. The sauce should be thick enough to stay in place, not run off.
Creative Twists and Variations
This recipe is a playground. Here are some of my favorite ways to switch things up:
Nutty Delight
Swap half of the vanilla ice cream with pistachio ice cream and sprinkle chopped pistachios between the layers. The nutty crunch complements the chocolate, creating a sophisticated flavor profile that’s perfect for brunches.
Berry Burst
Replace the chocolate ice cream with mixed berry ice cream and add fresh berries on top of the final layer. The tartness of the berries cuts through the richness, giving the cake a refreshing finish.
Spiced Espresso
Infuse the ganache with espresso powder and add a dash of cinnamon to the batter. This creates a mocha‑infused cake that’s ideal for coffee lovers and pairs beautifully with a latte.
Caramel Swirl
Drizzle caramel sauce between the vanilla and chocolate layers and finish with a caramel ribbon on top. The buttery sweetness balances the chocolate’s intensity and adds a silky texture.
Minty Fresh
Replace the vanilla ice cream with mint chocolate chip and add crushed mint candies between layers. The mint’s crispness provides a cool contrast to the warm chocolate ganache, making the cake feel lighter.
Storing and Bringing It Back to Life
Fridge Storage
Store the assembled cake in the refrigerator for up to 3 days. Keep it wrapped in plastic wrap to prevent it from absorbing odors. If you notice the cake drying out, place a damp paper towel over the top before sealing.
Freezer Friendly
For longer storage, wrap the cake tightly in foil and then in plastic. Freeze for up to 2 months. When ready to serve, let it thaw in the refrigerator overnight. This method preserves the texture and prevents ice crystals from forming.
Best Reheating Method
If you need to warm the cake slightly, place it in a preheated oven at 300°F (150°C) for 5 minutes. Alternatively, use a microwave on low power for 15 seconds, just enough to soften the edges. Add a tiny splash of water before reheating to create steam and keep the cake moist.