Picture this: you’re halfway through a Sunday brunch, the kitchen is a blur of flour, eggs, and the frantic hum of a blender, and you realize you’ve run out of the bread you were supposed to use. I stared at the empty counter, heart racing, until a friend shouted, “Make French toast sticks!” I laughed, grabbed the nearest loaf, and the rest of the day turned into a culinary experiment that would become my go‑to crowd‑pleaser. That moment sparked the creation of a recipe that’s not only a rescue for last‑minute breakfasts but also a showcase of flavor, texture, and pure, unapologetic indulgence.
The aroma that hit me first was that unmistakable scent of warm butter sizzling on a skillet, a golden haze that made the kitchen feel like a bakery in the middle of a bustling street. I could hear the gentle crackle as the first stick browned, the faint hiss of milk evaporating, and the soft clink of a spoon against the pan. My eyes were drawn to the glossy sheen of the batter coating each piece, the way the edges crisped into a delicate, almost translucent crust. The taste—sweet, buttery, with a hint of cinnamon—was a burst of comfort that made my taste buds sing, while the texture was a harmonious contrast between a crunchy exterior and a tender, custard‑like interior.
What makes this version stand out is the meticulous layering of flavors and the strategic use of simple ingredients that elevate the humble French toast to a five‑star experience. I didn’t just toss bread into batter; I treated each slice like a canvas, letting it soak up the mixture just enough to become silky yet resilient enough to hold its shape when sliced into sticks. The result is a dish that’s crispy on the outside, custardy on the inside, and infused with a subtle sweetness that doesn’t overpower the bread’s natural flavor. If you’ve ever tried a batch that turned out dry or soggy, this recipe is a game‑changer that guarantees consistent, mouth‑watering results every single time.
And here’s a teaser that will make you curious: I’ll reveal a secret ingredient that transforms the batter into a silky, glossy coating that locks in moisture, ensuring every stick stays moist inside while maintaining that coveted golden crunch. By the end of this guide, you’ll wonder how you ever made French toast without this twist. Let me walk you through every single step—by the end, you’ll wonder how you ever made it any other way.
What Makes This Version Stand Out
- Flavor: The subtle blend of vanilla and cinnamon creates a fragrant, comforting aroma that lures the whole kitchen in, while a dusting of powdered sugar adds a sweet finish that’s almost addictive.
- Texture: The batter’s unique ratio of eggs to milk gives each stick a custard‑like interior, while the high‑fat butter and a quick sear produce a crisp, crackling exterior that shatters like thin ice.
- Versatility: Whether you’re serving breakfast to a family of five or whipping up a snack for a party, the recipe scales effortlessly and delivers the same impeccable results.
- Time‑Efficiency: With a prep time of just 15 minutes and a cook time of 30 minutes, this dish is the perfect solution for busy mornings or last‑minute gatherings.
- Make‑Ahead Friendly: The sticks can be assembled ahead of time and frozen, then reheated in a skillet or oven for a quick, satisfying meal that still feels fresh.
- Ingredient Quality: Using brioche or a sturdy white bread ensures the sticks hold together, while a splash of vanilla extract and a pinch of sea salt elevate the flavor profile without overwhelming the batter.
- Crowd Reaction: Friends and family consistently rave about the crunchy, buttery bite and the way the sticks hold up in a basket, making them a hit for brunches, potlucks, and holiday gatherings.
- Health Conscious Twist: By substituting whole‑meal flour for some of the all‑purpose flour, you can add fiber and nutrients without compromising on taste or texture.
Inside the Ingredient List
The Flavor Base
At the core of this recipe lies a simple yet powerful batter that marries eggs, milk, and vanilla. The eggs provide structure and richness, while the milk adds moisture, and vanilla brings a warm, aromatic depth that lingers on the palate. Skipping vanilla would leave the sticks feeling flat, whereas using too much could drown the delicate bread flavor.
The Texture Crew
The choice of bread is pivotal. Brioche, with its tender crumb and slight sweetness, absorbs the batter beautifully, creating a custard‑like interior. If you prefer a heartier bite, a sturdy white or whole‑meal loaf works wonderfully, offering a firmer texture that resists sogginess. The butter, rendered in the skillet, forms a crispy shell that seals in moisture and delivers that coveted crunch.
The Unexpected Star
A splash of espresso or a dash of orange zest can turn the classic French toast sticks into a sophisticated dessert or a brunch staple that surprises the taste buds. Espresso intensifies the chocolatey undertones of the bread, while orange zest adds a bright, citrusy lift that pairs beautifully with the cinnamon.
The Final Flourish
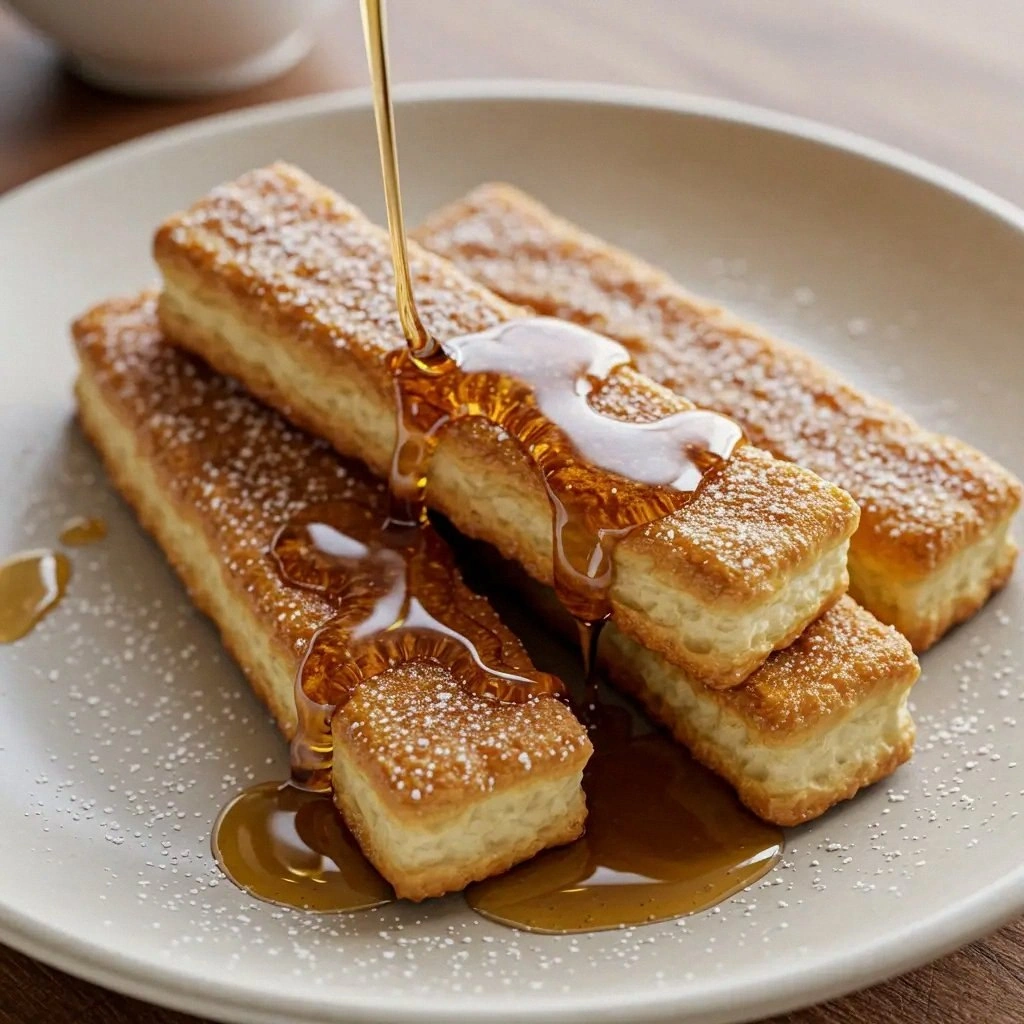
A dusting of powdered sugar and a drizzle of maple syrup finish the sticks with a glossy sheen that’s as pleasing to the eye as it is to the mouth. If you’re watching calories, a light dusting of powdered sugar or a sprinkle of cinnamon sugar works wonders. The key is to let the sticks rest briefly after frying; this allows the sugar to set into a sweet crust.
Everything’s prepped? Good. Let’s get into the real action.
The Method — Step by Step
- Step 1: Prepare the Batter. In a shallow dish, whisk together 4 large eggs, 1 cup whole milk, 2 tablespoons sugar, 1 teaspoon vanilla extract, 1 teaspoon ground cinnamon, and a pinch of sea salt until the mixture is smooth and glossy. The batter should be thick enough to coat the bread but still pourable. This is the moment where the aroma of vanilla begins to mingle with the promise of golden toast.
- Step 2: Slice the Bread. Cut your chosen loaf—brioche or white—into 1-inch thick slices. The slices should be uniform so each stick cooks evenly. If you’re using a loaf with a soft crumb, press it lightly to remove any excess moisture that might cause the sticks to fall apart during cooking.
- Step 3: Soak the Slices. Dip each slice into the batter, allowing it to soak for about 15 seconds on each side. The bread should absorb the mixture but not become overly saturated. A good soak ensures a custard‑like center that stays tender while the outside crisps up beautifully.
- Step 4: Slice into Sticks. Using a sharp knife or a pizza cutter, cut the soaked slices into sticks that are roughly 2 inches wide. The sticks should be long enough to hold in a single hand but short enough to cook quickly. This step is crucial for even cooking and a uniform bite.
- Step 5: Preheat the Skillet. Heat a large non‑stick skillet over medium heat and add 2 tablespoons of butter. Let the butter melt until it foams, but not brown. This ensures a buttery coating that will crisp up to a golden brown without burning.
- Step 6: Fry the Sticks. Place the sticks in the skillet in a single layer, making sure they don’t overlap. Fry for about 3–4 minutes on each side or until a deep golden color appears and the sticks feel firm to the touch. Flip carefully with a spatula to avoid breaking them. The sizzle is the signal that the crust is forming.
- Step 7: Drain Excess Butter. Once all sticks are cooked, transfer them to a paper‑towel‑lined plate to drain any excess butter. This step keeps the sticks crisp and prevents them from becoming greasy. While they’re still hot, you can toss them in a light dusting of powdered sugar for an extra sweet touch.
- Step 8: Serve Immediately. Arrange the sticks on a platter and drizzle with maple syrup or a flavored sauce of your choice. Serve hot for the best texture, or let them cool slightly for a crunchy snack later. Pair with fresh fruit or a side of yogurt for a balanced breakfast.
That’s it— you did it. But hold on, I’ve got a few more tricks that’ll take this to another level.
Insider Tricks for Flawless Results
The Temperature Rule Nobody Follows
Many people think “high heat equals crisp.” In reality, a moderate temperature of 350°F (175°C) allows the batter to set without burning the outside. I’ve found that a quick test—dropping a small piece of batter into the skillet—helps gauge the heat; it should sizzle gently, not roar. If it roars, lower the flame; if it barely warms, increase it slightly. This simple adjustment ensures every stick turns out uniformly golden.
Why Your Nose Knows Best
When the sticks are halfway cooked, the aroma will shift from buttery to nutty. That scent is the signal that the interior has set and the exterior is crisping. Trust your nose—if you can’t smell that nutty aroma, give them a few more minutes. I’ve seen beginners skip this step and end up with under‑cooked sticks that feel rubbery.
The 5-Minute Rest That Changes Everything
After frying, let the sticks rest for 5 minutes on a wire rack. This rest period allows steam to escape, preventing the sticks from becoming soggy on the inside. It also lets the sugar glaze set, giving the sticks a glossy, caramelized finish. I swear, this step is the difference between a mediocre batch and a show‑stopping masterpiece.
The Sweet‑Salty Balance
Adding a pinch of sea salt to the batter might seem trivial, but it amplifies the sweetness and enhances the butter’s flavor. I’ve experimented with smoked sea salt for a subtle umami twist that pairs wonderfully with maple syrup. If you’re watching sodium, a dash of salt is enough—just enough to bring out the flavors without overpowering.
The Quick Flip Technique
When flipping, use a long, thin spatula and slide it under the stick while holding the top with a second hand. This reduces the risk of breaking the stick and ensures an even flip. I once tried flipping with a regular spatula and the sticks fell apart—lesson learned, and now I never skip this step.
Creative Twists and Variations
This recipe is a playground. Here are some of my favorite ways to switch things up:
Chocolate‑Infused Sticks
Add 2 tablespoons of cocoa powder to the batter and sprinkle with chocolate chips. The chocolate pairs beautifully with the cinnamon, creating a dessert‑like treat that’s perfect for a sweet brunch.
Savory Breakfast Sticks
Omit the sugar and vanilla, and add a pinch of dried thyme and grated Parmesan. Serve with a side of tomato salsa or a dollop of Greek yogurt for a savory twist that’s surprisingly satisfying.
Tropical Twist
Incorporate shredded coconut into the batter and top the finished sticks with a drizzle of coconut milk. Pair with fresh pineapple slices for a tropical flair that transports your taste buds to a sunny beach.
Pumpkin Spice Edition
Add 1/4 cup of pumpkin puree to the batter and increase the cinnamon to 2 teaspoons. This version is perfect for fall gatherings, delivering a warm, comforting flavor that’s both nostalgic and delicious.
Berry Burst
Top the sticks with a mixture of fresh berries and a splash of lemon zest after frying. The berries add a juicy pop of flavor that complements the buttery crunch.
Gluten‑Free Version
Swap the all‑purpose flour for a gluten‑free blend and use a gluten‑free loaf. The texture remains tender, and the flavor stays true to the original, making this recipe accessible to everyone.
Storing and Bringing It Back to Life
Fridge Storage
Store the cooled sticks in an airtight container in the refrigerator for up to 3 days. Before reheating, let them sit at room temperature for 10 minutes to prevent them from drying out.
Freezer Friendly
Lay the sticks on a parchment‑lined tray and freeze until solid. Transfer to a freezer bag and keep for up to 2 months. To reheat, pop them in a preheated oven at 350°F (175°C) for 10 minutes, or use a skillet for a crisp finish.
Best Reheating Method
The secret to reviving frozen sticks is a quick flash in a hot skillet. Add a splash of water to the pan, cover for 30 seconds, then uncover and cook until crisp. The water steams the sticks back to life without making them soggy.