I still remember the night I tried to impress my roommate with deviled eggs for a game night. I had all the ingredients lined up, but the eggs came out looking like a sad, mushy mess—think half‑cooked custard instead of silky, creamy bites. That disaster sparked a mission: I needed a deviled egg recipe that would transform ordinary boiled eggs into a crowd‑pleaser that even my picky friend would devour. And that’s exactly what I’ve discovered.
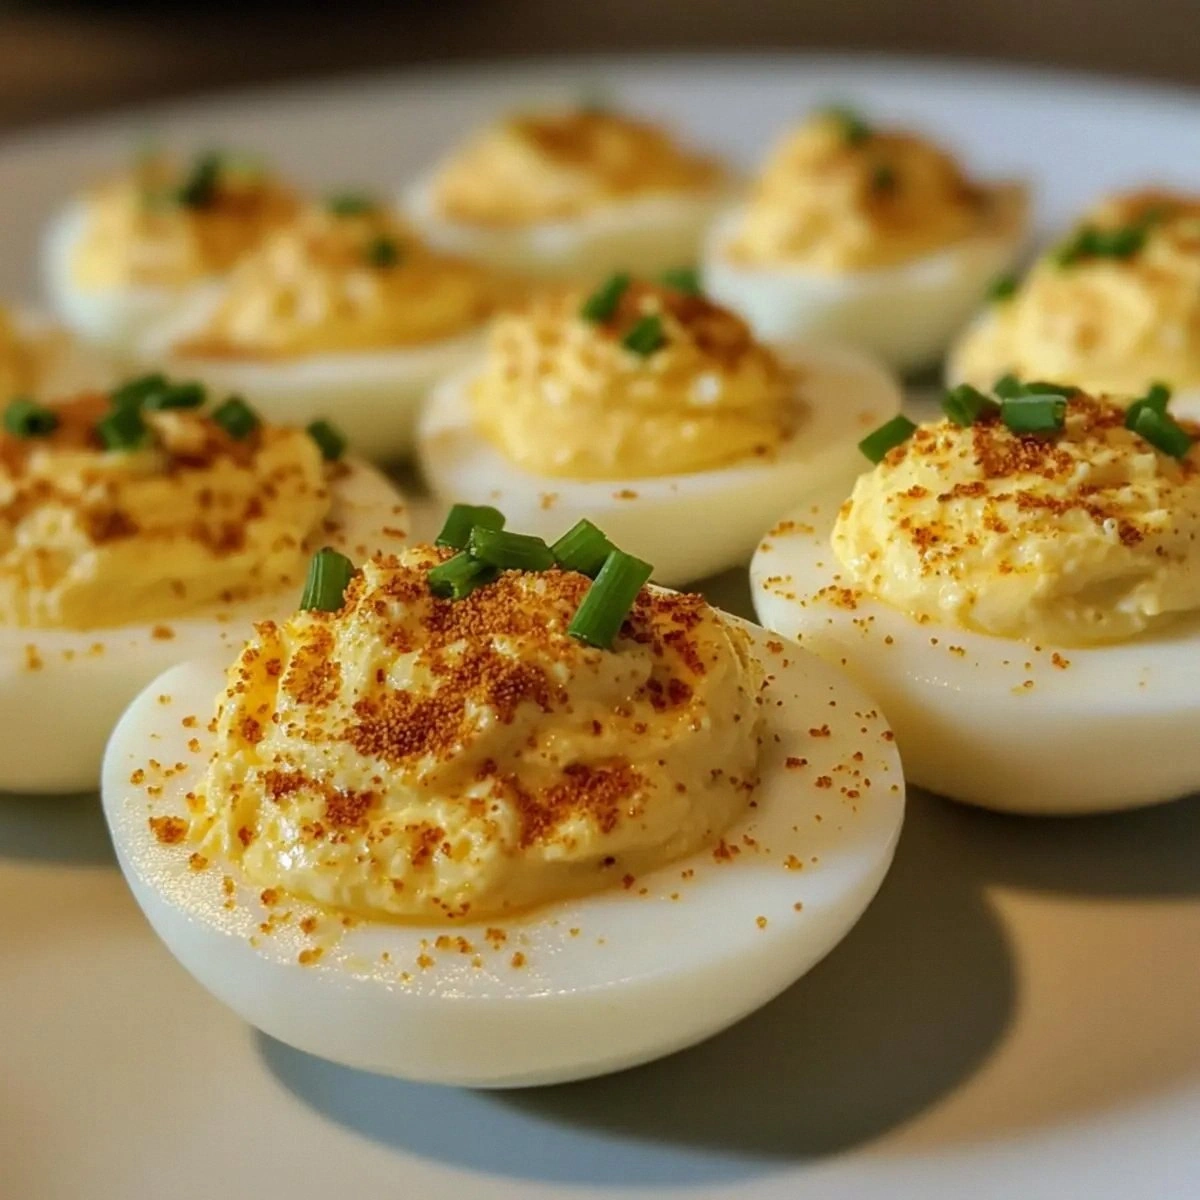
Picture this: a plate of golden eggs, each half split with a perfectly smooth, velvety filling that glistens under the kitchen light. The aroma of sharp Dijon mingles with fresh chives, and a dusting of paprika gives a subtle hint of warmth. The first bite releases a burst of tang, then the creamy mayo envelops your palate, and finally the paprika whispers a smoky finish. It’s a flavor rollercoaster that starts with a gentle kick and ends with a lingering, savory aftertaste.
Most deviled egg recipes fall into one of two traps: either they’re too dry and bland, or they’re overly heavy and greasy. I’ve spent years tweaking ratios, experimenting with mustard types, and testing different egg sizes until I found the sweet spot that balances richness with bright acidity. This version uses a touch of white vinegar to cut through the mayo, a whisper of pepper to add depth, and fresh chives for that green, herbaceous pop that makes the dish feel alive. It’s the kind of recipe that feels like a secret weapon at parties.
What sets this recipe apart is not just the taste but the simplicity of the technique. I’ve distilled the process into a few straightforward steps, each designed to preserve the eggs’ texture while amplifying flavor. I dare you to taste these and not go back for seconds—once you try them, you’ll never settle for the ordinary. So let me walk you through every single step—by the end, you’ll wonder how you ever made deviled eggs any other way.
What Makes This Version Stand Out
- Flavor: The combination of sharp Dijon and creamy mayo creates a balanced profile that’s both tangy and smooth, unlike the cloying sweetness of some commercial mixes.
- Texture: The eggs are boiled to a perfect soft center, then cooled quickly to lock in a firm yet tender bite that won’t crumble during filling.
- Freshness: Fresh chives add a bright, green note that lifts the dish, turning a standard appetizer into a garden‑fresh experience.
- Versatility: The recipe scales effortlessly, making it ideal for a small gathering or a large potluck without compromising quality.
- Make‑ahead: The filling can be prepared up to 24 hours in advance, allowing you to focus on plating on the day of the event.
- Health‑friendly: By using only a quarter cup of mayo and a teaspoon of vinegar, the dish stays light while still delivering a satisfying creaminess.
- Presentation: A light dusting of paprika gives a subtle pop of color and a gentle warmth that makes the eggs visually appealing.
Alright, let's break down exactly what goes into this masterpiece. Every ingredient has been chosen to enhance the overall experience, from the first bite to the last. I’ll walk you through each component, explaining its role and why you shouldn’t skip it. Trust me, even the tiniest detail matters when you’re aiming for deviled egg perfection.
Inside the Ingredient List
The Flavor Base
The eggs themselves are the foundation—six large eggs provide the custard-like texture that holds the filling together. Choosing fresh, firm eggs ensures a smooth, even yolk that doesn’t split or become watery. If you use older eggs, the yolks can become thin, and the filling will lose its structure.
Mayonnaise is the creamy backbone, delivering richness without overpowering the other flavors. A quarter cup of mayo is enough to coat the yolks and create a silky consistency that clings to the whites. If you prefer a lighter version, swap half the mayo for Greek yogurt; the texture changes slightly, but the result stays luscious.
Dijon mustard adds a subtle heat and sharpness that cuts through the mayo’s heaviness. One tablespoon of Dijon is a sweet spot—too little and the filling feels bland; too much and it becomes overwhelmingly pungent. If you’re a fan of extra spice, a pinch of cayenne can replace a portion of the mustard for a kick.
The Texture Crew
White vinegar is the secret to keeping the filling bright and airy. A teaspoon of vinegar balances the richness of mayo and helps the yolks set into a firm, custard-like consistency. Without vinegar, the filling can become gummy or overly dense.
Salt is the silent enhancer that brings all the flavors together. A quarter teaspoon of salt is enough to highlight the eggs, mayo, and mustard without making them taste metallic. If you’re watching sodium, a pinch of sea salt works just as well.
Black pepper adds a subtle, earthy note that rounds out the dish. An eighth teaspoon is a whisper of flavor; it’s enough to provide depth without dominating the palate. A fresh grind will give a more vibrant pepper taste than pre‑ground.
The Unexpected Star
Fresh chives are the green, herbaceous element that keeps the dish from feeling stale. Two tablespoons of chopped chives add a bright, oniony freshness that pairs wonderfully with the creamy filling. If you can’t find fresh chives, a pinch of dried chives will work, but the flavor will be more subdued.
Chives also provide a subtle crunch if you sprinkle them on top before serving. Their thin stems break easily, giving a pleasant texture contrast to the creamy interior. For a more pronounced herb flavor, you can add a tablespoon of finely chopped parsley or cilantro.
The Final Flourish
Paprika is the finishing touch that adds color, warmth, and a hint of smokiness. A teaspoon of paprika dusted over the tops gives a subtle depth that makes the eggs look inviting. Smoked paprika will intensify the smoky flavor, while sweet paprika offers a milder, sweeter finish.
Paprika also plays a visual role—its bright red hue contrasts beautifully with the pale egg whites and creamy filling, making each bite a feast for the eyes. If you’re a fan of spice, a pinch of cayenne or a dash of hot sauce can replace the paprika for an extra kick.
Everything's prepped? Good. Let's get into the real action...
The Method — Step by Step
- Place the eggs in a single layer in a saucepan and cover them with cold water. Bring the water to a gentle boil over medium heat. Once boiling, turn off the heat, cover the pan, and let the eggs sit for 12 minutes. This ensures the yolks remain soft and the whites firm. After 12 minutes, transfer the eggs to a bowl of ice water to stop the cooking process and make peeling easier.
- Peel the cooled eggs carefully, then slice them lengthwise into halves. Lay the halves on a clean cutting board, yolk side up. Gently press the yolks to release them into a bowl; you’ll see a smooth, golden paste forming. If any whites break, don’t worry—just trim the edges and keep the halves intact for serving.
- Mash the yolks with a fork until they’re almost crumbly. Add mayonnaise, Dijon mustard, and white vinegar to the bowl. Mix until the texture is silky and the mixture is well combined. This step is crucial; the right consistency will coat the whites perfectly. If the mixture feels too thick, add a splash of milk or water to loosen it.
- Season the mixture with salt and black pepper. Stir until the flavors meld, then fold in the chopped chives. The chives should be evenly distributed to avoid clumps. Taste the filling; adjust salt or mustard if needed. The goal is a balanced, savory filling.
- Fill each egg white half with the prepared mixture using a small spoon or a piping bag fitted with a star tip. The piping bag ensures a neat, uniform fill and gives a professional look. If you don’t have a piping bag, a plastic zip‑lock bag with a corner snipped works as a makeshift alternative.
- Once all halves are filled, dust each egg with paprika. This not only adds flavor but also creates a subtle contrast against the creamy white. The paprika should be light; you don’t want it to overpower the filling. A quick spritz of paprika also gives a slightly smoky aroma.
- Place the finished deviled eggs on a chilled platter. Keep them refrigerated until serving to maintain freshness. If you’re serving at a party, a small bowl of extra filling nearby allows guests to top their eggs as desired.
- Serve immediately or cover the platter with plastic wrap and refrigerate for up to 24 hours. The eggs stay creamy and flavorful, making them ideal for late‑night snacking or a pre‑party appetizer.
That's it — you did it. But hold on, I've got a few more tricks that'll take this to another level. From adjusting the seasoning to perfecting the plating, these extra steps will elevate your deviled eggs from good to unforgettable.
Insider Tricks for Flawless Results
The Temperature Rule Nobody Follows
Many people skip the ice bath after boiling, leading to cracked whites and uneven yolks. By plunging the eggs into ice water for at least 5 minutes, you stop the cooking process instantly and make peeling a breeze. The sudden temperature shift also helps the whites contract, giving a firmer bite.
Why Your Nose Knows Best
If the filling smells slightly off, it’s usually due to overcooking the eggs. A quick sniff test—if it smells like burnt toast, you’ve gone too far. The proper boiling time of 12 minutes keeps the yolks soft and the whites crisp.
The 5‑Minute Rest That Changes Everything
After filling the eggs, let them rest for 5 minutes before dusting with paprika. This pause allows the filling to set just enough to hold its shape, preventing it from sliding off when you plate them. It also lets the flavors meld, giving a richer taste.
Chill, Don’t Freeze
If you’re storing deviled eggs for later, keep them in a shallow airtight container. Freezing them can cause the yolk mixture to separate and become watery. Instead, refrigerate them on a plate lined with parchment to prevent sticking.
Presentation Matters
A simple garnish of fresh chive stems or a sprinkle of smoked paprika can elevate the visual appeal. Arrange the eggs in a circular pattern, alternating colors for a striking effect. Guests will be tempted to dig in before you even serve.
With these insider tricks, you’re now equipped to handle any deviled egg challenge. Whether it’s a last‑minute dinner or a pre‑planned potluck, you’ll always deliver a dish that’s creamy, flavorful, and visually stunning.
Creative Twists and Variations
This recipe is a playground. Here are some of my favorite ways to switch things up:
Spicy Sriracha Surprise
Swap the Dijon mustard for a tablespoon of Sriracha and add a dash of lime juice. The result is a fiery, tangy filling that pairs well with a crisp salad. Guests who love heat will love this bold twist.
Herby Mediterranean Edition
Add a tablespoon of chopped sun‑dried tomatoes and a teaspoon of oregano to the filling. The Mediterranean herbs give a savory depth, and the tomatoes add a burst of sweetness. This version works wonderfully with a Greek salad.
Cheesy Kick
Stir in a tablespoon of grated sharp cheddar or crumbled feta before filling the eggs. The cheese melts slightly, creating a creamy, gooey center. This variation is perfect for a brunch spread.
Truffled Elegance
Finish the eggs with a light drizzle of truffle oil and a sprinkle of finely grated Parmesan. The truffle’s earthy aroma elevates the dish to gourmet status. Ideal for a special occasion or a sophisticated gathering.
Vegan Version
Replace the eggs with baked tofu cubes and use vegan mayo and mustard. The tofu provides a protein punch, while the vegan mayo keeps the filling creamy. This twist makes the dish inclusive for plant‑based guests.
Chocolate Chip Delight
For a sweet spin, fold in a handful of mini chocolate chips into the filling. The chocolate pairs surprisingly well with the savory mayo, creating a sweet‑savory contrast that’s a hit with kids. Serve them as a fun party snack.
Experimenting with these variations keeps the classic deviled egg fresh and exciting. Whether you’re craving heat, herbs, or a playful sweet twist, there’s a version that will satisfy every palate.
Storing and Bringing It Back to Life
Fridge Storage
Store deviled eggs in a shallow airtight container in the refrigerator for up to 24 hours. The shallow container ensures even cooling and prevents the filling from pooling. Keep them chilled until serving to maintain the creamy texture.
Freezer Friendly
Freezing deviled eggs is not recommended because the yolk mixture can separate. If you must freeze, place the filled eggs in a freezer‑safe bag and remove as much air as possible. Thaw in the refrigerator overnight, then re‑coat with a fresh layer of paprika before serving.
Best Reheating Method
Reheat deviled eggs gently in a warm water bath for 5 minutes to restore softness. Avoid microwaving, which can make the filling rubbery. A tiny splash of water before reheating steams the eggs back to perfection, keeping the texture silky.