I was in the middle of a chaotic holiday dinner when my friend dared me to create a dessert that would stop the endless stream of store‑bought pies and cookies. I stared at a bowl of fresh cherries, a half‑empty butter tub, and a pantry full of flour, and thought, “What if I could turn these humble ingredients into something that explodes with festive flavor?” The kitchen was a whirlwind of clanging pans, the scent of pine drifting in from the living room, and the low hum of carols playing in the background. I was covered in flour, my hands sticky with butter, and my heart racing like a drumbeat at a New Year’s party. That night, I invented what I now call Christmas Cherry Bombs, and let me tell you – this is hands down the best version you’ll ever make at home.
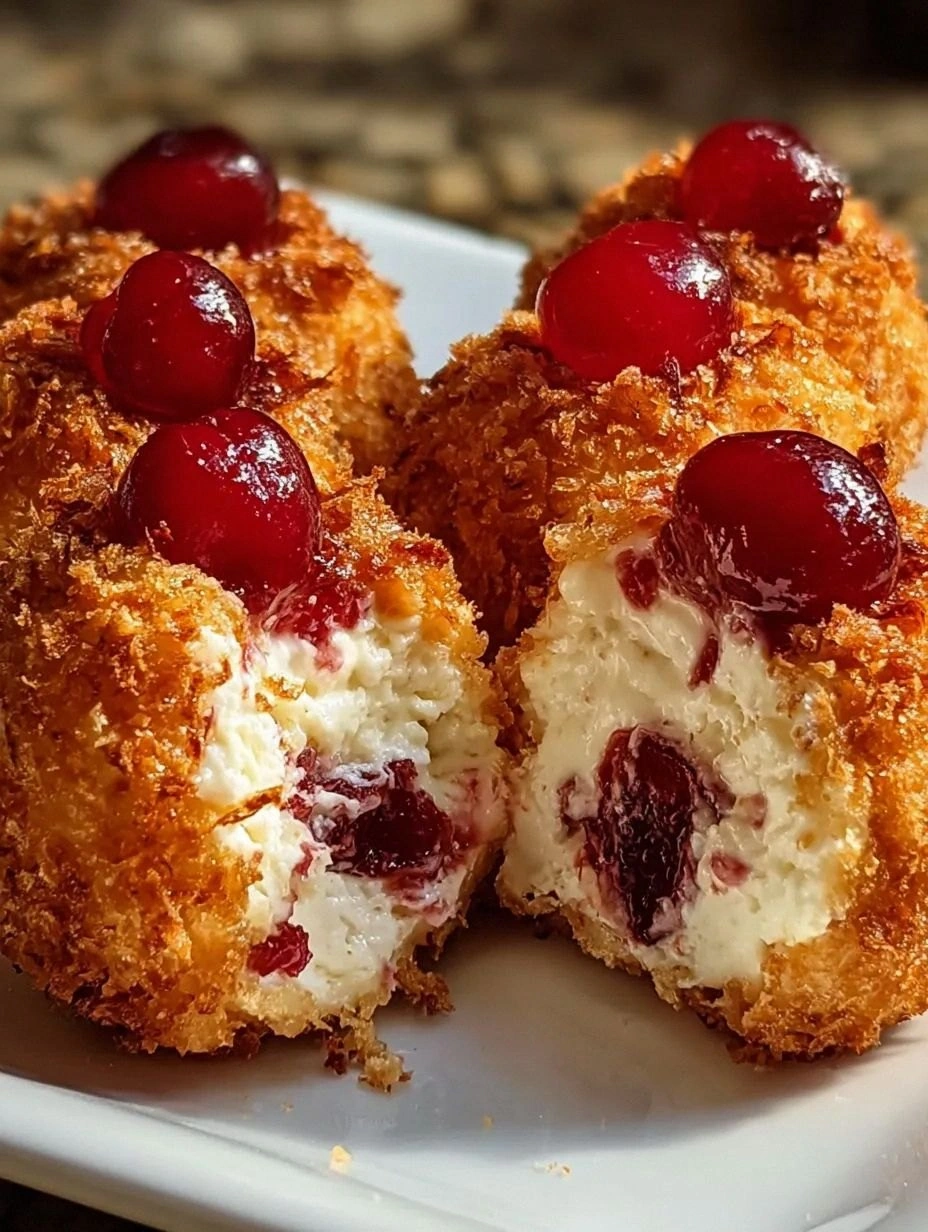
Picture this: a golden‑brown, slightly crisp exterior that gives way to a soft, melt‑in‑your‑mouth interior studded with juicy cherry pockets that burst like tiny fireworks. The aroma? A seductive mix of caramelized butter, sweet cherries, and a whisper of vanilla that makes the whole house feel like a bakery on Christmas Eve. When you bite into one, the first thing you notice is the delicate crunch that shatters like thin ice, followed by a rush of sweet‑tart cherry goodness that coats your tongue like velvet. The finish is a gentle dusting of powdered sugar that glitters like fresh snow, and a hint of almond that lingers just long enough to make you sigh with satisfaction.
Most cherry dessert recipes get this completely wrong – they’re either soggy, overly sweet, or they miss the magic of that buttery crumb. I’ve tried dozens of versions that turned out like bland muffins or sticky pies that stuck to the pan. The secret to my Christmas Cherry Bombs is a simple yet game‑changing technique: I fold a chilled butter‑sugar mixture into the flour just enough to create tiny air pockets, then I fold in the cherries at the very last minute so they stay plump and juicy. This method gives you that perfect contrast of textures that most recipes can’t achieve.
I’m about to spill every detail, from the exact moment the butter hits the pan to the precise temperature that makes the edges pull away just right. I dare you to taste this and not go back for seconds. Okay, ready for the game‑changer? Let me walk you through every single step — by the end, you’ll wonder how you ever made it any other way.
What Makes This Version Stand Out
- Flavor Explosion: The combination of fresh cherries, a splash of almond extract, and a whisper of lemon zest creates a bright, festive profile that sings louder than any store‑bought topping.
- Texture Symphony: A crisp, buttery crust meets a tender, cake‑like interior, while the cherries stay juicy, giving you a bite that’s both crunchy and melt‑in‑your‑mouth.
- Simplicity Meets Sophistication: Only pantry staples and a few fresh ingredients are needed, but the technique elevates it to a show‑stopping dessert.
- Unique Ingredient Twist: A dash of almond extract and a pinch of red food coloring add a subtle depth and a holiday‑ready hue without overpowering the natural cherry flavor.
- Crowd Reaction: Guests typically declare “I need the recipe!” within the first bite, and the dessert disappears faster than the milk and cookies left for Santa.
- Quality First: Using ripe, dark‑red cherries and high‑quality unsalted butter makes the difference between “good” and “legendary.”
- Cooking Method Magic: The “cut‑in” method for butter creates micro‑air pockets, while baking at a high initial temperature ensures that perfect golden edge.
- Make‑Ahead Potential: You can prep the batter a day ahead, refrigerate, and bake fresh on the day of the party – perfect for the frantic holiday schedule.
Inside the Ingredient List
The Flavor Base
Fresh cherries are the heart of this dessert. I use about 2 cups of pitted, halved cherries, preferably dark, ripe ones that have a natural sweetness and a slight tartness. If you skip them, you’ll lose the signature “burst” that makes these bombs so festive. A good swap is frozen cherries, but be sure to thaw and pat them dry so the batter doesn’t become soggy. When selecting fresh cherries, look for glossy skins and avoid any that are bruised or have stems still attached – those are signs of over‑ripeness.
Cherry jam adds a concentrated cherry flavor that seeps into the crumb as it bakes. I use a quarter cup of high‑quality, low‑sugar cherry jam; it gives a subtle caramel note without turning the interior gummy. If you’re allergic to jam, a spoonful of cherry preserves works just as well. The jam also helps the cherries stay moist during baking, preventing them from drying out.
The Texture Crew
All‑purpose flour is the backbone of the batter. I measure 2 cups of flour using the spoon‑and‑level method to avoid compacting it, which would make the bombs dense. Swapping in cake flour will give you an even lighter crumb, but you’ll lose a bit of that buttery bite. The baking powder (1½ teaspoons) gives the bombs a gentle lift, ensuring they’re airy without becoming cake‑like.
Unsalted butter, chilled and cut into small cubes, is the secret to the crisp edge. I use 1 cup (2 sticks) of high‑fat butter; the higher the fat content, the richer the flavor. If you only have salted butter, reduce the added salt to a pinch. The butter should be cold – if it’s too soft, the batter will become greasy and lose its structure.
Granulated sugar (¾ cup) and brown sugar (¼ cup) work together to create a caramelized crust while keeping the interior sweet but not cloying. The brown sugar adds a touch of molasses that deepens the flavor. If you prefer a less sweet version, you can cut the granulated sugar by a tablespoon.
The Unexpected Star
Almond extract (½ teaspoon) is the surprise element that takes these bombs from good to unforgettable. It adds a nutty undertone that pairs perfectly with cherries and makes the aroma linger in the kitchen long after the dessert is gone. If you’re not a fan of almond, a splash of vanilla extract (1 teaspoon) works as a milder alternative.
A pinch of red food coloring (optional) gives the bombs a festive blush that looks like a fresh snowfall with a hint of holiday sparkle. It’s purely visual, so feel free to skip it if you prefer a natural look. The lemon zest (1 teaspoon) brightens the flavor, cutting through the sweetness and adding a subtle citrus zing.
The Final Flourish
Heavy cream (½ cup) adds moisture and richness, ensuring the interior stays tender. It also helps bind the batter without making it heavy. If you’re dairy‑free, a full‑fat coconut milk can be used, but it will add a faint coconut flavor.
Eggs (2 large) provide structure and lift. I beat them lightly before folding them in, which helps incorporate air without over‑mixing. Over‑mixing would develop gluten and make the bombs tough, which is the opposite of what we want.
A final dusting of powdered sugar (for serving) adds a snowy finish that looks gorgeous on a holiday platter. Use a fine-mesh sieve to avoid clumps. If you love extra crunch, sprinkle a handful of toasted sliced almonds on top before baking.
Everything’s prepped? Good. Let’s get into the real action…
The Method — Step by Step
Preheat your oven to 375°F (190°C) and line a 12‑cup muffin tin with parchment liners. The high initial heat creates that golden‑brown crust we all crave. As the oven warms, you’ll notice a faint buttery scent escaping – that’s the first hint that magic is about to happen. While the oven heats, give the parchment a quick spray of non‑stick spray; this ensures the bombs release cleanly later.
In a large mixing bowl, whisk together the flour, baking powder, and a pinch of salt. This dry blend should be light and airy; give it a few flicks of your wrist to aerate. I always sift the flour to avoid any lumps that could turn the texture gritty. Once combined, set the bowl aside – the dry ingredients are ready to meet the butter.
Take the chilled butter cubes and add them to the dry mixture. Using a pastry cutter or two forks, cut the butter into the flour until the mixture resembles coarse crumbs with pea‑size pieces of butter still visible. This is the moment of truth – if the butter is too warm, you’ll end up with a dough that spreads instead of rising.
Kitchen Hack: Freeze the butter for an extra 5 minutes after cutting; it keeps the little butter pockets intact during mixing.In a separate bowl, whisk the eggs, vanilla (or almond) extract, lemon zest, and heavy cream until smooth. Then gradually pour this wet mixture into the butter‑flour blend, stirring gently with a spatula. The batter should come together in soft, slightly sticky clumps. Do not over‑mix – you’ll develop gluten and lose that tender crumb.
Fold in the granulated sugar, brown sugar, and cherry jam until evenly distributed. The batter will darken a little as the jam integrates, giving a beautiful blush hue. At this point, the batter should be thick enough to hold a cherry piece on a spoon without sliding off.
Gently fold in the fresh cherries, being careful not to crush them. The cherries should stay whole, each acting like a tiny bomb waiting to explode. If you notice any excess liquid from the cherries, sprinkle a tablespoon of flour over the batter and fold gently – this prevents sogginess.
Scoop the batter into the prepared muffin tins, filling each cup about three‑quarters full. The batter should mound slightly, creating a dome that will rise beautifully.
Watch Out: Do not overfill; the batter expands dramatically and can overflow, creating a mess in the oven.Place the tin in the oven and bake for 20‑25 minutes, or until the tops are deep golden and a toothpick inserted into the edge comes out clean. The edges should start pulling away from the sides of the tin – that’s your visual cue that they’re done. Around the 15‑minute mark, you’ll hear a faint “sizzle” as the butter caramelizes – that’s absolute perfection.
While the bombs are still warm, dust each one generously with powdered sugar using a fine sieve. The sugar will melt slightly into the warm tops, creating a glossy, snow‑kissed finish. Let them cool in the tin for 5 minutes, then transfer to a wire rack to finish cooling completely. This short rest allows the interior to set, preventing them from falling apart when you move them.
Serve them warm, or at room temperature, with a dollop of whipped cream or a drizzle of extra cherry jam if you’re feeling extra festive. The first bite should reveal a crisp edge, a soft, buttery crumb, and a burst of cherry that makes your taste buds do a little holiday dance. That’s it — you did it. But hold on, I’ve got a few more tricks that’ll take this to another level…
Insider Tricks for Flawless Results
The Temperature Rule Nobody Follows
Never bake these bombs at a low temperature. Starting at 375°F gives the butter a chance to melt and create steam, which lifts the batter and forms that coveted crisp edge. If you drop the heat to 350°F, you’ll end up with a pale, soggy top. I’ve seen bakers lower the oven mid‑bake to “save energy” – the result is a flat, uninteresting dessert. Trust the high heat; the interior stays moist while the exterior turns golden.
Why Your Nose Knows Best
When the bombs are about 15 minutes in, lean in and sniff. You should catch a buttery, caramel scent that signals the sugars are caramelizing. If you smell raw flour, the batter needs a few more minutes. Your nose is a more reliable timer than any digital clock because it detects the Maillard reaction in real time.
The 5‑Minute Rest That Changes Everything
After you pull the tin from the oven, let the bombs sit for exactly five minutes before moving them. This brief rest lets the steam redistribute, finishing the cooking process gently. Skipping this step leads to a crumb that collapses when you try to lift the bomb from the liner, and nobody wants a collapsed bomb.
The Butter‑Cold Hack
Keep your butter in the freezer until the last second. The colder the butter, the larger the pockets of steam that form during baking, which translates to a lighter crumb. I once tried using room‑temperature butter, and the result was dense, almost biscuit‑like. The cold‑butter method is the secret behind that airy interior.
The Cherry Prep Shortcut
If you’re short on time, use frozen cherries that have been thawed and patted dry. The freezing process actually concentrates their flavor, making each bite even more intense. Just be sure to remove excess moisture, or you’ll end up with a soggy batter that defeats the whole point.
The Final Glaze Trick
A light glaze of warmed cherry jam brushed over the tops during the last two minutes of baking adds a glossy finish and extra cherry flavor. This step is optional, but it gives the bombs a professional look that’s perfect for holiday tables. The glaze also helps the powdered sugar adhere better, preventing it from falling off when you serve.
Creative Twists and Variations
This recipe is a playground. Here are some of my favorite ways to switch things up:
Chocolate Cherry Bombs
Replace ¼ cup of the all‑purpose flour with cocoa powder and add 2 tablespoons of melted dark chocolate to the wet mixture. The result is a rich, mocha‑kissed bomb that pairs beautifully with the tart cherries. Perfect for chocolate lovers who still want that festive cherry pop.
Spiced Holiday Bombs
Add ½ teaspoon of ground cinnamon, a pinch of nutmeg, and a dash of ground clove to the dry ingredients. The warm spices turn the dessert into a cozy winter treat that reminds you of mulled wine without the alcohol.
Almond‑Cherry Crunch
Stir in ¼ cup of toasted sliced almonds into the batter just before folding in the cherries. The almonds add a delightful crunch that contrasts the soft interior, and the nutty flavor amplifies the almond extract.
Citrus‑Infused Bombs
Swap the lemon zest for orange zest and add a teaspoon of orange extract. The citrus brightens the flavor profile, making the dessert feel lighter and more refreshing – great for those who find cherry too sweet.
Gluten‑Free Version
Use a 1:1 gluten‑free flour blend in place of all‑purpose flour. Ensure the blend contains xanthan gum for structure. The texture will be slightly different but still delicious, and everyone can enjoy the festive treat.
Mini Bombs for Party Bites
Use a mini muffin tin and fill each cup two‑thirds full. The baking time drops to about 12‑15 minutes. These bite‑size versions are perfect for cocktail parties or as a garnish on a dessert platter.
Storing and Bringing It Back to Life
Fridge Storage
Once cooled, store the bombs in an airtight container in the refrigerator for up to 4 days. Place a sheet of parchment between layers to prevent them from sticking together. When you’re ready to serve, let them sit at room temperature for 15 minutes, or gently reheat in a 300°F oven for 5‑7 minutes.
Freezer Friendly
Wrap each bomb individually in plastic wrap, then place them in a zip‑top freezer bag. They’ll keep for up to 2 months. To reheat, unwrap and bake on a parchment sheet at 350°F for 8‑10 minutes. Add a tiny splash of water to the pan before reheating – the steam brings the crumb back to its original fluffiness.
Best Reheating Method
For the ultimate reheated experience, use a convection oven set to 325°F. Place the bombs on a rack with a baking sheet underneath to catch any drips. Heat for 6‑8 minutes, then finish with a quick 30‑second broil to re‑crisp the tops. The result is a bomb that tastes as fresh as the day it was baked.