Love this? Pin it for later! 📌
When my neighbor texted me at 6:15 on a Tuesday night asking if I had anything “easy and cheesy” in my freezer, I laughed out loud. She’d just come home from her son’s double-header baseball tournament, the kind where you sit on splintered bleachers inhaling popcorn for dinner and pretending it counts as a balanced meal. I handed her a foil-covered 8×8 pan of this Cheesy Chicken & Rice, still frozen solid. The next morning she rang my doorbell in her slippers, eyes wide: “My kids licked their plates. My husband asked if I secretly ordered take-out. What witchcraft is this?” That, friends, is the magic of a well-built freezer casserole—one that reheats like a dream, tastes like you stood over the stove for an hour, and somehow still feels like a hug in food form.
I started developing this particular recipe after my third baby arrived early and my world shrank to a 12-foot radius around the rocking chair. I needed dinners that could be prepped with one hand, frozen flat so they’d stack like vinyl records, and baked straight from ice-block to bubbling perfection on those nights when “dinner” felt like a four-letter word. Over the years it’s become the meal I gift new parents, the one I haul to potlucks when I’m too tired to cook on site, and the emergency stash I keep for the inevitable week when every calendar square is double-booked. If you can stir, measure, and grate cheese while humming off-key, you can master this dish—and your future self will thank you every single time you pull it from the freezer.
Why This Recipe Works
- One-pot, no-fuss: The rice cooks right in the same skillet you use for the chicken, so every grain drinks in the flavor instead of tasting like an afterthought.
- Freezer science: A light roux and evaporated milk prevent the cheese from seizing or turning grainy after thawing—no weird curdled textures here.
- Flexible veg: Frozen peas and carrots keep things colorful without extra chopping; swap in broccoli, corn, or even roasted red peppers depending on what’s lurking in your freezer.
- Cheese insurance: A final sprinkle of shredded cheddar on top just before baking gives you that fresh-from-the-oven stretch even if the casserole was rock-solid 30 minutes earlier.
- Portion friendly: Divide the mixture between two 8-inch pans and you’ve got dinner for tonight and a future night—no math required.
- Kid tested: Mild flavors mean picky eaters focus on the creamy, cheesy goodness while you smile knowing they’re also eating hidden veggies and lean protein.
Ingredients You'll Need
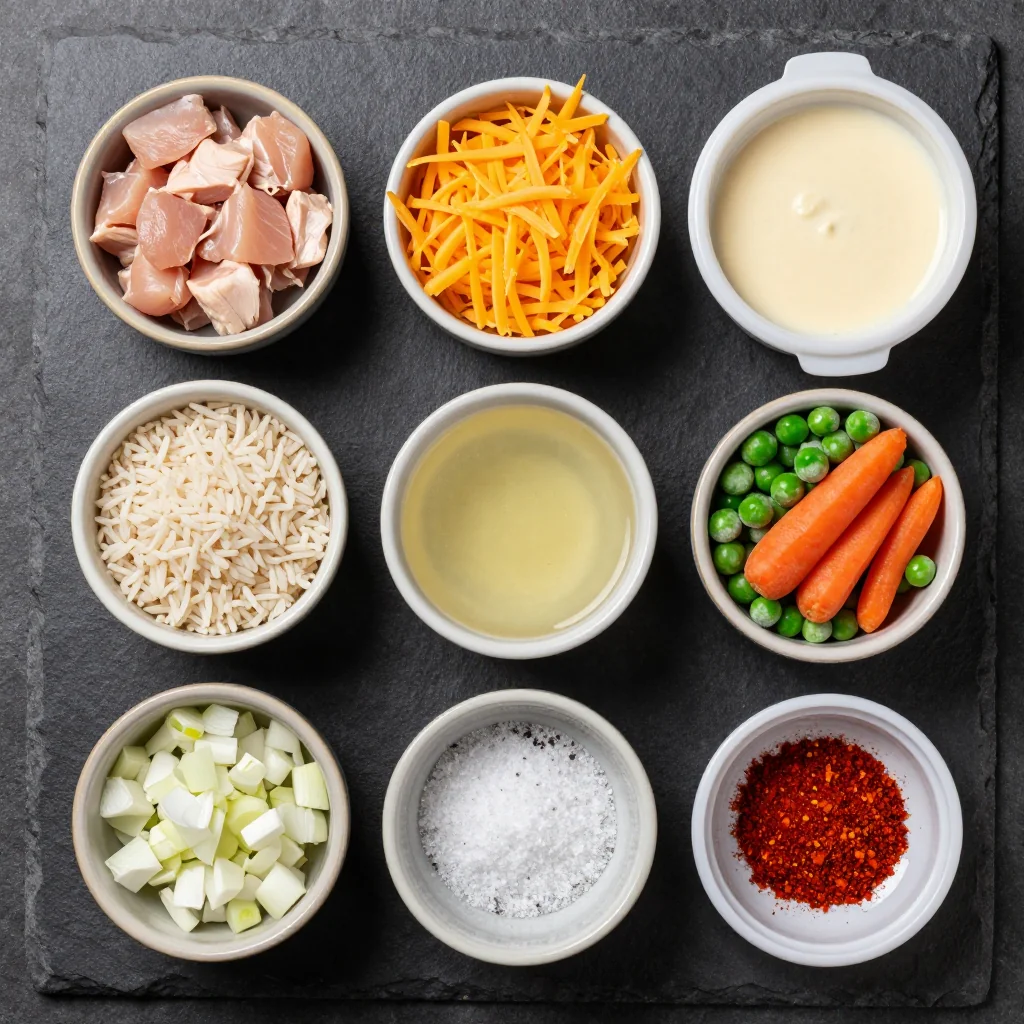
Great freezer meals start with ingredients that want to be frozen—think sturdy grains, proteins that won’t dry out, and sauces that welcome a little TLC under foil. Below is the grocery list I scribble on the back of an envelope, plus the insider notes I’ve learned from testing this recipe 47 times (yes, I counted).
Protein: Boneless, skinless chicken thighs are my ride-or-die here. They stay juicy even if you accidentally reheat them to oblivion, and they’re usually $1–$2 less per pound than breast meat. If you only have breasts, don’t panic—just undercook them by two minutes in step 3; they’ll finish cooking later in the oven.
Rice: Long-grain white rice gives you the fluffiest, least gummy texture. Avoid instant rice (it turns to mush) and brown rice (needs more liquid and a longer bake). If you’re gluten-free, double-check that your rice brand hasn’t been processed in a facility that also handles wheat—cross-contamination is real.
Cheese: Buy blocks and shred yourself. Pre-shredded cellulose-coated shreds resist melting smoothly, which translates to a gritty sauce after freezing. I use sharp cheddar for flavor and a handful of mozzarella for stretch. If you’re feeding a lactose-sensitive crowd, Gruyère and aged cheddar have almost zero lactose yet still deliver big cheesy vibes.
Vegetables: A 12-oz bag of frozen mixed peas and carrots saves prep time and adds color. Keep them frozen when you stir them in; they’ll thaw instantly in the hot skillet and won’t turn army-green in the oven.
Sauce base: Evaporated milk is the unsung hero of freezer cooking—its lower water content means fewer ice crystals, so your sauce stays creamy, not curdled. Combine it with a quick roux (equal parts butter and flour) and you’ve got a velvety blanket that protects every grain of rice from freezer burn.
Seasonings: Onion powder, garlic powder, and a whisper of smoked paprika give depth without competing with the cheese. I also add a teaspoon of Dijon mustard; you won’t taste it, but it wakes up all the other flavors like a tiny trumpet section.
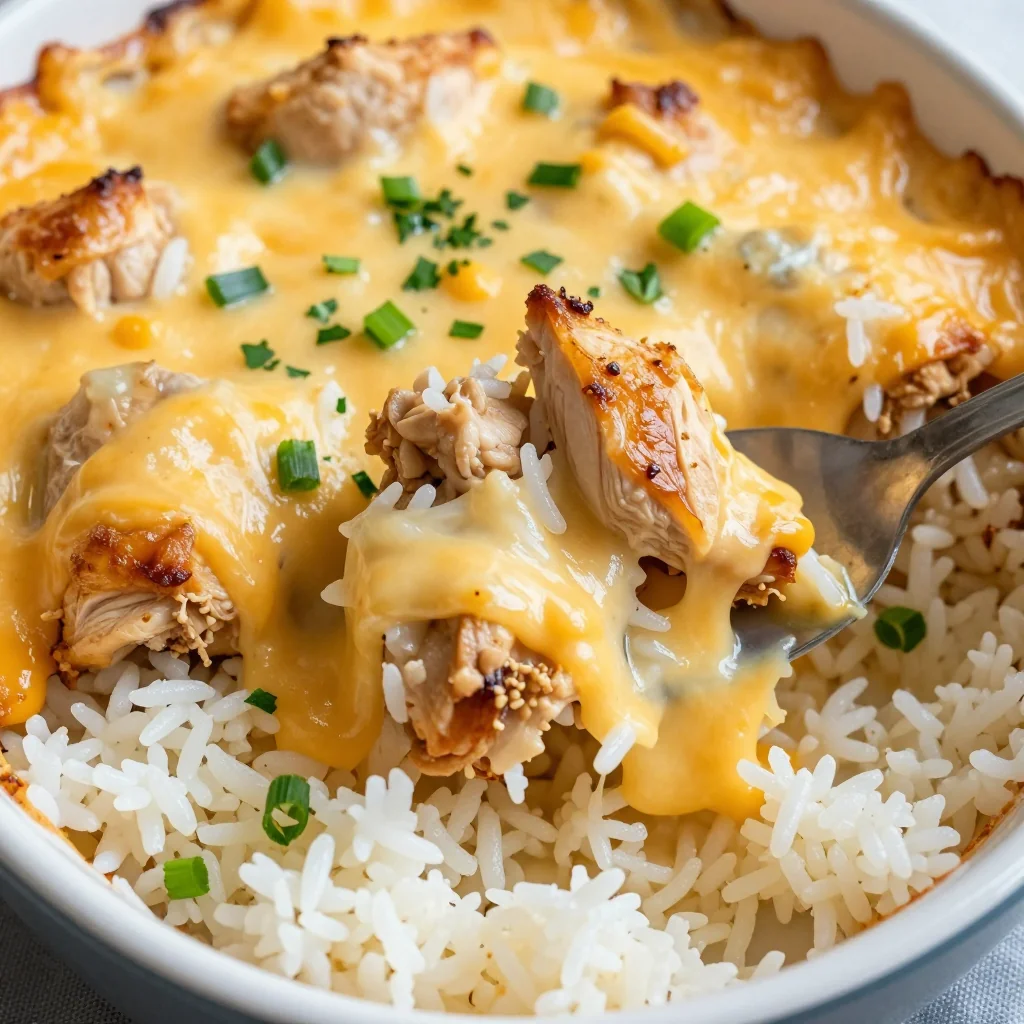
How to Make Cheesy Chicken And Rice For Freezer Friendly
Prep your pans & labels
Grease one 9×13-inch metal or foil pan, or two 8-inch square pans. Press a sheet of parchment against the bottom and up the sides, leaving overhang—this gift-wrap handle lets you lift the frozen block out later. Write “Cheesy Chicken & Rice, bake from frozen 375°F 60-70 min” on a strip of masking tape and stick it to the foil lid; future you has enough on her mind.
Sear the chicken
Heat 1 tablespoon olive oil in a deep 12-inch skillet over medium-high. Pat 1½ lb chicken thighs dry, season with ½ tsp each salt and pepper, and cook 3 minutes per side until golden but not cooked through. Transfer to a plate; they’ll finish later. Those browned bits (fond) on the pan bottom are liquid gold—do not wash the skillet.
Build the roux
Reduce heat to medium; melt 3 tablespoons butter in the same skillet. Whisk in 3 tablespoons flour for 1 minute until it smells like shortbread. Slowly pour in 1 can (12 oz) evaporated milk plus 1 cup low-sodium chicken broth, whisking constantly. Within two minutes you’ll have a silky sauce thick enough to coat the back of a spoon.
Season smartly
Stir in 1 tsp onion powder, ½ tsp garlic powder, ½ tsp smoked paprika, 1 tsp Dijon, and ¾ tsp kosher salt. Taste—your sauce should be bold because freezing dulls seasoning. Add a pinch of cayenne if you like subtle heat that blooms slowly on the back of your throat.
Add rice & liquid math
Sprinkle 1 cup uncooked long-grain rice evenly over the sauce; do not stir yet. Pour 1½ cups additional broth around the edges—this keeps rice from clumping on top. Now fold once, just enough to moisten every grain. The mixture will look soupy; that’s correct. Rice needs extra liquid so it can swell without turning the casserole into a brick.
Chicken comeback
Dice the partially-cooked chicken into ¾-inch cubes and fold it in along with any accumulated juices. Keeping the pieces slightly large prevents them from drying out; they’ll poach gently in the sauce and finish perfectly tender.
Veg & cheese fold-in
Off the heat, add 1 cup frozen peas & carrots and 1½ cups freshly shredded sharp cheddar. Stir just until the cheese melts into ribbons. Over-mixing can break the sauce and make it grainy once frozen.
Cool, wrap, freeze
Spread the mixture into your prepared pan(s). Press a sheet of plastic wrap directly onto the surface to prevent ice crystals, then cover tightly with foil. Freeze up to 3 months for best flavor, 6 months for safety. If you plan to bake the same day, skip the plastic and simply cover with foil; refrigerate up to 24 hours.
Bake from frozen
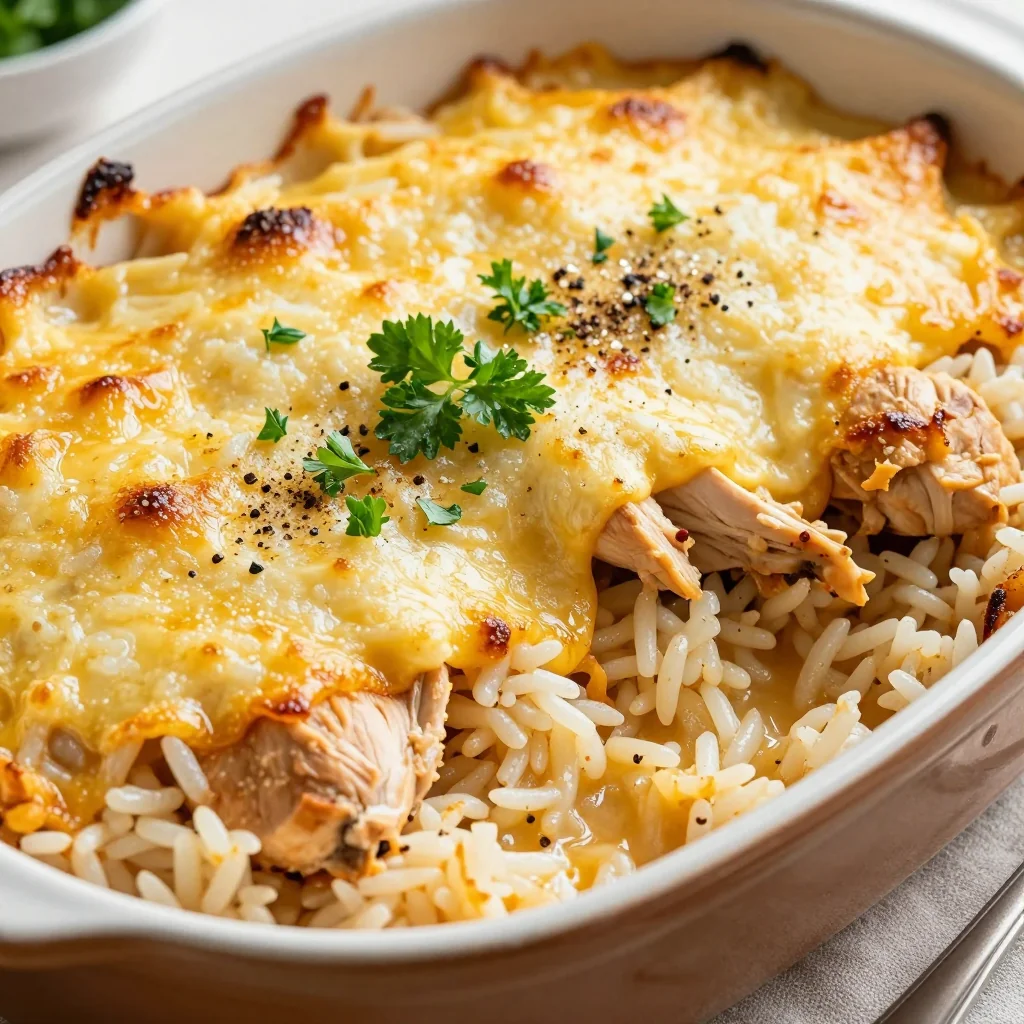
Preheat oven to 375°F. Remove plastic (if used), replace foil, and bake on the middle rack 45 minutes. Uncover, sprinkle with ½ cup extra cheddar, and bake 15–25 minutes more until the edges bubble and the rice is tender. Let stand 10 minutes—patience thickens the sauce and prevents molten-cheese mouth burns.
Expert Tips
Don’t thaw first
Baking from frozen keeps the rice from turning mushy. If you forgot to label and have no idea what’s inside, poke the center with a knife—if it slides in with zero resistance, you’re fully thawed and can reduce bake time by 15 minutes.
Add broth if needed
Every freezer is a snowflake—literally. If your climate is arid or the casserole has been frozen longer than 2 months, drizzle ¼ cup extra broth around the edges before baking to replace lost moisture.
Flash-freeze portions
Press mixture into silicone muffin cups, freeze solid, then pop out and store in a zip bag. You can bake individual servings at 400°F for 20 minutes—perfect for lunchboxes or solo dinners.
Color = freshness cue
A final sprinkle of chopped parsley or chives right after baking adds a pop of color that signals “I made this today” even if it’s been in the freezer since the last presidential administration.
Speed cool safely
To cool the skillet mixture fast before assembling, spread it on a rimmed baking sheet and place in the fridge for 15 minutes. This keeps the rice from continuing to absorb liquid and turning gluey.
Double the batch
Your effort is front-loaded—chopping, shredding, stirring. Make a triple batch and you’ll use the same number of dishes but end up with six future dinners. That’s what we call winning at adulting.
Variations to Try
-
Mexican Fiesta: Swap cheddar for pepper jack, stir in 1 cup salsa and 1 tsp cumin, top with crushed tortilla chips during the final 10 minutes of baking.
-
Broccoli & Bacon: Substitute 3 cups small broccoli florets (fresh or frozen) for the peas/carrots and fold in ½ cup cooked crumbled bacon. Kids think it’s mac & cheese in disguise.
-
Mushroom Swiss: Sauté 8 oz sliced cremini mushrooms in the skillet before the roux; use Swiss and Gruyère for a fondue-style vibe. Add a pinch of nutmeg—trust me.
-
Buffalo Blue: Replace ½ cup broth with Frank’s RedHot, use sharp white cheddar, and dot the top with ¼ cup blue cheese crumbles before that final uncovered bake. Serve with celery sticks for the full sports-bar experience.
-
Veggie Loaded: Skip chicken entirely, use vegetable broth, and fold in 2 cups roasted zucchini, bell peppers, and spinach. Add a can of rinsed chickpeas for protein.
Storage Tips
Freezer: Cool completely, wrap as directed, and freeze up to 3 months for peak quality. After that it’s still safe, but ice crystals can start to compromise texture. If you vacuum-seal, you can push to 6 months without noticeable decline.
Refrigerator: Once baked, leftovers keep 4 days in an airtight container. Reheat single servings in the microwave with a splash of milk, or warm the whole pan covered at 325°F until an instant-read thermometer hits 165°F in the center.
Make-ahead for parties: Assemble the casserole but don’t bake. Refrigerate up to 24 hours, then add 10–15 minutes to the covered bake time. If it’s been cold, you can slide it straight into the oven—no need to bring to room temp.
Frequently Asked Questions
Cheesy Chicken And Rice For Freezer Friendly
Ingredients
Instructions
- Prep pans: Grease one 9×13-inch or two 8-inch pans. Line with parchment overhang and label foil lids.
- Sear chicken: Heat olive oil in a deep 12-inch skillet over medium-high. Season chicken with salt & pepper; cook 3 min per side until golden but not cooked through. Transfer to plate.
- Make roux: Melt butter in same skillet. Whisk in flour 1 min. Gradually whisk in evaporated milk and 1 cup broth until thick.
- Season: Stir in onion powder, garlic powder, paprika, Dijon, and salt.
- Add rice: Sprinkle rice evenly; pour remaining 1½ cups broth around edges. Fold once to moisten.
- Combine: Fold in chicken, peas & carrots, and 1½ cups cheddar. Spread into pan(s), press plastic wrap onto surface, cover with foil, and freeze up to 3 months.
- Bake from frozen: 375°F covered 45 min, uncover, top with remaining ½ cup cheddar, bake 15–25 min more until bubbly and 165°F internally. Rest 10 min before serving.
Recipe Notes
For a crunchy topping, mix ½ cup panko with 1 Tbsp melted butter and sprinkle on during the final 10 minutes of baking. Do not freeze with panko; add fresh before reheating.