Picture this: the kitchen is a battlefield, flour dusting the air like confetti, and a friend’s daring challenge hanging over your head. “I dare you to taste this and not go back for seconds,” she whispered, eyes gleaming with mischief. My own culinary curiosity had been simmering for weeks, fueled by a craving for something sweet and airy, yet utterly comforting. I was determined to create a dessert that would make every bite feel like a cloud wrapped in caramel velvet. That moment of culinary rebellion sparked a recipe that would soon become my secret weapon for any gathering.
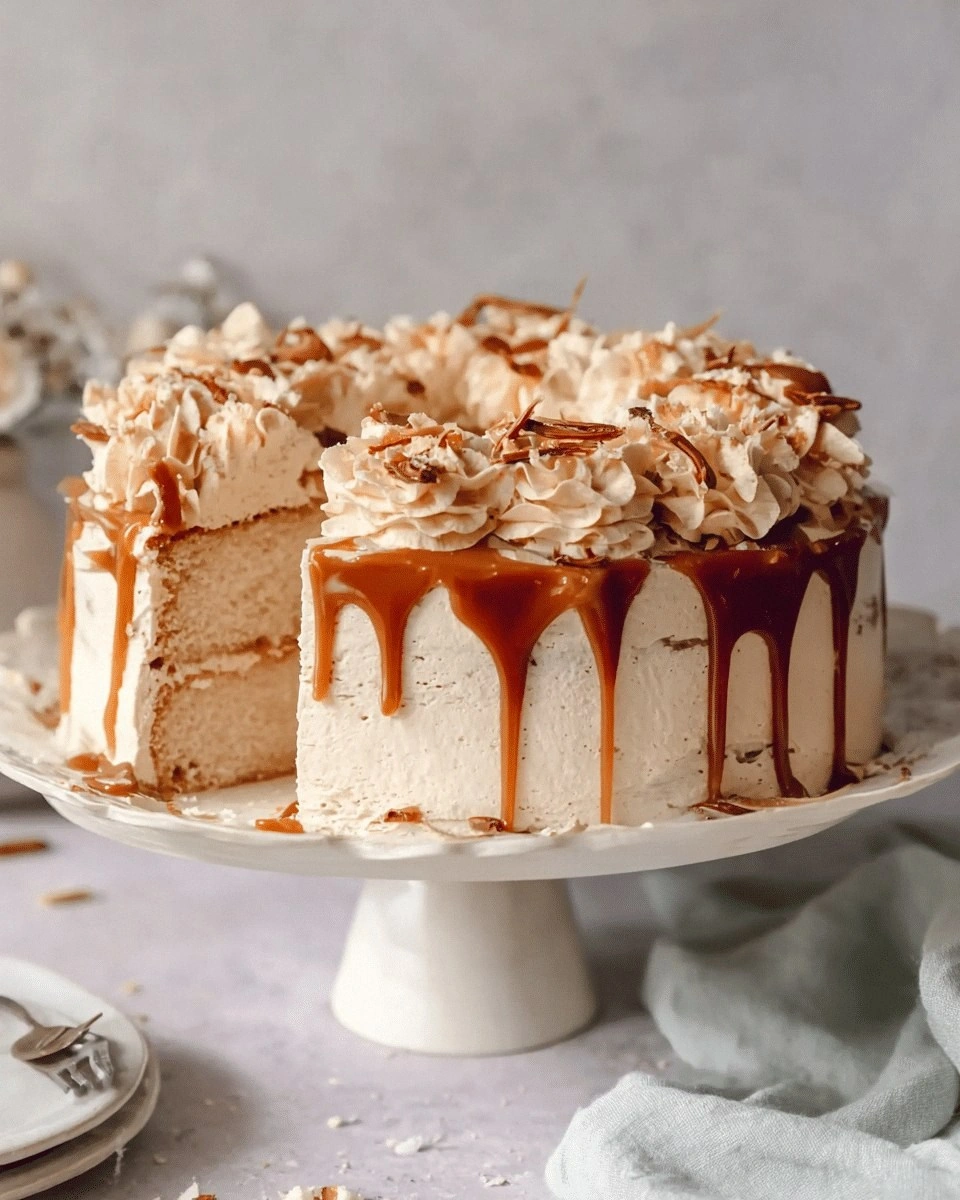
From the first crackle of butter to the final swirl of caramel, every element of this cake is a deliberate dance of texture and flavor. The batter rises like a puff of cumulus, light enough to melt on your tongue, while the caramel sauce drips like liquid gold, coating each crumb in buttery sweetness. The aroma that fills the kitchen as it bakes is a warm invitation, promising indulgence without the heaviness of typical cakes. I’ve spent countless hours tweaking the balance between airy fluff and caramel richness, and the result is a cake that feels both indulgent and light. The secret lies not just in the ingredients, but in the precise timing and the way each component is coaxed into harmony.
What makes this version stand out? It’s the meticulous layering of flavors, the flawless texture that never feels too dense, and the subtle nods to classic desserts while staying fresh and unexpected. I’ve refined the batter to achieve a cloud‑like rise, then drenched it in a caramel glaze that sets just enough to hold its shape but still gives way to a melt‑away finish. Every bite delivers a sweet, buttery punch followed by a silky finish that lingers, leaving you craving more. And if you think a caramel cake is just another dessert, think again—this is hands down the best version you'll ever make at home. The result is a cake that feels like a hug in a bowl, yet sophisticated enough to impress the most discerning palates.
Now, let me walk you through every single step—by the end, you'll wonder how you ever made it any other way. The journey from raw ingredients to a finished masterpiece is a series of small, intentional moves that come together like a well‑tuned orchestra. I’ll share the techniques that keep the batter airy, the caramel from hardening too quickly, and the final presentation that will leave your guests in awe. So buckle up, grab your whisk, and let’s dive into a dessert adventure that promises to be as fun as it is delicious.
What Makes This Version Stand Out
- Taste: The caramel sauce is infused with a hint of sea salt, giving the sweet batter a savory counterpoint that elevates every bite.
- Texture: The batter is leavened with a gentle fold of beaten egg whites, ensuring a light, cloud‑like crumb that contrasts beautifully with the dense caramel glaze.
- Simplicity: Despite its complex flavor profile, the recipe uses only a handful of pantry staples—no exotic ingredients or elaborate equipment.
- Uniqueness: A surprising twist: a splash of espresso in the batter unlocks a subtle depth that makes the caramel shine even brighter.
- Crowd Reaction: Friends who’ve tried other caramel cakes rave that this one doesn’t feel heavy; it’s indulgent without guilt.
- Ingredient Quality: Using high‑quality butter and fresh eggs makes the difference between a good cake and a memorable one.
Inside the Ingredient List
The Flavor Base
The heart of the cake starts with a simple mixture of flour, sugar, and a pinch of salt. These dry ingredients are the canvas that allows the other flavors to shine. If you skip the salt, the batter will taste flat, lacking the essential contrast that caramel demands. The combination of all‑purpose flour and a touch of sea salt balances sweetness and depth, creating a foundation that supports the airy rise.
Next comes the butter, melted and cooled to room temperature. Butter brings richness and moisture, essential for a cake that feels both buttery and light. A common mistake is to use cold butter; this can cause the batter to seize and become dense. By letting the butter cool, you preserve its silky texture, which melts into the batter like a gentle whisper.
The Texture Crew
Eggs are the secret agents of texture. The yolks contribute fat and flavor, while the whites, when beaten to soft peaks, introduce air that gives the cake its cloud‑like quality. If you omit the whites or skip the beating step, the cake will feel heavy and less fluffy. The ratio of yolks to whites is crucial; too many whites can make the cake dry.
Milk is added to hydrate the flour and create a batter that’s pourable yet thick enough to hold its shape when baked. Using whole milk adds a subtle creaminess, while skim milk keeps the cake lighter. A common error is to add cold milk; always let it warm slightly to avoid shocking the batter and causing uneven rise.
The Unexpected Star
Espresso is the twist that brings depth to the caramel flavor. A tablespoon of espresso enhances the chocolate undertones of caramel, creating a complex flavor profile that feels both familiar and novel. If you’re a coffee lover, this addition is a must; if not, you can simply omit it without compromising the overall taste.
Caramel sauce is the star that coats each crumb. It’s made from butter, sugar, and cream, simmered until golden. The sauce’s thickness is key; if it’s too thin, it will run off the cake; if too thick, it won’t coat evenly. The sauce should be poured over the cake while it’s still warm, allowing it to seep into the crevices.
The Final Flourish
Heavy cream is folded into the batter to give it a silky finish. It lightens the texture and adds a subtle richness that balances the caramel’s sweetness. Powdered sugar is dusted over the finished cake for a delicate, sweet finish that also adds a bit of crunch. Lemon zest offers a bright, citrusy contrast that cuts through the caramel’s heaviness.
Everything's prepped? Good. Let's get into the real action...
The Method — Step by Step
- Preheat your oven to 350°F (175°C). Line a 9‑inch round cake pan with parchment paper, then lightly grease the paper with butter. In a medium bowl, whisk together 2 cups of all‑purpose flour, 1 cup of granulated sugar, 1 tsp of baking powder, and ½ tsp of sea salt until evenly blended. This dry mix sets the stage for a smooth, lump‑free batter.
- In a separate bowl, combine ½ cup of melted butter, ½ cup of whole milk, 3 large eggs, 1 tsp of vanilla extract, and 1 tbsp of espresso. Beat the mixture on medium speed until the eggs are fully incorporated and the mixture is glossy. The espresso may look like a coffee‑infused batter, but trust me, it’s the secret to that deep caramel undertone.
- Gently fold the wet mixture into the dry ingredients, taking care not to overmix. The batter should be smooth but still a bit lumpy—over‑mixing will develop gluten and produce a dense crumb. This is the point where the batter starts to resemble a thick, silky custard.
- Pour the batter into the prepared pan, smoothing the top with a spatula. The batter should fill the pan to about three‑quarters full, allowing room for the cake to rise without overflowing. Place the pan in the oven and bake for 25 minutes. During this time, the cake will rise like a cloud, its edges pulling away from the pan.
- While the cake is baking, prepare the caramel glaze. In a small saucepan, melt 1 cup of caramel sauce over low heat, stirring constantly. Add 1 cup of heavy cream and whisk until the mixture is smooth and glossy. The glaze should be thick enough to coat the cake but still pourable.
- After 25 minutes, remove the cake from the oven and let it cool in the pan for 10 minutes. Then transfer the cake to a wire rack to cool completely. While the cake cools, pour the caramel glaze over the warm cake, letting it soak into the crevices. The glaze should set into a glossy, caramelized crust.
- Once the glaze has set, dust the cake with 2 tbsp of powdered sugar. The sugar adds a subtle crunch and a sweet finish that complements the caramel. Optionally, sprinkle 1 tsp of lemon zest over the top for a bright, citrusy contrast.
- Slice the cake with a warm, buttered knife to prevent sticking. The knife should glide through the fluffy layers, revealing the soft, airy interior. Serve immediately, or chill for a more firm texture if desired.
- If you prefer a richer finish, drizzle additional caramel sauce over each slice before serving. The extra drizzle adds a glossy shine and amplifies the buttery sweetness. The cake will taste like a caramel cloud that’s been dipped in chocolate.
- Enjoy the cake with a cup of coffee or a glass of chilled milk. The caramel notes pair beautifully with the coffee’s bitterness, creating a balanced flavor profile. The creamy milk complements the cake’s airy texture, making every bite a delightful experience.
That's it — you did it. But hold on, I've got a few more tricks that'll take this to another level...
Insider Tricks for Flawless Results
The Temperature Rule Nobody Follows
Oven temperature can make or break your cake. Many bakers set their oven to 350°F without checking the calibration, resulting in uneven baking. I recommend preheating for at least 15 minutes and using an oven thermometer to verify the temperature. Even a 10‑degree difference can cause the cake to rise unevenly or develop a cracked top.
Why Your Nose Knows Best
During baking, the scent of caramel rising from the pan is a reliable indicator of doneness. A warm, buttery aroma signals that the cake is nearly finished. If you’re unsure, press a finger into the batter; it should feel firm but not doughy. Trust your nose—it’s the ultimate test.
The 5‑Minute Rest That Changes Everything
After removing the cake from the oven, let it rest in the pan for exactly five minutes before transferring to a wire rack. This brief rest allows the structure to set, preventing the cake from collapsing. Many bakers skip this step, leading to a cake that sinks or cracks.
Using the Right Pan
A 9‑inch round pan is ideal for this recipe, but a 10‑inch pan will yield a thinner cake that bakes faster. If you use a larger pan, reduce the baking time by 5 minutes to avoid overcooking. The key is to maintain a consistent thickness for even rise and caramel coating.
Caramelizing Your Sauce at the Right Time
The caramel glaze should be ready when the cake is about 10 minutes away from completion. Timing is critical; if the glaze cools too much, it will harden and be difficult to spread. Keep it warm over a double boiler or in a low‑heat saucepan until you’re ready to pour.
Creative Twists and Variations
This recipe is a playground. Here are some of my favorite ways to switch things up:
Nutty Caramel Cloud
Add ½ cup of toasted pecans or walnuts to the batter for a crunchy texture. The nuts provide a savory bite that balances the sweetness. Serve with a drizzle of maple syrup for an extra layer of flavor.
Chocolate‑Infused Caramel Cloud
Replace half of the caramel sauce with melted dark chocolate. The chocolate deepens the flavor profile, creating a chocolate‑caramel hybrid. Dust the top with cocoa powder for a dramatic finish.
Berry‑Burst Variation
Fold ½ cup of fresh blueberries or raspberries into the batter before baking. The berries burst with juice, adding a tart contrast to the rich caramel. Pair with a dollop of whipped cream for a dessert that feels like a summer picnic.
Spiced Caramel Cloud
Incorporate a pinch of ground cinnamon, nutmeg, and cardamom into the dry mix. The spices add warmth and complexity, turning the cake into a comforting autumn treat. Finish with a dusting of powdered sugar for a subtle sweetness.
Vegan Caramel Cloud
Swap dairy butter for coconut oil and use plant‑based milk. Replace eggs with flaxseed meal mixed with water to create a binding agent. The vegan version maintains the airy texture while offering a plant‑based alternative.
Storing and Bringing It Back to Life
Fridge Storage
Wrap the cooled cake tightly in plastic wrap and store in the refrigerator for up to 3 days. The caramel glaze will stay glossy, and the cake’s airy texture will remain intact. Before serving, let it sit at room temperature for 15 minutes to soften slightly.
Freezer Friendly
Freeze the cake in a tightly sealed container or freezer bag for up to 2 months. Thaw overnight in the refrigerator, then let it warm at room temperature for 30 minutes. The cake’s texture will recover, and the caramel glaze will remain smooth.
Best Reheating Method
Reheat the cake in a preheated oven at 300°F (150°C) for 10 minutes, then finish with a quick brush of melted butter. This method restores moisture and ensures the caramel glaze stays glossy. For a quick fix, microwave on low power for 15 seconds, then let it rest for a minute.