Love this? Pin it for later! 📌
Since that night, this budget pantry tuna melt has become my Wednesday-night insurance policy, my kids’ favorite weekend lunch, and the dish I teach every cash-strapped intern who passes through my kitchen. It scales up for a crowd, plays nice with whatever odd condiments you’ve stockpiled, and—best part—costs less than a latte while tasting like a diner classic. Whether you’re feeding yourself after a long shift, feeding teenagers who just inhaled your groceries, or simply craving something crispy, gooey, and fast, keep this recipe in your back pocket. You’ll never look at a humble can of tuna the same way again.
Why This Recipe Works
- Pantry MVP: Canned tuna, sliced bread, and a hunk of cheddar are the only true necessities—everything else is negotiable.
- Quick Fix: From can-opener to plate in under 12 minutes, perfect for hangry humans.
- Pickle Punch: Finely diced pickles (juice included) act like little acid bombs that brighten canned fish and cut richness.
- Cheese Insurance: A thin layer of mayo on the outside guarantees the toast bronzes evenly while the cheese stays molten inside.
- One-Skillet Wonder: No panini press, no specialty gear—just a heavy pan and a spatula.
- Budget Math: Under $1.75 per sandwich even using good sourdough and sharp cheddar.
- Freezer Friendly: Assemble, wrap, freeze, then toast straight from frozen for emergency dinners.
Ingredients You'll Need
Before we talk technique, let’s set the record straight on the cast of characters. Each item pulls double duty for flavor and frugality, but I’ve also listed smart swaps so you can shop your shelves instead of the store.
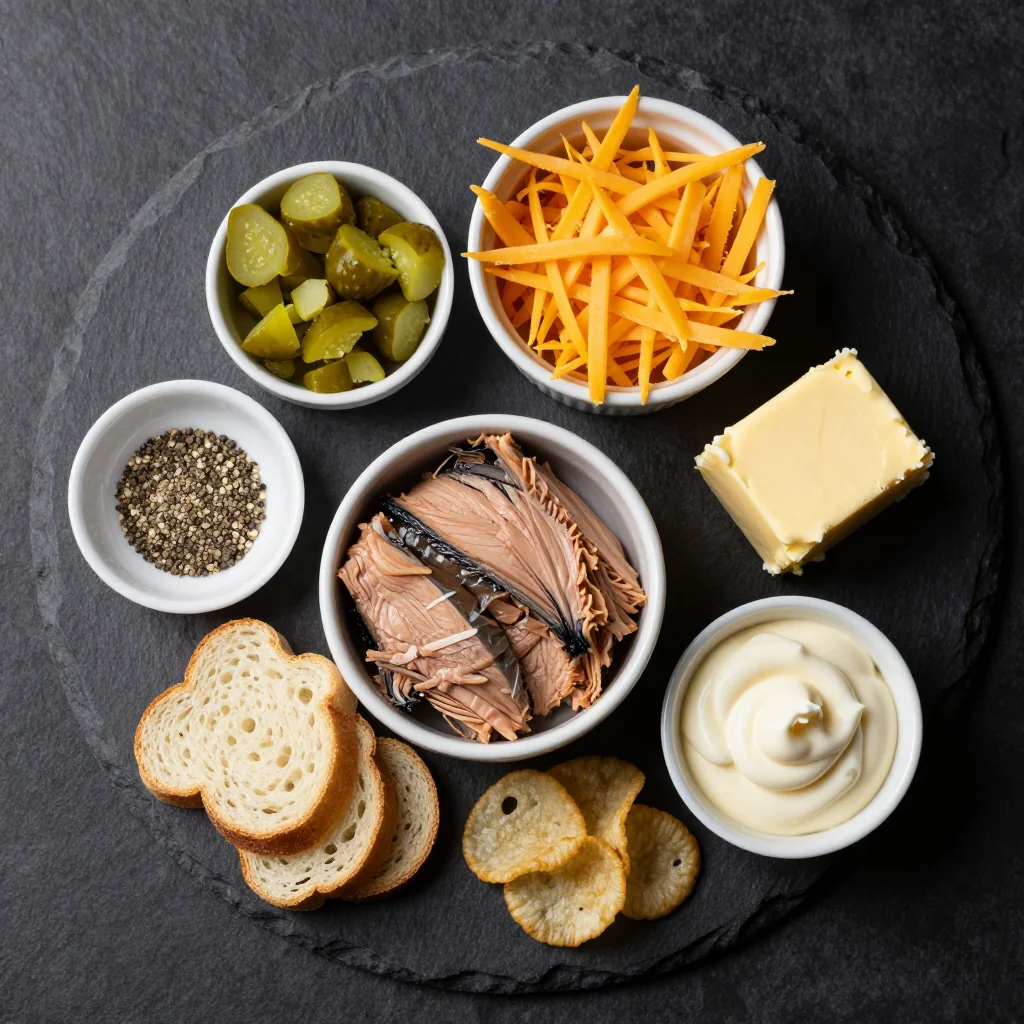
Canned Tuna in Water, 5-oz: Water-packed keeps the sandwich from feeling greasy; oil-packed works if that’s what you have—just drain well. Look for “skipjack” or “light” tuna for the most sustainable and budget-friendly option. If you’re a white-albacore loyalist, one can still suffices, but you may need an extra teaspoon of mayo to keep the filling moist.
Sharp Cheddar, 2 oz per sandwich: Pre-shredded bagged cheese is coated in cellulose and resists melting, so buy a block and grate it yourself for maximum silkiness. Yellow or white is fine; the color is only annatto. No cheddar? Swap in provolone for stringy pull, pepper jack for kick, or even a slice of American for old-school diner vibes.
Dill Pickles, 1 heaping tablespoon minced: The cheapest brand in the pickle aisle still brings crunch and tang. Sweet bread-and-butter chips work if you’re into that sweet-savory game. For extra credit, save a splash of pickle juice to season the tuna salad.
Mayonnaise, 1 tablespoon plus extra for the bread: Mayo is the great emulsifier, binding tuna and pickles into a cohesive spread. Light mayo is acceptable; Greek yogurt plus a drizzle of olive oil works for a protein boost. Vegan? Use your favorite plant-based mayo—flavor beats purity here.
Country-Style Bread, 2 slices: A sturdy slice about ¾-inch thick prevents sogginess. Sourdough is my splurge, but basic sandwich bread, whole-wheat, or even an English muffin split in half will do. Day-old bread actually toasts better because it’s slightly drier.
Unsalted Butter, softened: Buttering the outside of the bread encourages even browning and that crave-worthy crackle when you bite in. If butter is rationed, a thin smear of mayo on the exterior also browns beautifully thanks to its egg content.
Optional Flavor Boosters: A pinch of smoked paprika, a few capers, or a teaspoon of whole-grain mustard can catapult the filling from dorm-room to deli-level. Add any of these sparingly; you still want the tuna, cheese, and pickle trifecta to sing.
How to Make Budget Pantry Tuna Melt with Cheddar and Pickles
Prep the Tuna Salad Base
Drain the tuna thoroughly—squeeze the lid against the flesh or press with the back of a fork to expel every last drop of water; excess moisture is the enemy of crisp toast. Scrape tuna into a small bowl and flake with the fork until no large chunks remain. Fold in minced pickles, 1 tablespoon mayonnaise, and a few grinds of black pepper. Taste and add a pinch of salt only if needed; canned tuna and pickles already bring sodium.
Grate Your Cheese Fresh
Using the large holes of a box grater, shred 2 oz (about ½ packed cup) of cheddar. Freshly grated cheese melts faster and more evenly than pre-shredded, eliminating those tragic semi-melted shreds that slide off the sandwich. Pile the cheese on a small plate so it’s ready to sprinkle.
Assemble the Sandwich Interior
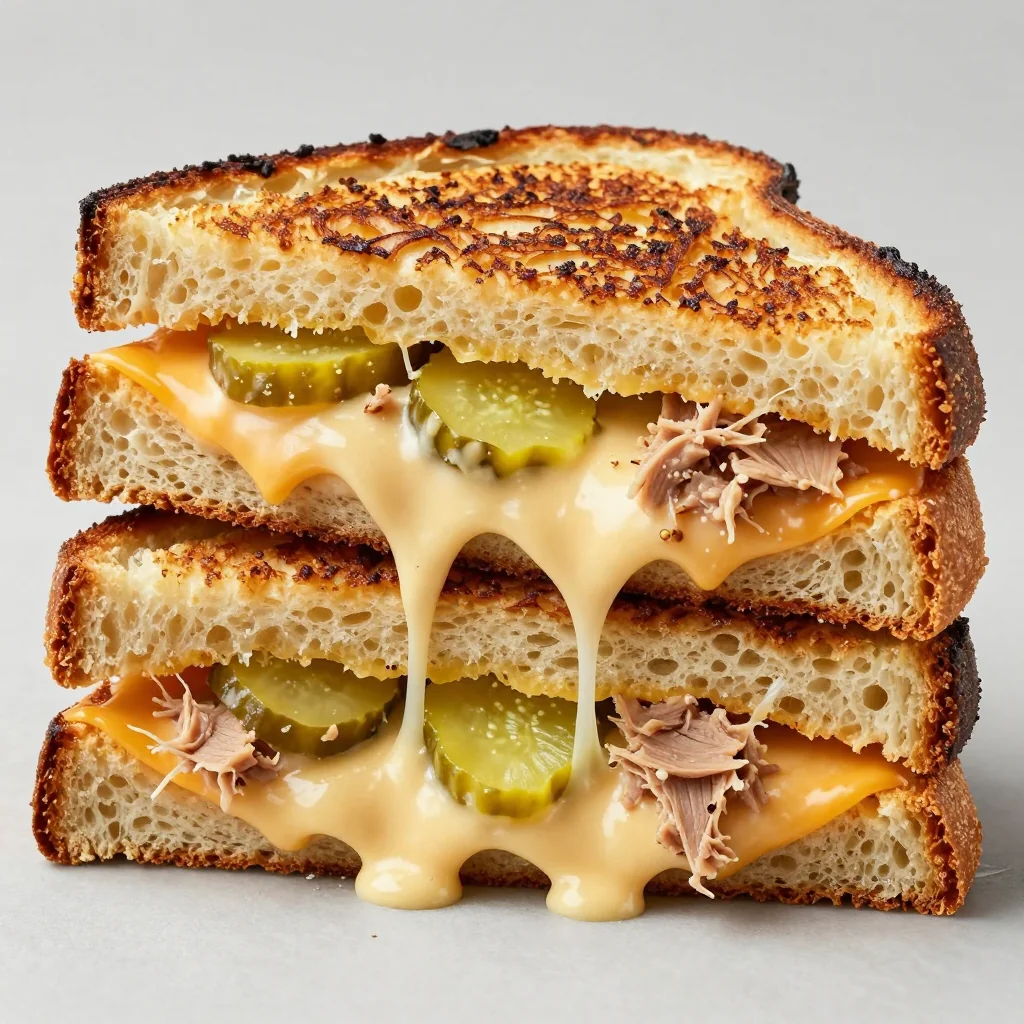
Lay out both slices of bread. Spread the tuna mixture evenly on one slice, patting gently so the surface is flat—this prevents air pockets that keep cheese from adhering. Mound the grated cheddar on top of the tuna, pressing lightly to create a cheese “lid.” Crown with the second slice of bread.
Butter the Exterior
Spread a paper-thin layer of softened butter on the top slice of bread, edge to edge. Flip the sandwich and repeat on the underside. You need only about ½ teaspoon total; too much butter will pool in the pan and fry the bread unevenly.
Preheat the Pan Correctly
Heat a heavy skillet (cast iron or non-stick) over medium-low for 60 seconds. A droplet of water should sizzle gently, not race across the surface; too-hot heat scorches bread before cheese melts. Swirl in an extra dab of butter for flavor insurance.
Grill Side One
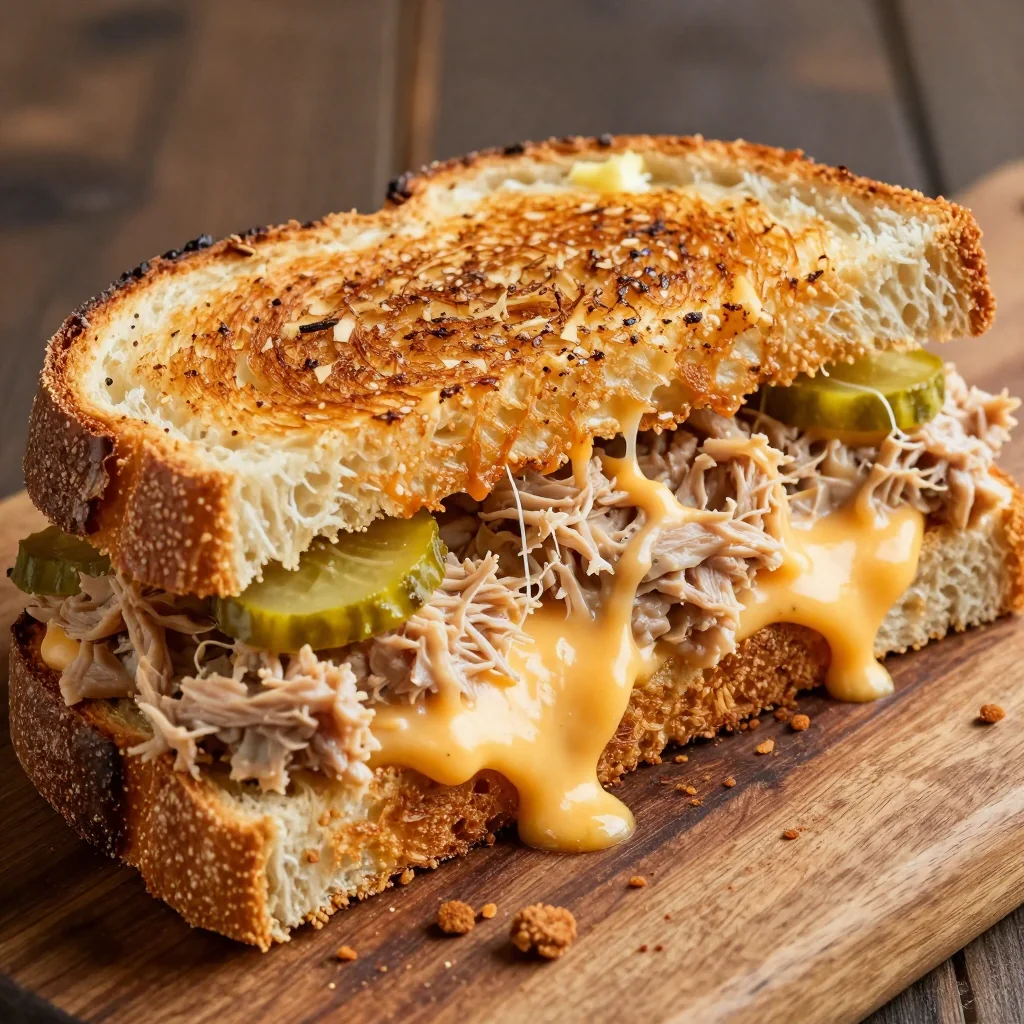
Slide the sandwich into the pan, buttered-side down. Cook 3–4 minutes, pressing lightly with a spatula to ensure even contact. Peek at the underside; when it’s walnut-brown with darker edges, it’s time to flip.
Flip and Finish
Flip confidently with a thin, wide spatula. If a cheese avalanche starts, tuck it back between the bread slices using the spatula. Cook the second side 2–3 minutes more. If the bread threatens to brown too fast, lower the heat and cover the pan with a lid for the final minute; trapped steam encourages cheese melt.
Rest, Slice, Serve
Transfer the sandwich to a cutting board and let it sit 1 minute—this sets the cheese so it doesn’t ooze out when sliced. Using a sharp knife, cut on the diagonal (science says triangles taste better). Serve immediately while the crust crackles and the center flows.
Expert Tips
Low and Slow Wins
High heat seems faster but leaves you with scorched bread and stubbornly cold cheese. Medium-low heat plus patience yields a uniformly golden crust and molten center.
Double-Decker Hack
To stretch one can of tuna for two sandwiches, mix in ½ cup canned chickpeas, roughly mashed. The texture mimics more tuna and keeps the cost per serving under a dollar.
Mayo Browning
If you’re out of butter, spread mayo on the exterior instead. The egg and oil content browns beautifully and adds a subtle tang.
Midnight Cleanup
Soak the skillet while you eat; a quick swipe with a paper towel removes most butter residue, saving you from a scrub marathon tomorrow.
Clean Slices
Wipe your knife between cuts to prevent cheese drag and achieve Instagram-worthy cross-sections.
Make-Ahead Filling
Mix a triple batch of tuna salad and refrigerate up to 3 days. At mealtime, just assemble and grill—perfect for camping trips or dorm mini-fridges.
Variations to Try
-
Spicy Caliente: Add a minced chipotle pepper in adobo plus ½ teaspoon of the sauce for smoky heat, and swap cheddar for pepper jack.
-
Mediterranean: Trade pickles for chopped kalamata olives and a pinch of dried oregano; finish with crumbled feta on the outside for salty crunch.
-
Everything Bagel: Slather the interior with whipped cream cheese, sprinkle everything-bagel seasoning on the buttered exterior before grilling.
-
Avocado Deluxe: Add 3 thin avocado slices between cheese layers; press gently so they adhere. The creaminess offsets the briny tuna.
-
French-Onion Spin: Caramelize half an onion until jammy, fold into tuna, and use Gruyère instead of cheddar. Top with a whisper of thyme.
-
Gluten-Free Fix: Use sturdy gluten-free bread or corn tortillas (quesadilla-style) and cook in a clean skillet to avoid cross-contact.
Storage Tips
Fridge: Store assembled but un-grilled sandwiches wrapped tightly in plastic for up to 24 hours. Grill when ready; add 30 extra seconds per side to account for the chill.
Freezer: Assemble, omit butter, wrap in parchment, then foil, and freeze up to 2 months. To cook, brush frozen sandwich with melted butter and grill covered over low heat 6 minutes per side.
Cooked Leftovers: While best fresh, a cooked tuna melt can be cooled, wrapped, and refrigerated. Reheat in a toaster oven at 350 °F (175 °C) for 8 minutes to restore crunch.
Tuna Salad Alone: Keep in an airtight container up to 3 days. Stir before using; the pickles may release a little juice.
Frequently Asked Questions
Budget Pantry Tuna Melt with Cheddar and Pickles
Ingredients
Instructions
- Make filling: In a small bowl combine drained tuna, pickles, mayonnaise, and a grind of pepper; mix well.
- Assemble: Pile tuna mixture on one bread slice, top evenly with grated cheddar, and close with second slice.
- Butter: Spread butter thinly on the outside top and bottom of the sandwich.
- Grill: Cook in a pre-heated skillet over medium-low heat 3–4 minutes per side until bread is golden and cheese melted.
- Rest & slice: Let stand 1 minute, slice diagonally, and serve hot.
Recipe Notes
For extra crunch, press a tablespoon of grated cheese onto the buttered exterior during the last minute of cooking—it fries into a lacy cheese crust.